Developer Guide
- Introduction
- Setting up, getting started
- Design
- Implementation
- Documentation, logging, testing, configuration, dev-ops
- Appendix: Requirements
- Appendix: Instructions for manual testing
Introduction
ParentPal is a desktop application designed for parents to manage their children-related contacts and appointments. It is named ParentPal because it aims to be a ‘pal’ to the busy parents who need help managing their kids’ schedules and important contacts. ParentPal is built for use via a Command Line Interface (CLI), the Graphical User Interface (GUI) is primarily meant for displaying key information.
ParentPal is largely built with Java. GUI related functionality is powered by JavaFX and CSS.
Setting up, getting started
Refer to the guide Setting up and getting started.
Design
The following section provides details of the architecture and a few selected functionalities of the application.
Architecture
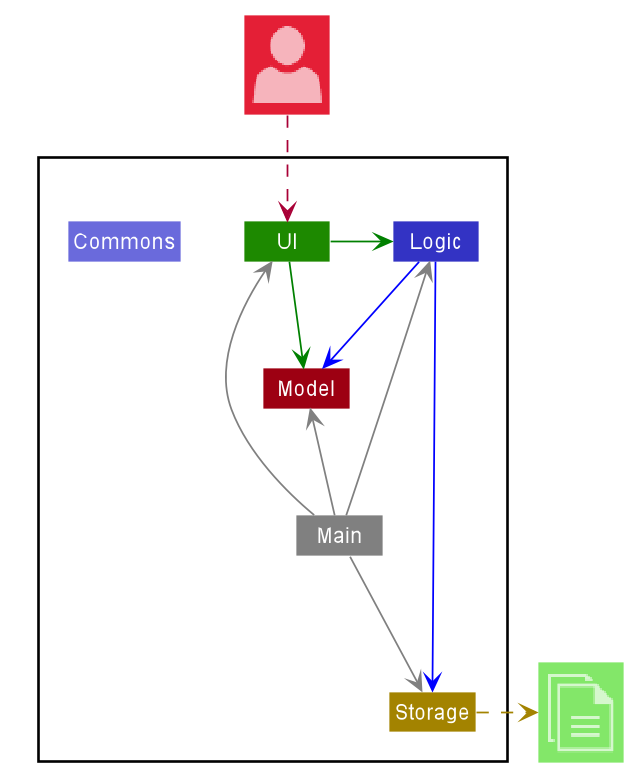
The Architecture Diagram given above explains the high-level design of the App. Given below is a quick overview of each component.
.puml files used to create diagrams in this document can be found in the diagrams folder. Refer to the PlantUML Tutorial at se-edu/guides to learn how to create and edit diagrams.
Main has two classes called Main and MainApp. It is responsible for,
- At app launch: Initializes the components in the correct sequence, and connects them up with each other.
- At shut down: Shuts down the components and invokes cleanup methods where necessary.
Commons represents a collection of classes used by multiple other components.
The rest of the App consists of four components.
-
UI: The UI of the App. -
Logic: The command executor. -
Model: Holds the data of the App in memory. -
Storage: Reads data from, and writes data to, the hard disk.
Each of the four components,
- defines its API in an
interfacewith the same name as the Component. - exposes its functionality using a concrete
{Component Name}Managerclass (which implements the corresponding APIinterfacementioned in the previous point.
For example, the Logic component (see the class diagram given below) defines its API in the Logic.java interface and exposes its functionality using the LogicManager.java class which implements the Logic interface.
How the architecture components interact with each other
The Sequence Diagram below shows how the components interact with each other for the scenario where the user issues the command delete 1.
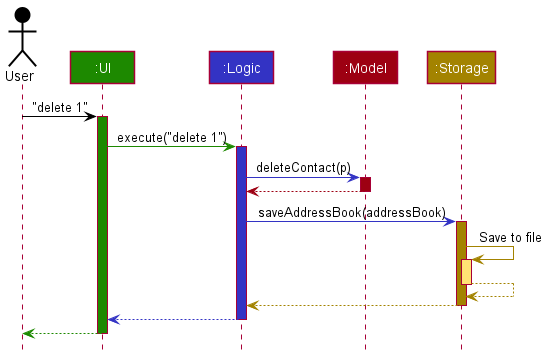
The sections below give more details of each component.
UI component
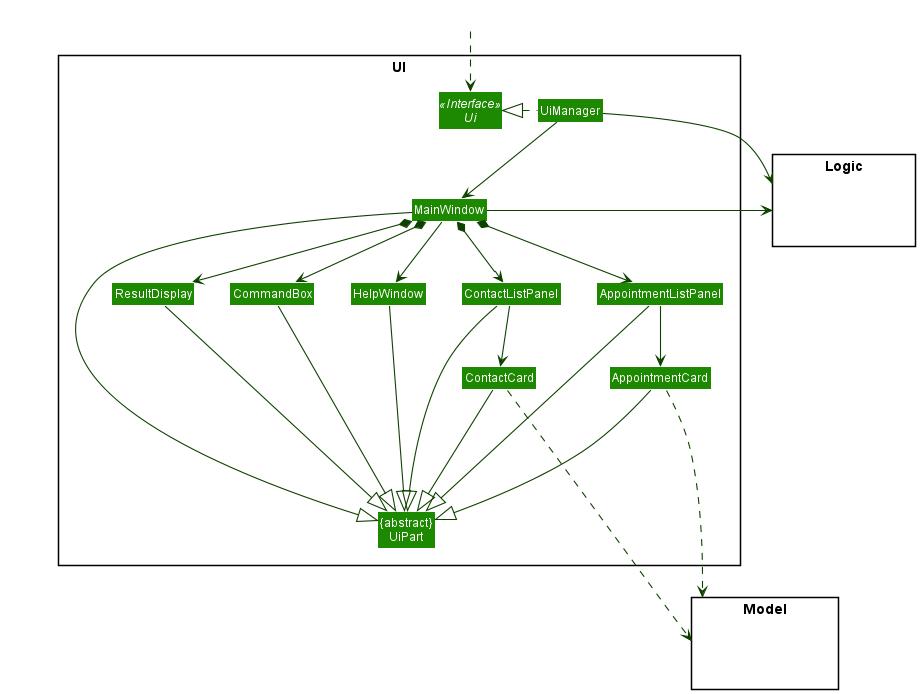
API :
Ui.java
The UI consists of a MainWindow that is made up of parts e.g.CommandBox, ResultDisplay, PersonListPanel, etc. All these, including the MainWindow, inherit from the abstract UiPart class.
The UI component uses JavaFx UI framework. The layout of these UI parts are defined in matching .fxml files that are in the src/main/resources/view folder. For example, the layout of the MainWindow is specified in MainWindow.fxml
The UI component,
- Executes user commands using the
Logiccomponent. - Listens for changes to
Modeldata so that the UI can be updated with the modified data.
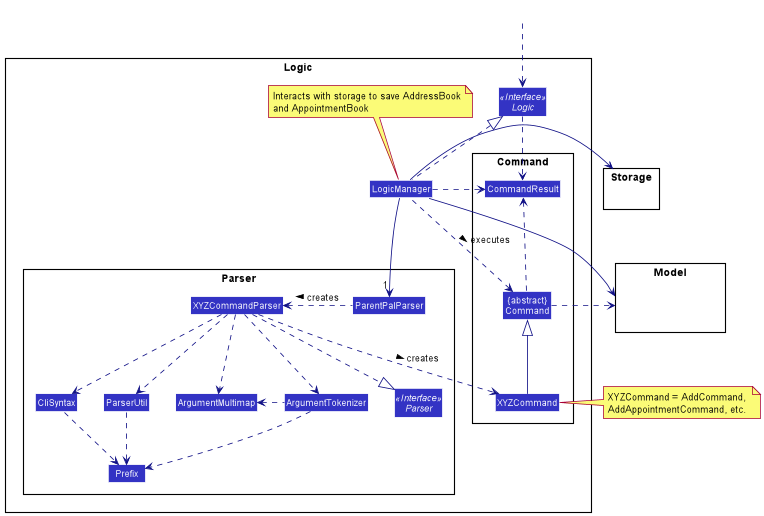
Logic component
API :
Logic.java
-
Logicuses theParentPalParserclass to parse the user command. - This results in a
Commandobject which is executed by theLogicManager. - The command execution can affect the
Model(e.g. adding a contact). - The result of the command execution is encapsulated as a
CommandResultobject which is passed back to theUi. - In addition, the
CommandResultobject can also instruct theUito perform certain actions, such as displaying help to the user.
Given below is the Sequence Diagram for interactions within the Logic component for the execute("delete 1") API call.
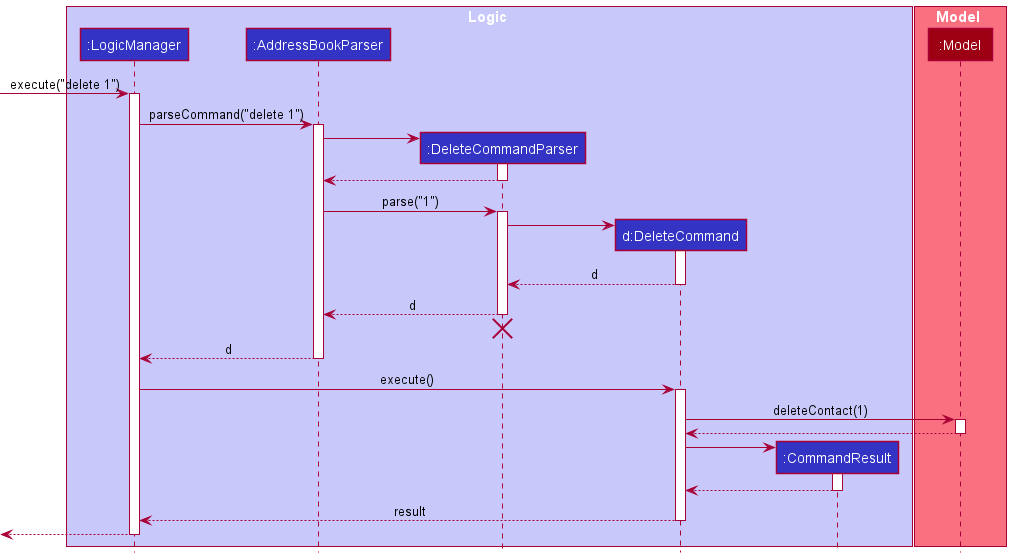
DeleteCommandParser should end at the destroy marker (X) but due to a limitation of PlantUML, the lifeline reaches the end of diagram.
Model component
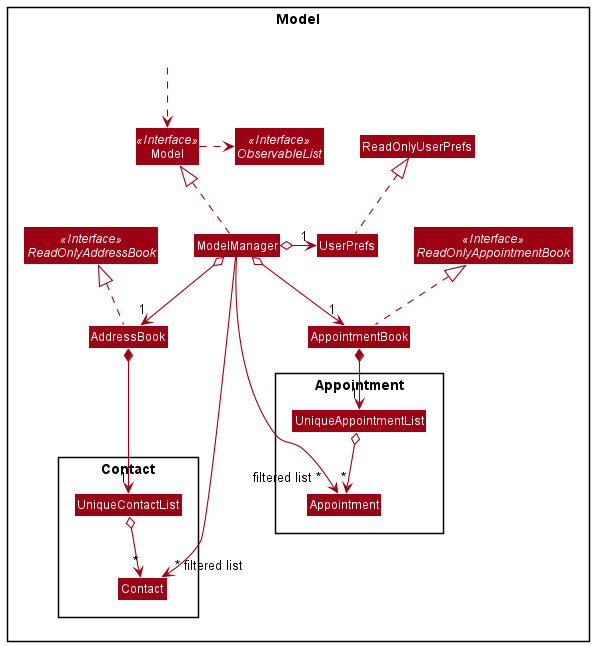
API : Model.java
The Model,
- stores a
UserPrefobject that represents the user’s preferences. - stores the address book data.
- stores the appointment book data.
- exposes unmodifiable
ObservableList<Contact>andObservable<Appointment>that can be ‘observed’ e.g. the UI can be bound to this list so that the UI automatically updates when the data in the list change. - does not depend on any of the other three components.
Tag list in the AddressBook, which Contact references. This allows AddressBook to only require one Tag object per unique Tag, instead of each Contact needing their own Tag object.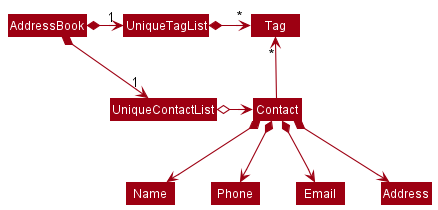
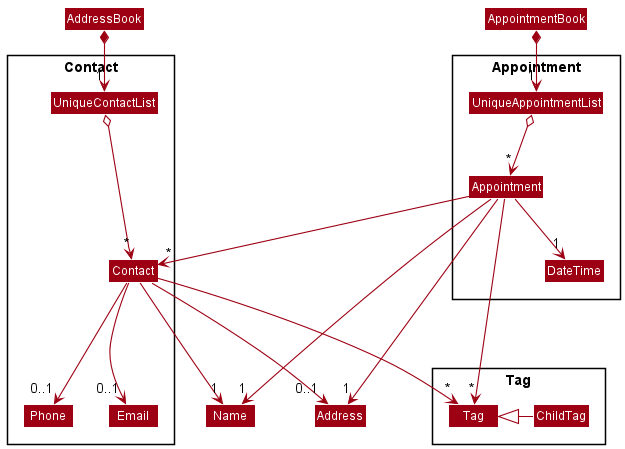
- Some attributes have their own class, like
Name,DateTime, and they contain methods to check for the validity of the value given by the user. -
NameandAddressclasses are referenced by bothContactandAppointmentclass and are hence not within theContactorAppointmentpackage.
Storage component
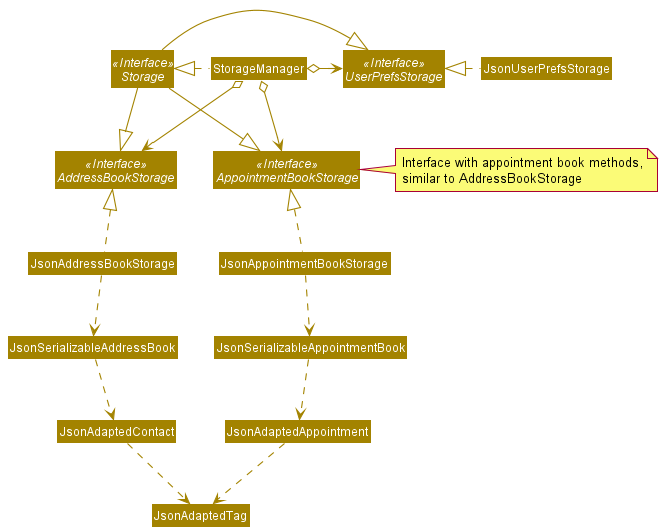
API : Storage.java
The Storage component,
- can save
UserPrefobjects in json format and read it back. - can save the address book data in json format and read it back.
- can save the appointment book date in json format and read it back.
Common classes
Classes used by multiple components are in the seedu.address.commons package.
Implementation
This section describes some noteworthy details on how certain features are implemented.
Tagging features
Current Implementation
The current tagging system uses objects of the Tag class and its children ChildTag. Each Contact in the
AddressBook maintains its own set of tags as a HashSet<Tag>.
The tag command allows for the appending of tags to an existing
Contact without having to replace existing tags as offered by edit and is facilitated by
the TagCommand and TagCommandParser classes.
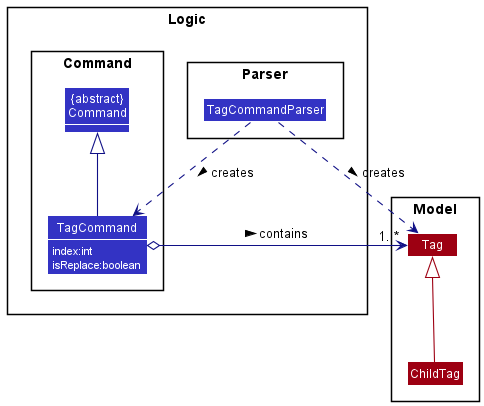
As part of the Model component, other components interact with tags through the Model.java API.
As Contact objects are designed to be immutable, commands that involve manipulating Persons such as edit and tag
involve creating a new Contact and replacing the original Contact through Model#setPerson().
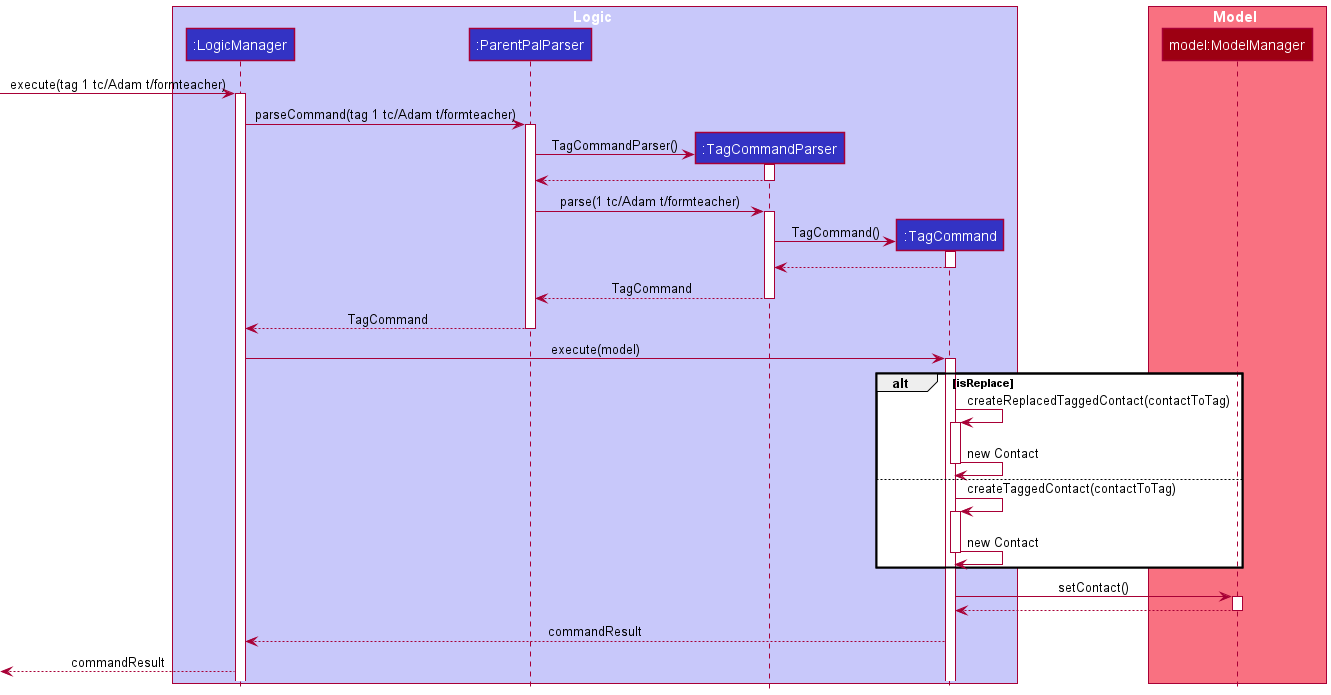
Given below is an example usage scenario of the tag command and how the application behaves through its execution.
Step 1. The user executes tag 1 tc/Adam t/formteacher to add tags to a previous contact they have added.
Step 2. The LogicManager calls on the AddressBookParser to parse the user input
, which creates a new TagCommandParser object and calls its parse method.
Step 3. TagCommandParser will tokenize the given arguments using ArgumentTokenizer#tokenize().
The index of 1 and option fields are parsed out. Since no option is used in this scenario,
the isReplace variable is set to false.
Step 4. ParserUtil#parseTags and ParserUtil#parseChildTags methods are used to generate tagSet, a Set<Tag>
containing ChildTag:Adam and Tag:formteacher.
Step 5. A new TagCommand is created using index, tagSet, and isReplace and returned to AddressBookParser
and subsequently LogicManager.
Step 6. LogicManager then calls the execute method of the newly created TagCommand.
Step 7. Similar to EditCommand, TagCommand will generate a new Contact object
though the createTaggedPerson method which will have its tags appended with the new Set<Tag> defined by the command.
Step 8. The Model#setPerson() method is used to update the model with the newly tagged Contact and a CommandResult
representing success is returned to the LogicManager.
Shown below is the sequence diagram that visualises the above operations of a tag command.
When displaying the tags in the UI as a PersonCard, a customised TagComparator that implements
Comparator<Tag> is used to sort the tags such that ChildTag will be placed first before regular
Tag. During the generation of the Label for the each Tag a different background color is then set
for ChildTag.
Design considerations
The decision to implement ChildTag as its own class rather than a boolean in the Tag class was to allow for the
future extensibility of the program in being able to create more types of Tags in the future.
This also allows for ChildTag to store its own seperate information from regular Tag if needed
such as other details of the child itself. Extending ChildTag from the original Tag class allows for them to be
stored within the same data structure allowing for easier manipulation by other commands that may deal with tags such
as find.
Help feature
Implementation
The help mechanism is facilitated by HelpCommandParser and HelpCommand. HelpCommandParser implements Parser#parse(args) from the Parser interface. The args passed to the method specify the command to display information for. If args specifies more than one command, the last command will be taken. Otherwise, HepCommandParser returns a new HelpCommand.
If no commands were specified in args, the HelpCommand constructor without any parameters will be called. If a single command was specified, the command will be passed as an argument to the HelpCommand(specifiedCommand) constructor.
To execute a HelpCommand, HelpCommand#execute() is called. The method reads and parses information in the user guide (found at resources/UserGuideCopy.md) into a helpMessage differently depending on whether a command was specified. helpMessage can contain the following:
- Command was not specified: A list of all available ParentPal commands that was parsed from the command summary table in the user guide.
- Command was specified: Information on the specified command taken from the user guide. If the specified command is not found in the user guide, an exception is thrown.
Given below are 2 example usage scenarios and how the help mechanism behaves in each scenario.
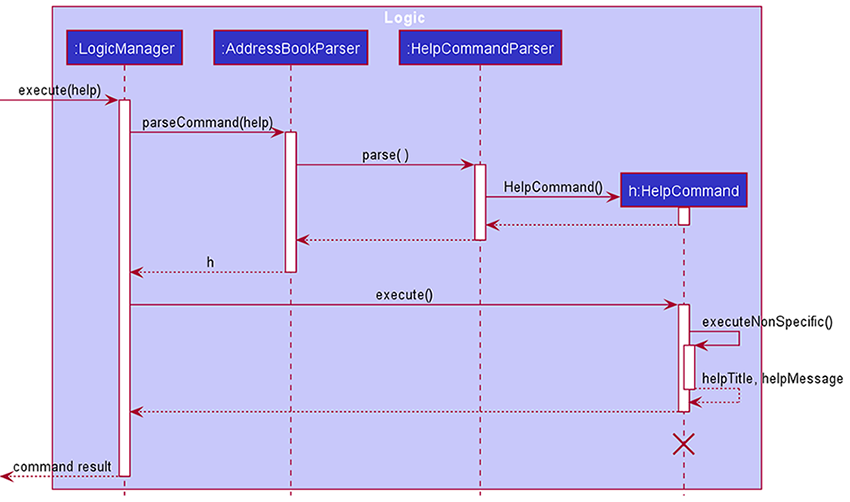
Scenario 1: User enters help without specifying commands.
Step 1. LogicManager#execute(userInput) calls AddressBookParser#parseCommand(userInput), which then parses the input into the command word and arguments, which is an empty string in this case. The empty string is passed to HelpCommandParser#parse().
Step 2. A new HelpCommand() is returned.
Step 3. LogicManager#execute() calls HelpCommand#execute(), which then calls HelpCommand#executeNonSpecific().
Step 4. The command summary table in the user guide is parsed so that each row is displayed as “commandName: description” in the helpMessage with the help of HelpCommand#commandSummaryParser().
Step 5. The helpMessage is returned via a CommandResult. A default helpTitle is also returned via the CommandResult.
Step 6. LogicManager#execute(userInput) returns the CommandResult to MainWindow#executeCommand, which sets the help window header to helpTitle and the content to helpMessage via HelpWindow#setHelpText().
Step 7. The help window is displayed.
The following sequence diagram shows how the ‘help’ operation works in this scenario:
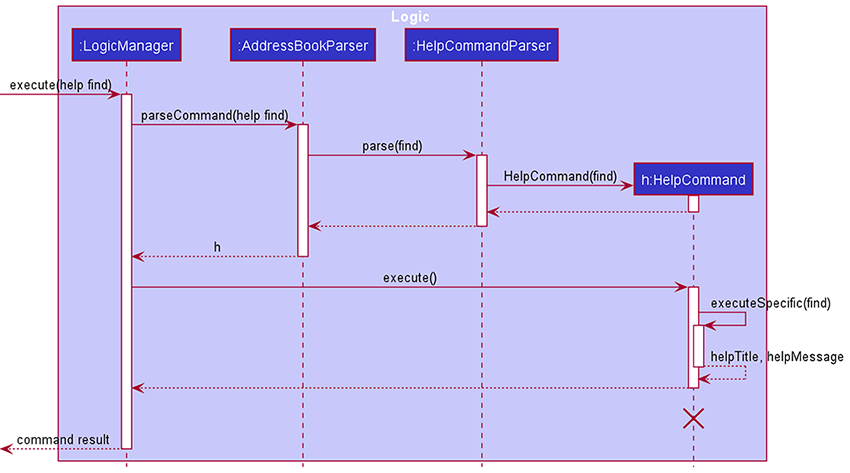
Scenario 2: User enters help find.
Step 1. LogicManager#execute(userInput) calls AddressBookParser#parseCommand(userInput), which then parses the input into the command word and arguments, find. find is passed to HelpCommandParser#parse(find).
Step 2. A new HelpCommand(find) is returned.
Step 3. LogicManager#execute() calls HelpCommand#execute(), which then calls HelpCommand#executeSpecific().
Step 4. The user guide is searched for the section containing information on find.
Step 5. The information under the find section is parsed and appended to helpMessage.
Step 6. The find section heading is parsed and assigned to helpTitle.
Step 7. The helpMessage and helpTitle are returned via a CommandResult.
Step 8. LogicManager#execute(userInput) returns the CommandResult to MainWindow#executeCommand(), which sets the help window header to helpTitle and the content to helpMessage.
Step 9. The help window is displayed.
The following sequence diagram shows how the ‘help’ operation works in this scenario:
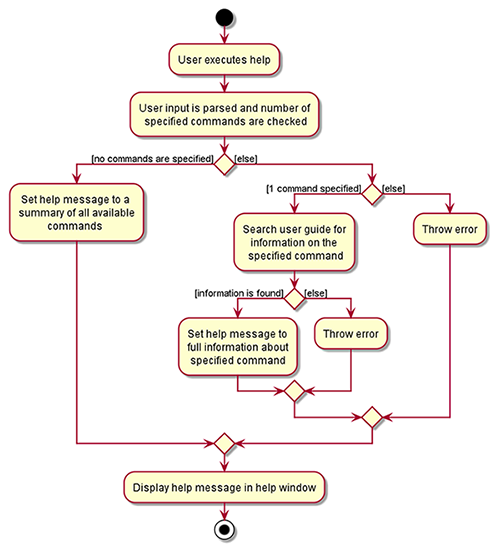
The following activity diagram summarises what happens when a user executes the help command:
Design considerations
Aspect: Where the information displayed in the help window is retrieved from
-
Alternative 1 (current choice): Retrieve from user guide document stored in resource folder and packed into
JARfile.- Pros: Easy to update when features change, command classes will not be cluttered with a long
helpMessagestring. - Cons: Have to remember to copy the latest version of the user guide from the docs folder into the resources folder, scanning user guide for information each time help is called can be time consuming, have to parse markdown into plain text.
- Pros: Easy to update when features change, command classes will not be cluttered with a long
-
Alternative 2: Retrieve from
helpMessagestring stored in eachCommandclass.- Pros: Easy to implement, easy to retrieve
helpMessage, minimal processing needed. - Cons: To update the
helpMessageof a command, we must search for its class and edit thehelpMessagestring manually. This essentially means we have do 2 updates every time a change is made to a command: one to the user guide and one to the command’s class.
- Pros: Easy to implement, easy to retrieve
-
Alternative 3: Retrieve from user guide webpage.
- Pros: Minimal updating needed when features change since only the user guide in the docs folder needs to be updated.
- Cons: Does not work when ParentPal is used offline, implementation might be complicated, scanning user guide for information each time help is called can be time-consuming.
Alternative 1 was eventually chosen as we were planning to make major changes to ParentPal over several iterations. Since we are already expected to update the user guide with each iteration, it is more efficient to simply copy the latest user guide document into the resources folder after updates are made rather than to edit each helpMessage. Furthermore, as long as the format of the user guide remains constant, parsing the markdown text into plain text is manageable and does not take too much time. This alternative will also work when ParentPal is used offline, making the application easy to use on the go. Lastly, alternative 1 keeps the actual code and documentation separate, making it a more logical and organised implementation. As such, that is the alternative that was chosen.
Sort feature
Implementation
The sort mechanism is facilitated by SortCommand and SortCommandParser.
SortCommandParser implements the following operation:
-
SortCommandParser#parse(String order)— Parses the arguments usingArgumentTokenizer#tokenizeand checks foroption.
SortCommand extends Command, and implements the following operation:
-
SortCommand#execute(Model model)— Executes the sort command by sorting thelastShownListand updating themodelaccordingly.
Sorting by name is done using the NameComparator,by comparing Contact objects, which implement Comparable<Contact>.
Sorting by date is done using the DateComparator, which compares the TimeAdded attribute of the Contact objects.
The comparator is saved in AddressBookSettings so that the list stays sorted in the chosen order.
Given below are some example usage scenario and how the sort mechanism behaves at each step.
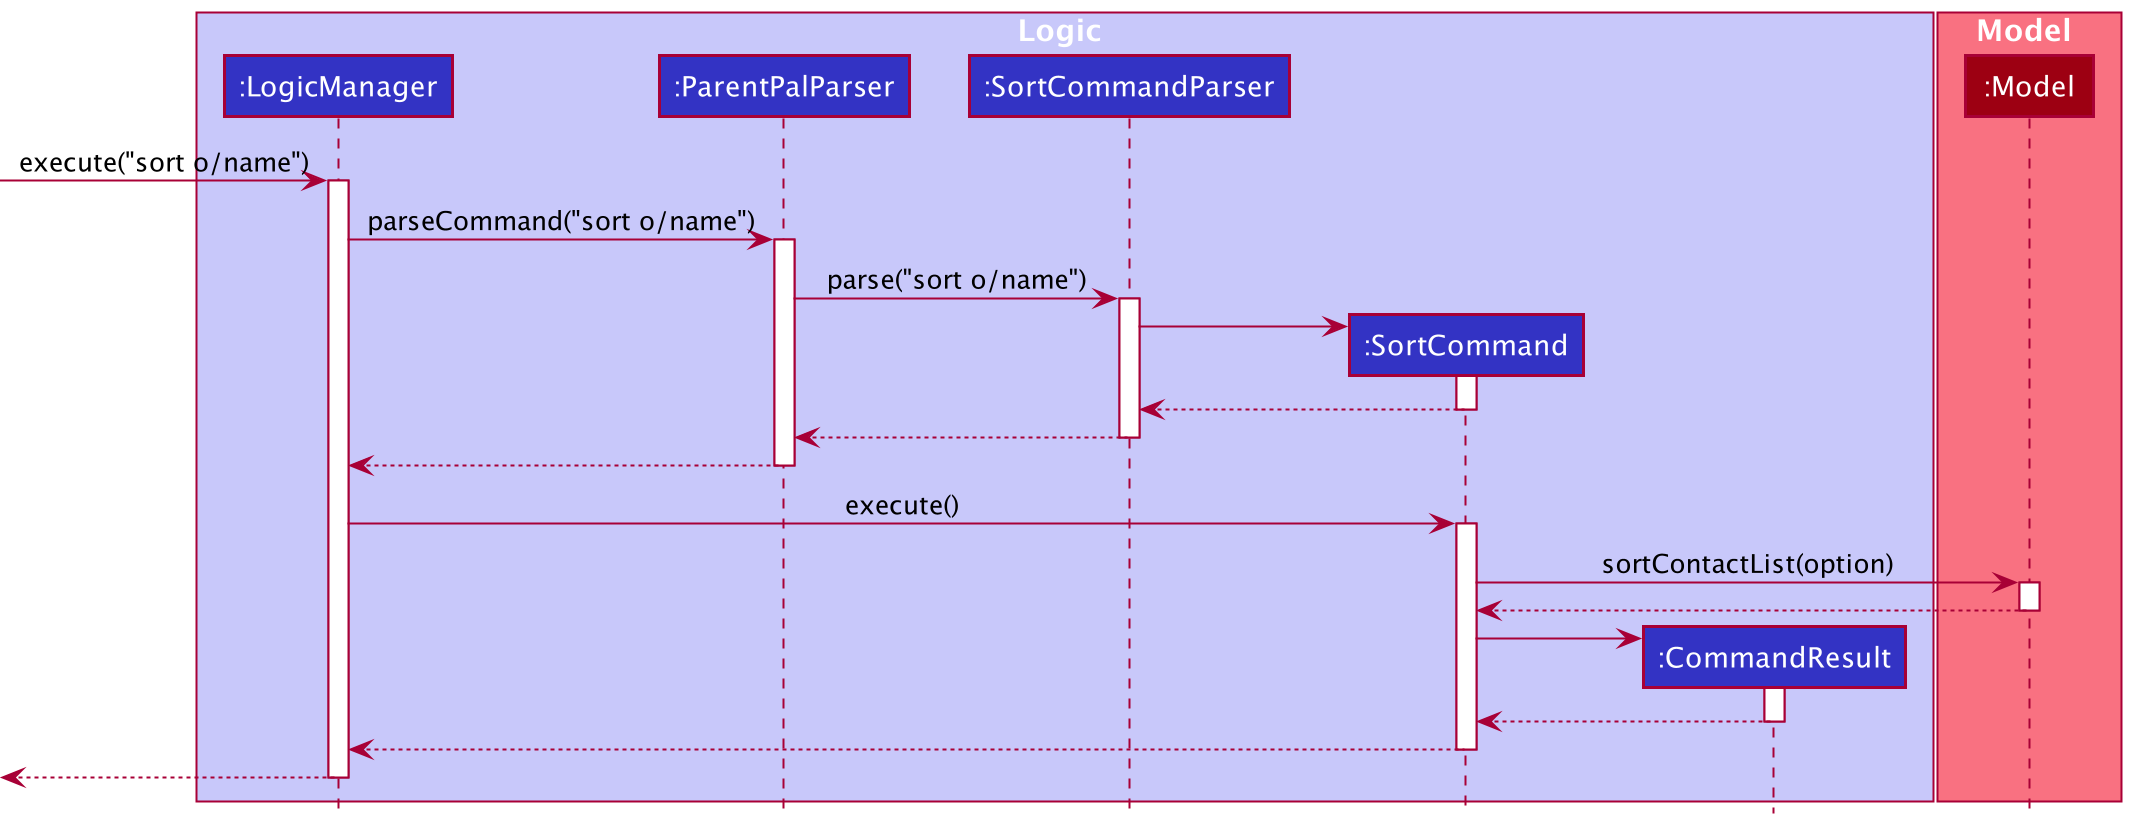
Scenario 1: The user executes sort o/name after executing list.
Note: The Contact objects have been timestamped with the TimeAdded attribute.
By default, they will be displayed on in the order in which they were added.
Step 1. LogicManager#execute(userInput) calls ParentPalParser#parseCommand(userInput),
which then parses the input into the command word and arguments, o/name.
o/name is passed to SortCommandParser#parse(o/name).
Step 2. SortCommandParser will tokenize the given arguments using ArgumentTokenizer#tokenize().
The option field name is parsed out. A new SortCommand("name") is returned.
Step 3. LogicManager#execute() calls SortCommand#execute().
The model is sorted accordingly using the sortContactList method,
which will use the NameComparator on setAddressBookComparator.
Step 4. The success message is returned to LogicManager via a CommandResult.
The displayed list would be sorted in alphabetical order.
The following sequence diagram shows how the sort operation works:
Scenario 2: The user executes sort o/date after executing find john, followed by list.
Step 1. LogicManager#execute(userInput) calls ParentPalParser#parseCommand(userInput),
which then parses the input into the command word and arguments, o/date.
o/date is passed to SortCommandParser#parse(o/date).
Step 2. SortCommandParser will tokenize the given arguments using ArgumentTokenizer#tokenize().
The option field date is parsed out. A new SortCommand("date") is returned.
Step 3. LogicManager#execute() calls SortCommand#execute().
The model is sorted accordingly using the sortContactList method,
which will use the DateComparator on setAddressBookComparator.
Step 4. The success message is returned to LogicManager via a CommandResult.
The displayed found list would be sorted in chronological order.
Step 5. When the user executes list, the displayed list will still be in chronological order as the DateComparator
is stored in AddressBookSettings.
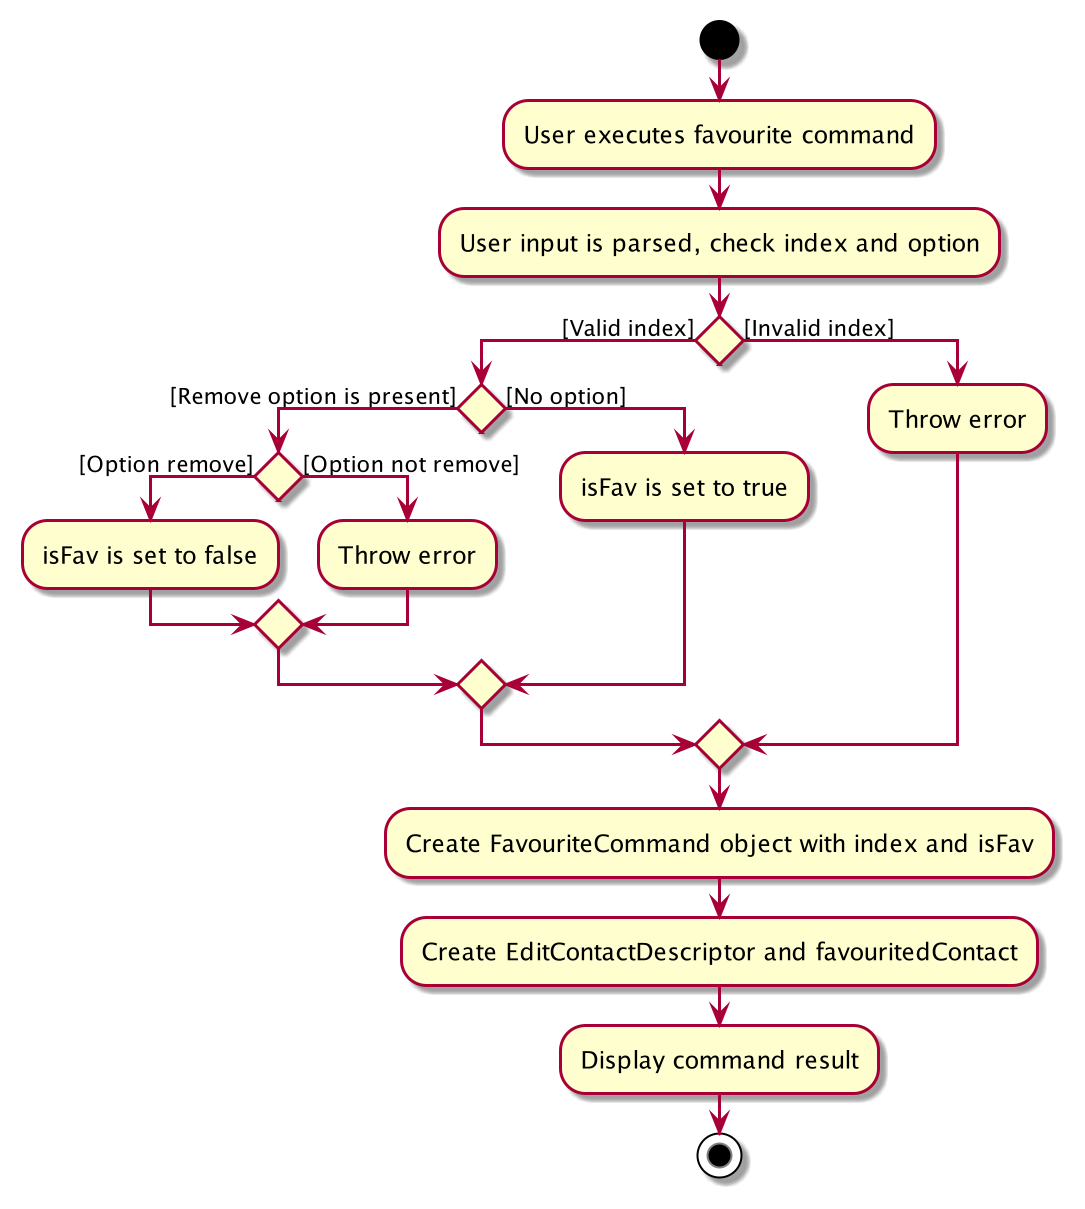
Favourite feature
Implementation
The favourite mechanism is facilitated by FavouriteCommand and FavouriteCommandParser.
FavouriteCommandParser implements the following operation:
-
FavouriteCommandParser#parse(String args)— Parses the arguments usingArgumentTokenizer#tokenizeand checks foroption. - If there are no options specified in
args, it means the user is simply favouriting a contact, soisFavis set to true. - If the
removeoption specified inargs, it means the user is unfavouriting a contact, soisFavis set to false.
FavouriteCommand extends Command, and implements the following operation:
-
FavouriteCommand#execute(Model model)— Executes the favourite command by creating an edited contact and setting thefavouriteattribute usingEditCommand.EditContactDescriptorbased onisFav. Themodelis then updated accordingly.
Given below are some example usage scenario and how the favourite mechanism behaves at each step.
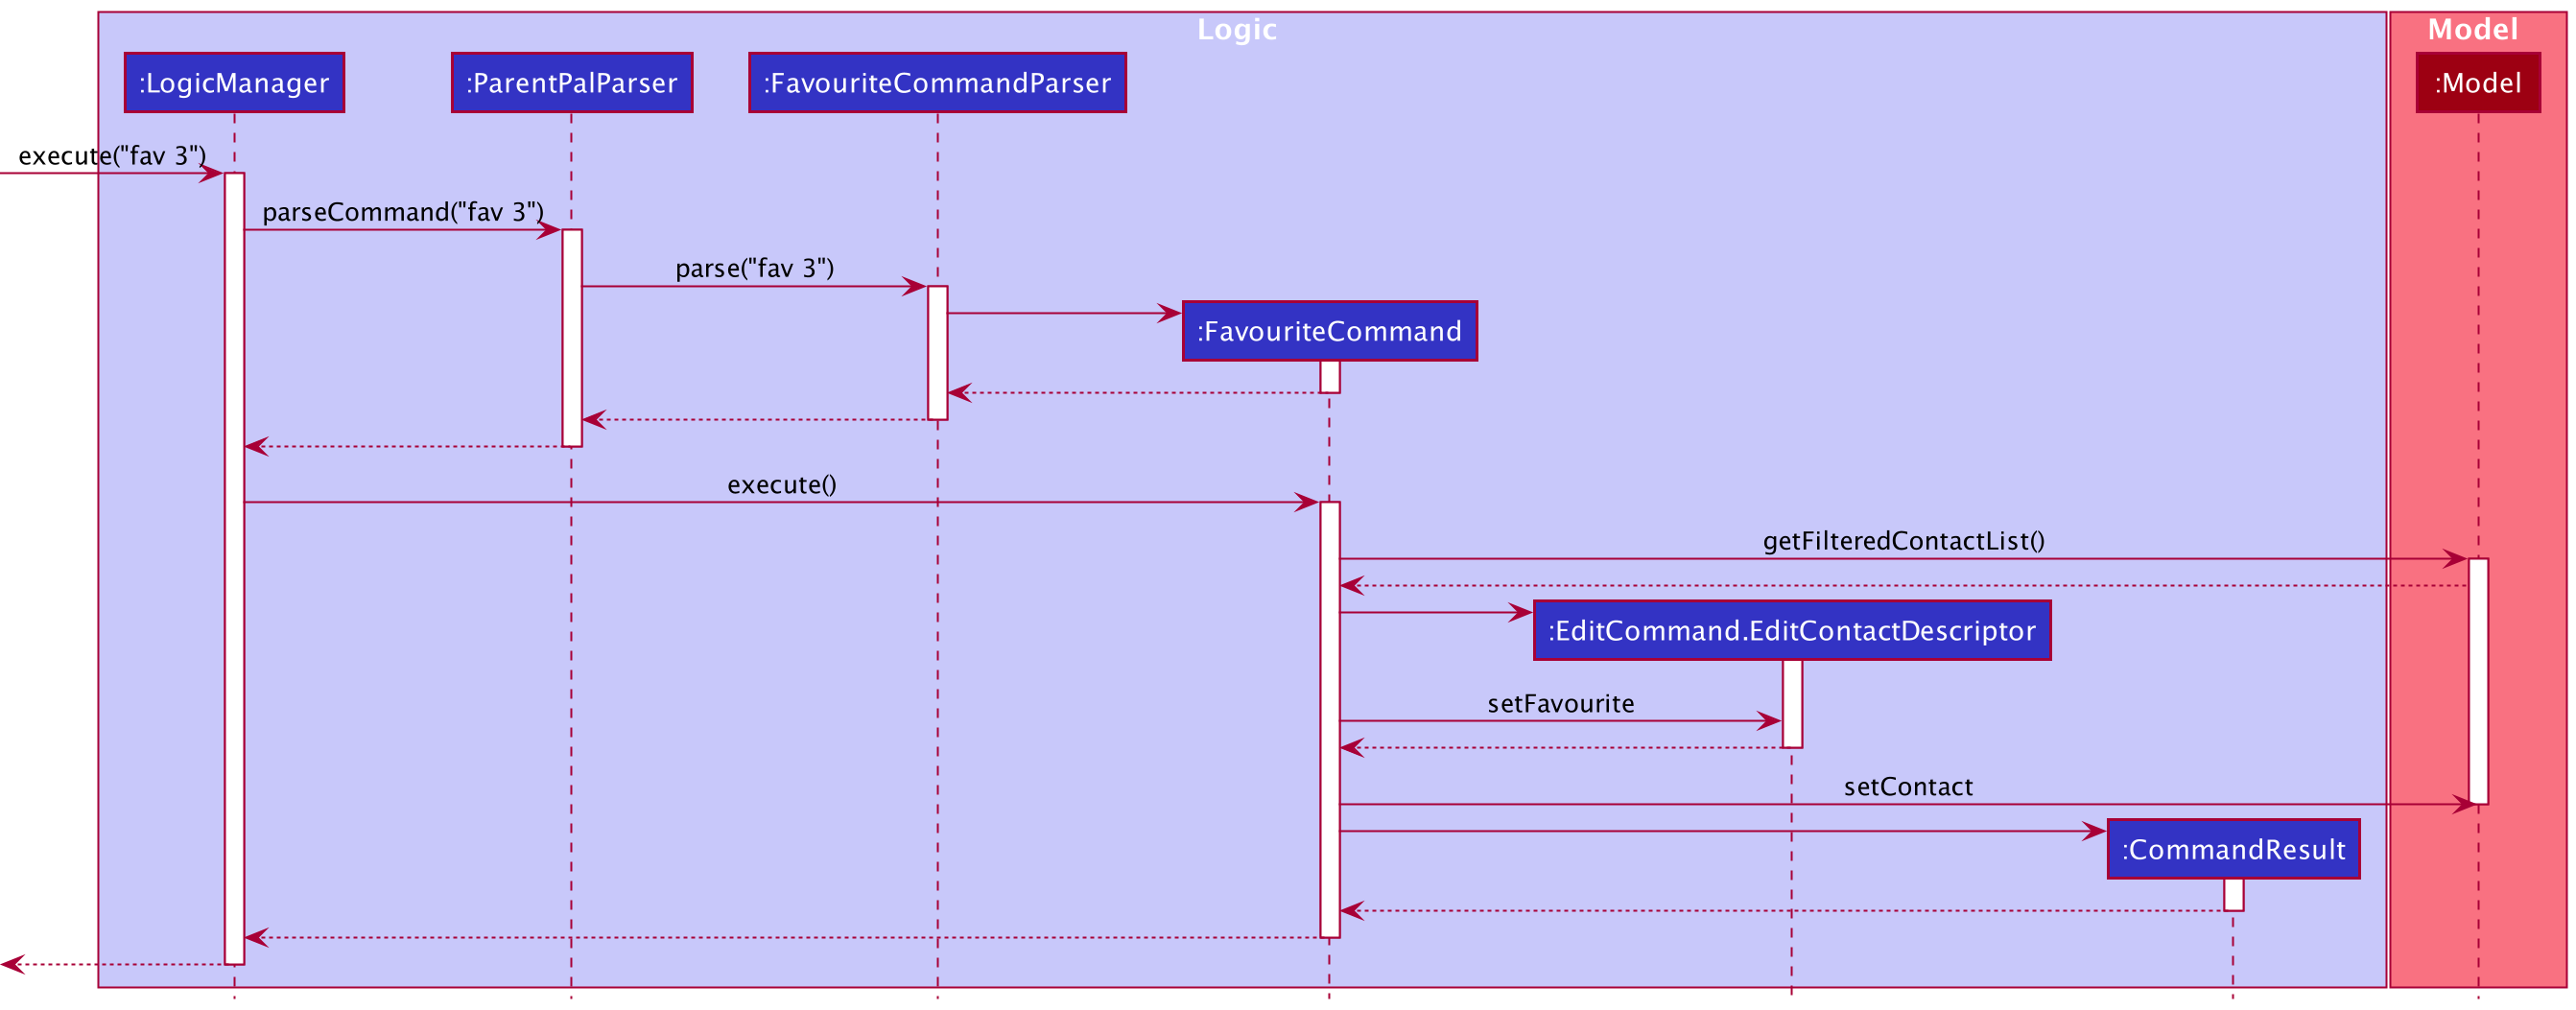
Scenario 1: User enters fav 3 after entering the list command.
Step 1. LogicManager#execute(userInput) calls ParentPalParser#parseCommand(userInput),
which then parses the input into the command word and arguments, 3.
3 is passed to FavouriteCommandParser#parse(3).
Step 2. FavouriteCommandParser will tokenize the given arguments using ArgumentTokenizer#tokenize().
The index of 3 and option fields are parsed out. Since no option is used in this scenario,
the isFav variable is set to true. A new FavouriteCommand(3, true) is returned.
Step 3. LogicManager#execute() calls FavouriteCommand#execute().
This creates an EditContactDescriptor, which is used to set the favourite attribute of the contact to true.
A new favourited Contact is created. The model is updated accordingly.
Step 4. The success message and favourited Contact are returned to LogicManager via a CommandResult.
The following sequence diagram shows how the favourite operation works:
Scenario 2: User enters fav 3 o/remove after entering the list command.
Step 1. LogicManager#execute(userInput) calls ParentPalParser#parseCommand(userInput),
which then parses the input into the command word and arguments, 4 o/remove.
4 is passed to FavouriteCommandParser#parse(4 o/remove).
Step 2. FavouriteCommandParser will tokenize the given arguments using ArgumentTokenizer#tokenize().
The index of 4 and option field remove are parsed out. Since the remove option is used in this scenario,
the isFav variable is set to false. A new FavouriteCommand(4, false) is returned.
Step 3. LogicManager#execute() calls FavouriteCommand#execute().
This creates an EditContactDescriptor, which is used to set the favourite attribute of the contact to false.
A new unfavourited Contact is created. The model is updated accordingly.
Step 4. The success message and unfavourited Contact are returned to LogicManager via a CommandResult.
The following activity diagram shows how the favourite operation works:
Design considerations
Aspect: How to implement the favourite feature
-
Alternative 1 (current choice): Favouriting contacts is done using its own
FavouriteCommand.- Pros: Most intuitive from a user’s point of view. In a clickable GUI, users would typically click on a star button to star the contacts. For a CLI, having a favourite command would be the most similar to that.
- Cons: This involves editing the contact, which means it should use some implementation of the
EditCommand.
-
Alternative 2: Favouriting contacts is done as a subset of
EditCommand.- Pros: Makes sense because we are essentially editing a field of the contact.
- Cons: Does not look intuitive from the perspective of a user. In a clickable GUI, users would not go to the edit contacts page just to favourite a contact. The editing is usually only for fields directly related to the details of the contact, such as their name, phone or email.
-
Alternative 2: Favouriting contacts is done as a subset of
TagCommand.- Pros: Makes sense if we add favourite as a tag.
- Cons: This could add clutter to the interface as there are already a lot of tags, and there are also child tags.
Alternative 1 was eventually chosen as being user-centric is a key aspect of software engineering. Making the app intuitive to users is important, and in this case, it does not sacrifice too much in terms of implementation. As such, that is the alternative that was chosen.
Aspect: How to save the favourite
-
Alternative 1 (current choice): Create a
Favouriteclass, each contact has afavouriteattribute and favourited contacts have a star icon next to their name.- Pros: Standardised with other fields that the contacts have.
- Cons: More troublesome to implement.
-
Alternative 2: Favourite is saved and shown as a special tag.
- Pros: Standardised style as the child tag, can be implemented the same way.
- Cons: Might add unnecessary clutter when we have the word “favourite”, as it could be easily represented by an icon. This is in contrast to tags which are best represented as text.
-
Alternative 3: Favourite is saved as a boolean value under each contact,
and favourited contacts have a star icon next to their name.
- Pros: Simple to implement.
- Cons: Not standardised with other contact fields, might not be as readable to have a random boolean variable appear.
Alternative 1 was eventually chosen as it was the most standardised way and minimises the amount of clutter displayed to the user. As such, that is the alternative that was chosen.
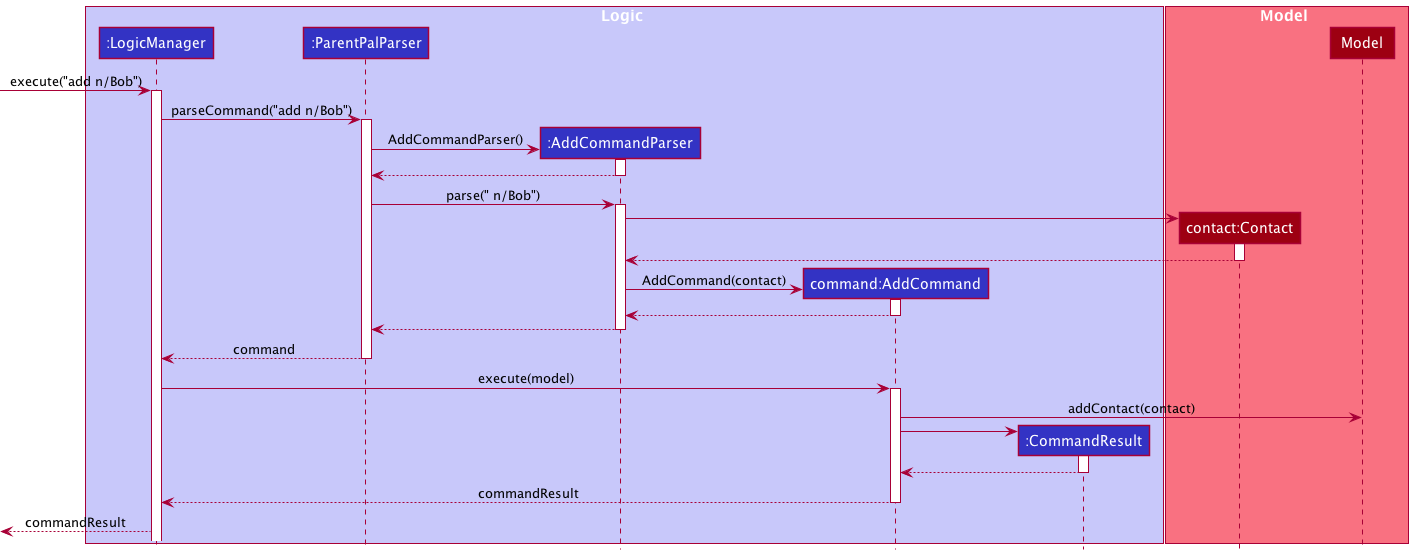
Add feature
Implementation
The add mechanism is facilitated by AddCommand and AddCommandParser.
AddCommandParser implements the following operation:
-
AddCommandParser#parse(String order)— Parses the arguments usingArgumentTokenizer#tokenizeand checks for if the variousargsare specified, only then/arg is compulsory to be specified.
AddCommand extends Command, and implements the following operation:
-
AddCommand#execute(Model model)— Executes the add command by adding the contact with the givenargs, if one of more args are not specified a ‘NIL’ is automatically used as a placeholder.
Given below is an example usage scenario and how the add mechanism behaves at each step.
Step 1. The user enters add n/David .
Step 2. LogicManager#execute(userInput) calls ParentPalParser#parseCommand(userInput), which then parses
the input into the command word and arguments, ` n/David . n/David is then passed to
AddCommandParser#parse(“ n/David”)`
Step 3. AddCommandParser will tokenize the given arguments using ArgumentTokenizer#tokenize() into the
various fields for the Contact. A new Contact is created with these fields. Since only the n/ arg is
specified for this example, the string ‘NIL’ will be used for the remaining args.
Step 5. A new AddCommand is created using the new Contact and returned to AddressBookParser
and subsequently LogicManager.
Step 6. LogicManager#execute() calls AddCommand#execute().
Step 7. The Model#addContact() method is used to add the new Contact into the model. The success message
is returned to LogicManager via a CommandResult.
The following sequence diagram shows how the add operation works:
Design considerations
Aspect: How to allow incomplete contacts to be added
-
Alternative 1 (current choice): Setting a placeholder string when fields not specified
- Pros: Lesser code refactoring, more uniform data in model so lesser need to check if a field is null.
- Cons: Might affect future extensions if logic is applied on the placeholder.
-
Alternative 1: Setting a placeholder class.
- Pros: Slightly more extendable
- Cons: More code refactoring leading to more bugs
Alternative 1 was eventually chosen due to ease of refactoring and low chance of future extensions being affected by the placeholder since it is a String and only one single use case of placeholders being use throughout the entire project hence it would be unnecessary abstraction.
[Proposed] Undo/redo feature
Proposed Implementation
The proposed undo/redo mechanism is facilitated by VersionedAddressBook. It extends AddressBook with an undo/redo history, stored internally as an addressBookStateList and currentStatePointer. Additionally, it implements the following operations:
-
VersionedAddressBook#commit()— Saves the current address book state in its history. -
VersionedAddressBook#undo()— Restores the previous address book state from its history. -
VersionedAddressBook#redo()— Restores a previously undone address book state from its history.
These operations are exposed in the Model interface as Model#commitAddressBook(), Model#undoAddressBook() and Model#redoAddressBook() respectively.
Given below is an example usage scenario and how the undo/redo mechanism behaves at each step.
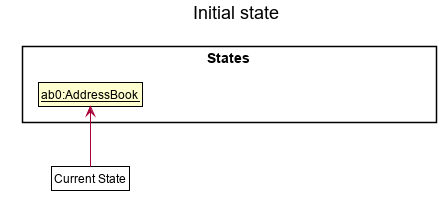
Step 1. The user launches the application for the first time. The VersionedAddressBook will be initialized with the initial address book state, and the currentStatePointer pointing to that single address book state.
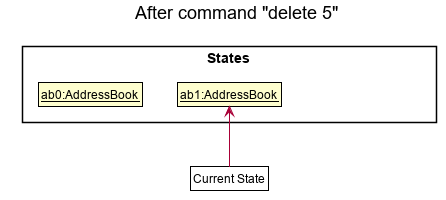
Step 2. The user executes delete 5 command to delete the 5th contact in the address book. The delete command calls Model#commitAddressBook(), causing the modified state of the address book after the delete 5 command executes to be saved in the addressBookStateList, and the currentStatePointer is shifted to the newly inserted address book state.
Step 3. The user executes add n/David … to add a new contact. The add command also calls Model#commitAddressBook(), causing another modified address book state to be saved into the addressBookStateList.
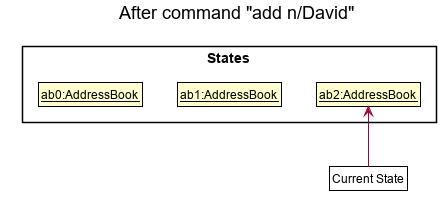
Model#commitAddressBook(), so the address book state will not be saved into the addressBookStateList.
Step 4. The user now decides that adding the contact was a mistake, and decides to undo that action by executing the undo command. The undo command will call Model#undoAddressBook(), which will shift the currentStatePointer once to the left, pointing it to the previous address book state, and restores the address book to that state.
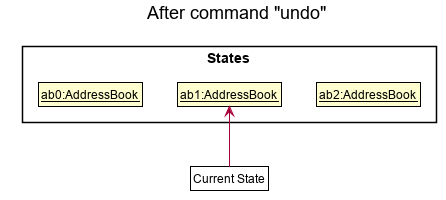
currentStatePointer is at index 0, pointing to the initial AddressBook state, then there are no previous AddressBook states to restore. The undo command uses Model#canUndoAddressBook() to check if this is the case. If so, it will return an error to the user rather
than attempting to perform the undo.
The following sequence diagram shows how the undo operation works:
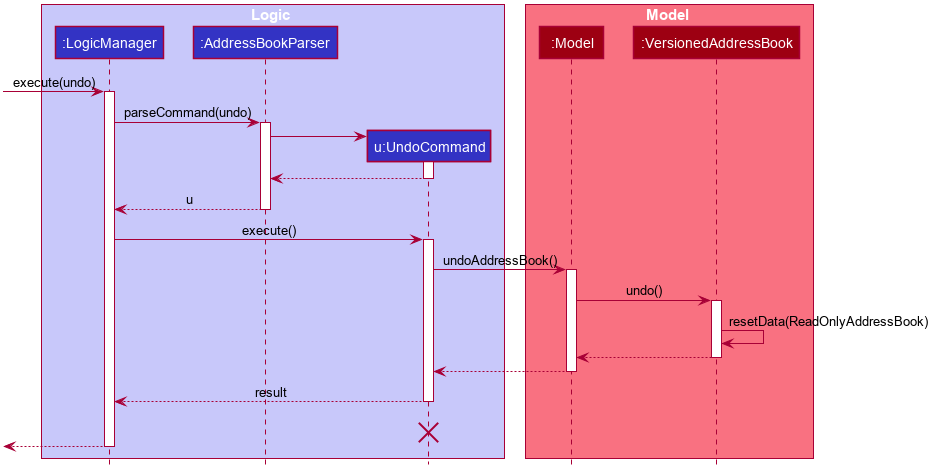
UndoCommand should end at the destroy marker (X) but due to a limitation of PlantUML, the lifeline reaches the end of diagram.
The redo command does the opposite — it calls Model#redoAddressBook(), which shifts the currentStatePointer once to the right, pointing to the previously undone state, and restores the address book to that state.
currentStatePointer is at index addressBookStateList.size() - 1, pointing to the latest address book state, then there are no undone AddressBook states to restore. The redo command uses Model#canRedoAddressBook() to check if this is the case. If so, it will return an error to the user rather than attempting to perform the redo.
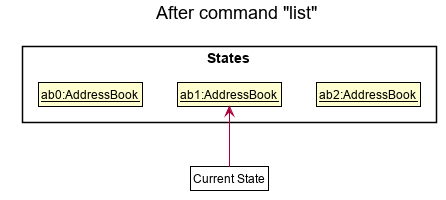
Step 5. The user then decides to execute the command list. Commands that do not modify the address book, such as list, will usually not call Model#commitAddressBook(), Model#undoAddressBook() or Model#redoAddressBook(). Thus, the addressBookStateList remains unchanged.
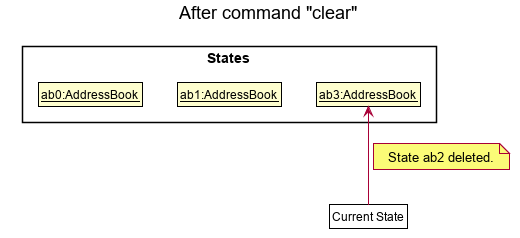
Step 6. The user executes clear, which calls Model#commitAddressBook(). Since the currentStatePointer is not pointing at the end of the addressBookStateList, all address book states after the currentStatePointer will be purged. Reason: It no longer makes sense to redo the add n/David … command. This is the behavior that most modern desktop applications follow.
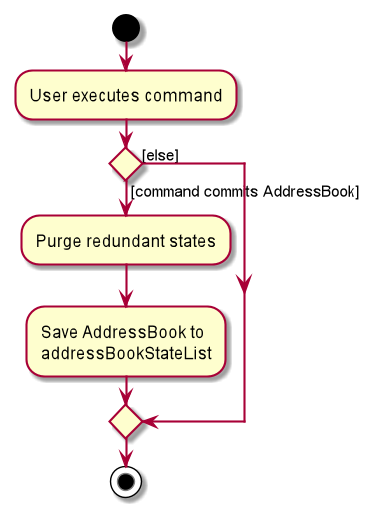
The following activity diagram summarizes what happens when a user executes a new command:
Design considerations
Aspect: How undo & redo executes
-
Alternative 1 (current choice): Saves the entire address book.
- Pros: Easy to implement.
- Cons: May have performance issues in terms of memory usage.
-
Alternative 2: Individual command knows how to undo/redo by
itself.
- Pros: Will use less memory (e.g. for
delete, just save the contact being deleted). - Cons: We must ensure that the implementation of each individual command are correct.
- Pros: Will use less memory (e.g. for
Documentation, logging, testing, configuration, dev-ops
- Documentation guide
-
Testing guide
- See also: Intructions for manual testing
- Logging guide
- Configuration guide
- DevOps guide
Appendix: Requirements
Product scope
Target user profile:
- tech-savvy parents
- need to manage a significant number of their young children’s contacts
- prefer desktop apps over other types
- can type fast
- prefers typing to mouse interactions
- is reasonably comfortable using CLI apps
Value proposition:
- manage contacts faster than a typical mouse/GUI driven app
- easily keep track of their children’s contacts in one centralised platform
- organise, categorise and sort their contacts easily
User stories
Priorities: High (must have) - * * *, Medium (nice to have) - * *, Low (unlikely to have) - *
| Priority | As a … | I want to … | So that I can… |
|---|---|---|---|
* * * |
new user | see usage instructions | refer to instructions when I forget how to use the App |
* * * |
user | add a new contact | |
* * * |
user | delete a contact | remove entries that I no longer need |
* * * |
user | find a contact by name | locate details of contacts without having to go through the entire list |
* * |
user | hide private contact details | minimize chance of someone else seeing them by accident |
* |
user with many contacts in the address book | sort contacts by name | locate a contact easily |
* * * |
Beginner | Add contacts | add contacts |
* * |
User | Add incomplete contacts | easily save contacts I don’t have all the contact information for easily without having to use placeholders |
* * |
Beginner | Add contacts easily | save time |
* * * |
Beginner | Update contacts | change the details of my contacts |
* * * |
Beginner | Be able to view a user guide | learn to use the app |
* * * |
Parent of multiple children | Be able to view a user guide | troubleshoot any problems that I encounter |
* * * |
Parent of multiple children | Tag my contacts by child | easily identify which child the contact is related to |
* * * |
User | Tag my contacts by other categories | identify the contacts more easily (i.e. by subject, lesson etc.) |
* |
Beginner | Download the app easily | use the app quickly |
* * |
Beginner | Add photos to contacts | match the contacts’ names to their faces easily |
* |
User | Colour code my tags | easily differentiate my contacts at a glance |
* * |
User | Search for contacts by tag | search for contacts quickly and easily |
* * * |
User | Search for contacts by name | search for contacts quickly and easily |
* |
User | Search for contacts by number | search for contacts quickly and easily |
* * |
User | Sort my contacts by tag | search for contacts quickly and easily |
* * |
User | Sort my contacts by name | search for contacts quickly and easily |
* |
User | Sort my contacts by the closest appointment time | find out my next upcoming appointment quickly. |
* * |
User | Export my contacts | share the contacts with other people/transfer to other devices. |
* |
User | Sync my contacts with my partner | add or update the contacts for our children once such that both of us are able to see the changes. |
* * |
User | Remove all contacts saved under a certain tag | quickly clear contacts that I no longer need because my child has graduated. |
* * |
User | Remove all selected contacts | quickly clear contacts that I no longer need |
* |
User who works under different lighting conditions | Change the colour scheme of my app | view the contents more clearly and my app looks better visually. |
* * |
Careless user | Receive a notification before deleting my contacts | prevent deleting important contacts by accident |
* * |
Careless user | Undo my actions | undo any careless mistakes |
* |
Careless user | Have a bin for deleted contacts | retrieve any contacts deleted by mistake |
* * |
User | Add an appointment time with a particular contact | keep track of any meetings I have with my children’s teachers. |
* * |
Parent of multiple children | Record appointment dates and times and | keep track of all appointments I need |
* |
Parent of multiple children | Be notified of clashes in appointments | ensure that I/my children can attend all of the appointments |
* |
Caring Parent | Favourite contacts | ensure that the important contacts are at the forefront of my list. |
* |
Frequent user of the app | Have shortcuts to quickly add contacts/details | save the contact/details first thing when I receive them |
* |
User who contacts some people more frequently than others | Have a list of recently contacted contacts | view their details easily. |
* * * |
User | Have a list of contact | view all contacts at the same time |
* * * |
User | Be able to view the number, email address of my contacts | all or email them quickly |
{More to be added}
Use cases
(For all use cases below, the System is the ParentPal and the Actor is the user, unless specified otherwise)
For our product, we have two different entities Contact and Appointment. Across the two entities,
some implementations are rather similar.
Therefore, for those implementations, we will use ENTITY to generalise the different entities and then provide use
cases for the general entity. If any of the features have a different implementation, we will provide the alternative use case below.
UC1: Edit a ENTITY
MSS
- User requests for a list of
ENTITY - ParentPal shows a list of
ENTITY - User requests to edit a specific
ENTITYdetails in the list -
ParentPal edits the
ENTITYdetails accordinglyUse case ends.
Extensions
-
2a. The list is empty.
Use case ends.
-
3a. The given index is invalid.
-
3a1. ParentPal shows an error message.
Use case resumes at step 2.
-
UC2: Delete a ENTITY
MSS
- User requests for a list of
ENTITY - ParentPal shows a list of
ENTITY - User requests to delete a specific
ENTITYin the list -
ParentPal deletes the
ENTITYUse case ends.
Extensions
-
2a. The list is empty.
Use case ends.
-
3a. The given index is invalid.
-
3a1. ParentPal shows an error message.
Use case resumes at step 2.
-
UC3: Add a tag to a contact
MSS
- User requests to list contacts
- ParentPal shows a list of contacts
- User requests to tag a specific contact in the list with a specific tag name
-
ParentPal adds the tag to the contact
Use case ends.
Extensions
-
2a. The list is empty.
Use case ends.
-
3a. The given index is invalid.
-
3a1. ParentPal shows an error message.
Use case resumes at step 2.
-
-
3b. The given tag name already exists for that contact.
Use case ends.
UC4: Find an Existing ENTITY from the respective list
MSS
- User requests to find a
ENTITY. - ParentPal shows the
ENTITYdetails that match the attributes that the user has keyed in.
Use case ends
Extensions
- 1a. User enters an invalid input.
- 1a1. ParentPal shows an error message.
Use case ends.
- 1a1. ParentPal shows an error message.
{More to be added}
Non-Functional Requirements
- Should work on any mainstream OS as long as it has Java
11or above installed. - Should be able to hold up to 1000 contacts and appointments without a noticeable sluggishness in performance for typical usage.
- A user with above average typing speed for regular English text (i.e. not code, not system admin commands) should be able to accomplish most of the tasks faster using commands than using the mouse.
- Should work on both 32-bit and 64-bit environments.
- A user who is new to the app should be able to familiarise themselves with it within a few uses.
- All commands should be explained in the user guide, including the format of the command and examples of how it is used.
- Should be able to restore app with up to 1000 contacts and appointments from backup file within seconds if app crashes and in-app data is lost.
- Should be able to locate local backup file easily.
- App UI should look uniform across different OSes to ensure that usage of application is similar regardless of OS.
- Should be able to view all data with or without app window maximised.
- Should be able to customise colour scheme of app for comfortable viewing without having to search up hexadecimal codes.
- Project is expected to adhere to a schedule that delivers a feature set every two weeks.
Glossary
- Action: Executed command
- Address book: Section of the application that stores and manages data related to contacts
- Appointment: Entry in the appointment book containing an appointment’s information
- Appointment list: List of appointments displayed
- Appointment book: Section of the application that stores and manages data related to appointments
- Backup file: JSON file that stores address and appointment book data in the hard disk
- Contact: Entry in the address book containing a contact’s contact information
- Contact list: List of contacts displayed
- Index: Index number shown in the displayed contact/appointment list
- Mainstream OS: Windows, Linux, Unix, OS-X
Appendix: Instructions for manual testing
Given below are instructions to test the app manually.
Launch and shutdown
-
Initial launch
-
Download the jar file and copy into an empty folder
-
Double-click the jar file or run
java -jar parentpal.jar.
Expected: Shows the GUI with a set of sample contacts and appointments. The window size may not be optimum.
-
-
Saving window preferences
-
Resize the window to an optimum size. Move the window to a different location. Close the window.
-
Re-launch the app by double-clicking the jar file or run
java -jar parentpal.jar.
Expected: The most recent window size and location is retained.
-
-
Subsequent launch
- Re-launch the app by double-clicking the jar file or run
java -jar parentpal.jar.
Expected: Shows the GUI with data loaded from the json files.
- Re-launch the app by double-clicking the jar file or run
Testing General Features
Help
-
Retrieving a full list of available commands
- Test case:
help
Expected: Help window is opened and full list of available general, address book and appointment book commands are displayed in it.
- Test case:
-
Retrieving information about a specific command
-
Test case:
help find
Expected: Help window is opened and information about thefindcommand is displayed in it. -
Test case:
help find add
Expected: Help window is opened and information about theaddcommand is displayed in it. -
Test case:
help invalid
Expected: Help window is not opened. Error details shown in the status message.
-
Change ParentPal’s theme
-
Changing theme to light theme when dark theme
-
Prerequisites: Set theme to dark by
theme o/dark. -
Test case:
theme o/light
Expected: Theme will change to the light theme. Success message is shown in the status message. -
Test case:
theme o/dark
Expected: Theme will remain in dark theme. Success message is shown in the status message. -
Test case:
theme
Expected: No change to theme. Invalid command format error details shown in the status message. -
Other incorrect sort commands to try:
theme,theme 1,theme aaa,theme o/lol
Expected: Similar to previous. -
Test case:
theme o/dark o/light
Expected: Theme will change to the light theme as last parameter will be taken.
-
-
Change theme to dark theme when light theme
-
Prerequisites: Set theme to light by
theme o/light. -
Test case:
theme o/dark
Expected: Theme will change to dark theme. Success message is shown in the message. -
Test case:
theme o/dark
Expected: Theme will remain in dark theme. Success message is shown in the status message.
-
-
Check that theme is saved successfully after changing theme.
-
Prerequisites: Set theme to light by
theme o/light. -
Exit the application.
-
Open the application again.
-
Expected: Theme is still light.
-
-
Check that help window has same theme as main window.
-
Prerequisites: Set theme to light by
theme o/light. -
Open help window with
helpcommand. -
Expected: Theme of help window is also the light theme.
-
Testing Address Book Features
Add a contact
-
Add a contact while all contacts are being shown
-
Prerequisites: List all contacts using the
listcommand. Multiple contacts in the list. -
Test case:
add n/Alice
Expected: Contact with name ‘Alice’ will be added. Should only see name in the Contact card for Alice in scrolling list. -
Test case:
add n/Alice p/99091109 e/apple@gmail.com
Expected: Contact with name ‘Alice’, phone number ‘99091109’ and email ‘apple@gmail.com’ will be added. -
Test case:
add n/Alice p/99091109 e/apple@gmail.com tc/Anna tc/Bob t/math
Expected: Contact with name ‘Alice’, phone number ‘99091109’ and email ‘apple@gmail.com’, child tags ‘Anna’ and ‘Bob’ and tag ‘math’ will be added.
-
Tag a contact
-
Append tags to a contact
-
Prerequisites: The contacts list are the set of sample contacts as provided when ParentPal is first opened.
-
Input
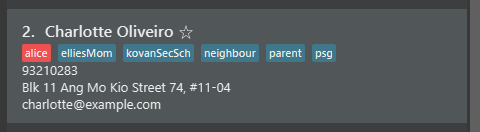
tag 2 tc/alice t/kovanSecSchinto the command box and press enter. Expected: The tags of the second contact (Charlotte Oliveiro) should now include a red ChildTagaliceand the tagkovanSecSchas seen below.
-
-
Replace tags of a contact
-
Prerequisites: The contacts list are the set of sample contacts as provided when ParentPal is first opened.
-
Input
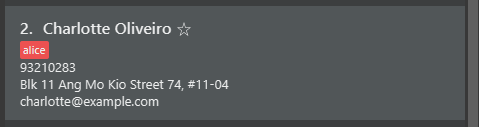
tag 2 o/replace tc/aliceinto the command box and press enter.
Expected: The tags of the second contact (Charlotte Oliveiro) should be entirely replaced with only a red ChildTagaliceas seen below.
-
Clear contacts
-
Clear all contacts while all contacts are being shown
-
Prerequisites: List all contacts using the
listcommand. Multiple contacts in the list. -
Test case:
clear
Expected: All contacts are cleared.
-
Clear by tags
-
Clearing contacts by tag
-
Prerequisites: The contacts list are the set of sample contacts as provided when ParentPal is first opened.
-
Input
clear t/psginto the command box and press enter.
Expected: The contacts with a psg tag, ‘Charlotte Oliveiro’ and ‘Annie Li’ are deleted from the address book.
-
Delete a contact
-
Deleting a contact while all contacts are being shown
-
Prerequisites: List all contacts using the
listcommand. Multiple contacts in the list, with some contacts tagged in appointments. -
Test case:
delete 1(where the 1st contact is not tagged in any appointment)
Expected: 1st contact is deleted from the list. Details of the deleted contact are shown in the status message. -
Test case:
delete 0
Expected: No contact is deleted. Error details shown in the status message. -
Other incorrect delete commands to try:
delete,delete x(where x is larger than the list size).
Expected: Similar to the previous. -
Test case:
delete y(where the contact at index y is tagged in an appointment)
Expected: Contact is not deleted. Error message is shown in status message.
-
Delete multiple contacts
-
Deleting multiple contacts while all contacts are being shown
-
Prerequisites: List all contacts using the
listcommand. Multiple contacts in the list, with some contacts tagged in appointments. -
Test case:
delete 1 2(where the 1st, 2nd contact is not tagged in any appointment)
Expected: 1st, 2nd contact is deleted from the list. Details of the deleted contacts are shown in the status message.
-
Edit a contact
-
Editing optional fields of a contact while all contacts are being shown
-
Prerequisites: List all contacts using the
listcommand. Multiple contacts in the list. Some contacts have optional fields not yet filled in (e.g.phone,email,address), and some have optional fields already filled in. -
Test case:
edit x e/johndoe@example.com(where contact at index x does not have optional email filled in yet)
Expected: Contact at index x is edited to have emailjohndoe@example.com. Details of edited contact is shown in status message. -
Test case:
edit y p/(where contact at index y already has optional phone filled in)
Expected: Contact at index x is edited to have its optional phone field removed. Details of edited contact is shown in status message.
-
-
Editing name of a contact involved in an appointment.
-
Prerequisites: List all contacts using the
listcommand. Second contact is tagged in at least one appointment. -
Test case:
edit 2 n/Annie
Expected: Second contact in the list is edited to have nameAnnie. Details of edited contact is shown in status message. Appointments that have been tagged with the second contact will have their respective contact tags updated toAnnie.
-
Find contacts
-
Find contacts with given option
-
Prerequisites: There is at least an existing contact that fit the search criteria.
-
Test case:
find Alice Bob
Expected: Returns all contacts which contains ‘Alice’ or ‘Bob’ in any of its fields -
Test case:
find o/name Alice
Expected: Returns all contacts whose name contains ‘Alice’. -
Test case:
find o/phone 123
Expected: Returns all contacts whose phone number contains ‘123’.
-
Sort contacts
-
Sorting contacts while all contacts are being shown
-
Prerequisites: List all contacts using the
listcommand. Multiple contacts in the list. -
Test case:
sort o/name
Expected: List of contacts get sorted in alphabetical order. Success message is shown in the status message. -
Test case:
sort o/date
Expected: List of contacts get sorted in chronological order. Success message is shown in the status message. -
Test case:
sort
Expected: List does not get sorted. Invalid command format error details shown in the status message. -
Other incorrect sort commands to try:
sort,sort 1,sort aaa
Expected: Similar to previous. -
Test case:
sort o/jskdnks
Expected: List does not get sorted. Invalid option error details shown in the status message.
-
-
Sorting contacts on a found list
-
Prerequisites: Multiple contacts in the list sharing a keyword. Find contacts related to keyword using the
findcommand. -
Test case:
sort o/name
Expected: Found list of contacts get sorted in alphabetical order. Executing thelistcommand after this should show the full contact list in alphabetical order. -
Test case:
sort o/date
Expected: Found list of contacts get sorted in chronological order. Executing thelistcommand after this should show the full contact list in chronological order.
-
Favourite a contact
-
Favourite a contact while all contacts are being shown
-
Prerequisites: List all contacts using the
listcommand. -
Test case:
fav 1
Expected: First contact in the list is favourited. Details of favourited contact is shown in status message. The star next to the first contact’s name becomes filled. -
Test case:
fav 1 o/remove
Expected: First contact in the list is unfavourited. Details of unfavourited contact is shown in status message. The star next to the first contact’s name becomes empty. -
Test case:
fav
Expected: Invalid command format error details shown in the status message. -
Other incorrect sort commands to try:
fav
Expected: Similar to previous. -
Test case:
fav aaaExpected: Invalid index error details shown in the status message. -
Other incorrect sort commands to try:
fav x(where x is larger than list size)
Expected: Similar to previous. -
Test case:
fav 1 o/jskdnks
Expected: Invalid option error details shown in the status message.
-
-
Favourite a contact while a found list is being shown
-
Prerequisites: Multiple contacts in the list sharing a keyword. Find contacts related to keyword using the
findcommand. -
Test case:
fav 2
Expected: Second contact in the list is favourited. Details of favourited contact is shown in status message. The star next to the second contact’s name becomes filled. -
Test case:
fav 1 o/remove
Expected: First contact in the list is unfavourited. Details of unfavourited contact is shown in status message. The star next to the first contact’s name becomes empty.
-
List all contacts
-
List all contacts
-
Prerequisites: Multiple contacts in the list.
-
Test case:
listExpected: Full list of contacts will be displayed. Success message is shown in the status message. -
Test case:
list ajkndskjnExpected: Invalid command format error details shown in the status message.
-
-
List favourited contacts
-
Prerequisites: Multiple contacts in the list, some being favourited contacts.
-
Test case:
list o/favExpected: List of favourited contacts will be displayed. Success message is shown in the status message. -
Test case:
list o/randomExpected: Invalid option error details shown in the status message.
-
Testing Appointment Book Features
Add an appointment
-
Adding an appointment
-
Test case:
addAppt n/PTM a/ABC Pri Sch d/21/05/2021 10:00 tc/alice, where an appointment named “PTM” does not already exist
Expected: A new appointment named “PTM” is created. The date of the appointment is 21/05/2021 10:00, the address is “ABC Pri Sch” and the appointment is tagged with the child tag “alice”. -
Test case:
addAppt n/PTM a/ABC Pri Sch d/21/05/2021 10:00 tc/alice, where an appointment named “PTM” that occurs on 21/05/2021 10:00 at ABC Pri Sch already exists
Expected: No appointment is added. Error details shown in the status message. -
Test case:
addAppt n/PTM
Expected: No appointment is added. Error details shown in the status message.
-
Delete an appointment
-
Deleting a appointment while all contacts are being shown
-
Prerequisites: List all appointments using the
listApptcommand. Multiple appointments in the list. -
Test case:
delete 1
Expected: 1st appointment is deleted from the list. Details of the deleted appointment are shown in the status message. -
Test case:
delete 0
Expected: No appointment is deleted. Error details shown in the status message. -
Other incorrect delete commands to try:
delete,delete x(where x is larger than the list size).
Expected: Similar to the previous.
-
Find appointments
-
Find appointments with given option
-
Prerequisites: There is at least an existing appointment that fit the search criteria.
-
Test case:
findAppt Alice meeting
Expected: Returns all appointments which contains ‘Alice’ or ‘meeting’ in any of its fields -
Test case:
findAppt o/name meeting
Expected: Returns all appointments with name containing ‘meeting’. -
Test case:
findAppt o/address jurong
Expected: Returns all appointments with address containing ‘jurong’.
-
Edit an appointment
-
Edit all fields
-
Prerequisites: There is an existing appointment and existing contact in ParentPal.
-
Input
editAppt 1 n/Math Tuition a/Sunshine Tuition Center d/20/10/2021 13:00 c/1 tc/aliceand press enter.
Expected: The first appointment is edited to the fields specified.
-
Saving data
-
Dealing with missing data files
-
Prerequisites: some commands that triggers saving data have been performed.
-
Delete the
addressbook.jsonandappointmentbook.jsonfiles found in the directory[JAR file location]/data. -
Re-launch the app by double-clicking the jar file or run
java -jar parentpal.jar.
Expected: The app launches with the sample contacts and appointments.
-
-
Dealing with corrupted address book data
-
Prerequisites: some commands that triggers saving data have been performed.
-
Open the
addressbook.jsonfile with a text editor found at[JAR file location]/data/addressbook.json. -
Make some changes to corrupt the file such as deleting a line or adding a nonsense line such as
aaaaaaaato the middle of the file. -
Re-launch the app by double-clicking the jar file or run
java -jar parentpal.jar.
Expected: The app launches with the appointments loading correctly, and an empty contacts list.
-
-
Dealing with corrupted appointment book data
-
Prerequisites: some commands that triggers saving data have been performed.
-
Open the
appointmentbook.jsonfile with a text editor found at[JAR file location]/data/appointmentbook.json. -
Make some changes to corrupt the file such as deleting a line or adding a nonsense line such as
aaaaaaaato the middle of the file. -
Re-launch the app by double-clicking the jar file or run
java -jar parentpal.jar.
Expected: The app launches with the contacts loading correctly, and an empty appointments list.
-