User Guide
Welcome to the User Guide for ParentPal! This guide aims to help users in navigating and using ParentPal.
Are you a parent whose phone’s contact book is filling up with the contacts of teachers? Do you have trouble remembering who exactly that contact in your address book is referring to? Do you have multiple children and want a centralised place to keep track of all their activities? Then ParentPal could be the app for you!
ParentPal is a desktop application that helps busy parents manage their children’s contacts and related appointments, optimized for use via a Command Line Interface (CLI) while still having the benefits of a Graphical User Interface (GUI). If you can type fast, ParentPal can get your contact management tasks done faster than traditional GUI apps.
Want to get started with ParentPal? Jump right into the Quick Start guide here.
Table of Contents
- Using this Guide
- Quick start
- Interface of ParentPal
- Command Parameters
- Features
- Managing ParentPal Data
- FAQ
- Command Summary
- Glossary
Using this Guide
COMMAND : If you see words formatted in monospace like this, it represents a command or part of a command.
Interface : If you see italicized words, it represents a part of the ParentPal GUI. See Interface of ParentPal for more information.
Quick start
-
Ensure you have Java 11 or above installed on your computer. To install Java, you can view the guide here.
-
Download the latest parentpal.jar from here.
-
Copy the parentpal.jar file to the folder you want to use as the home folder for your ParentPal.
-
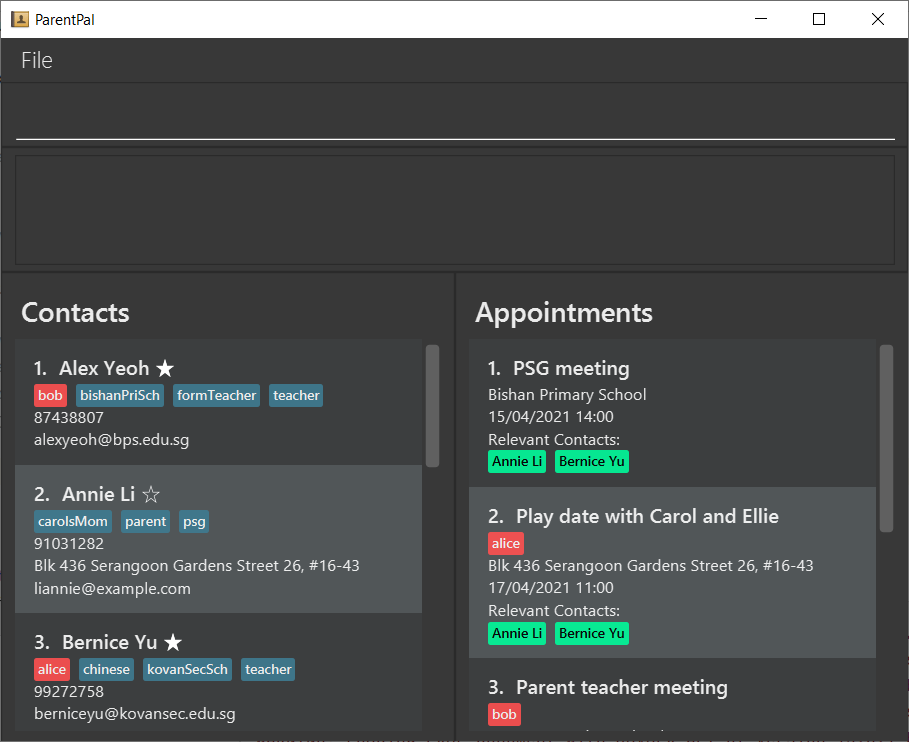
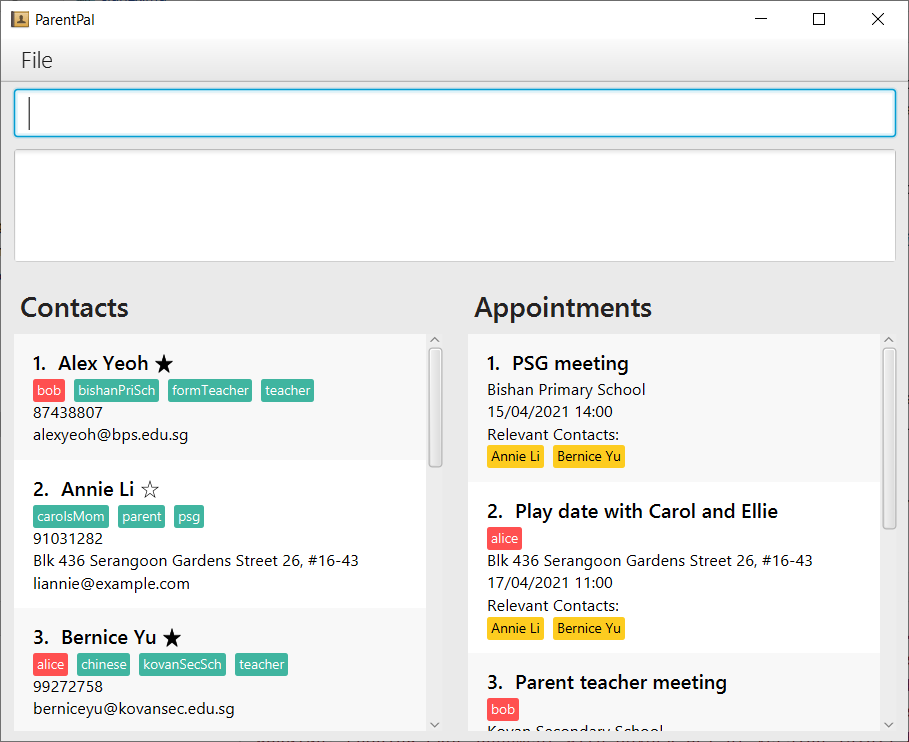
Double-click the file to start the app. The GUI similar to the below image should appear in a few seconds. Note how the app contains some sample data.
-
Type a command in the command box and press Enter to execute it. e.g. typing
helpand pressing Enter will open the help window.
Some example commands you can try:-
list: Lists all contacts. -
add n/John Doe p/98765432 e/johnd@example.com a/Smith Street, Block 123, #01-01: Adds a contact namedJohn Doeto the Contact List. -
delete 3: Deletes the 3rd contact shown in the Contact List. -
clear: Deletes all contacts. -
exit: Exits ParentPal.
-
-
Refer to the Features section for details of each command.
Interface of ParentPal
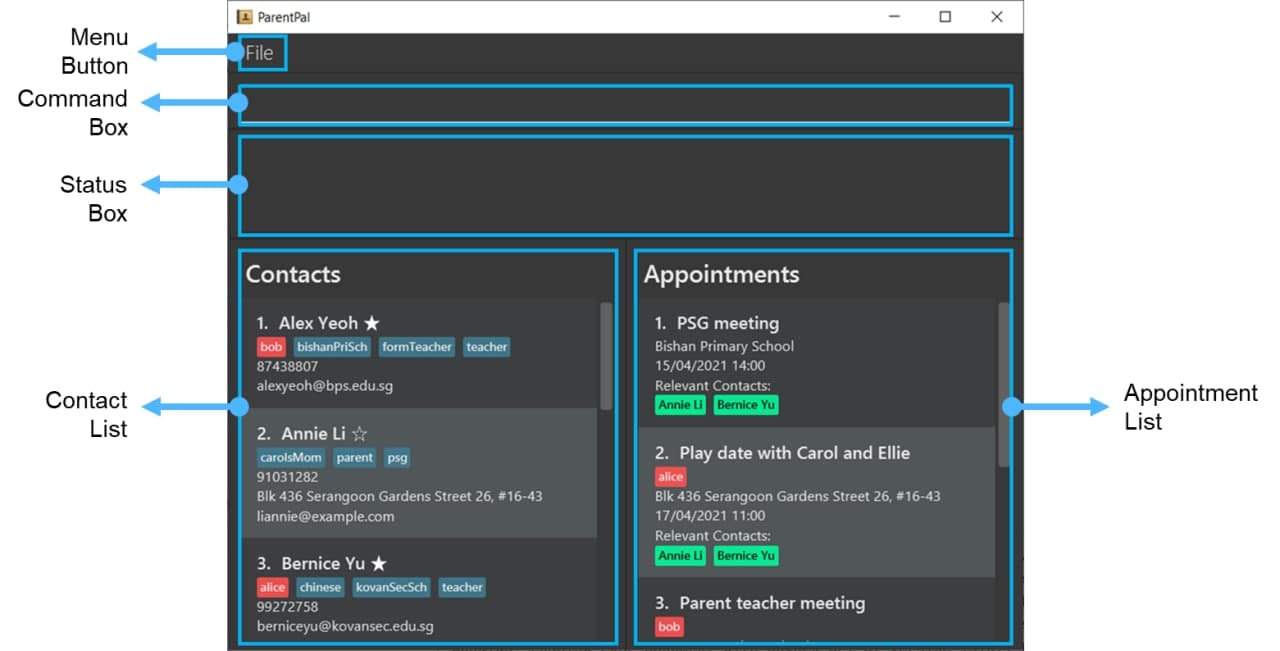
-
Menu Button
- Click to see an option to exit.
-
Command Box
- ParentPal makes it easy for you to manage your contacts and appointments with a single command.
- Type the command into the command box, and press Enter to execute it.
- Should an error occur, an error message will be displayed in the status box.
-
Status Box
- Displays success message or error message.
-
Contact List
- Scroll to view all of your contacts.
- By default, the Contact List is sorted by the order in which they were added. See
sortfor how you can change the order of the contacts.
-
Appointment List
- Scroll to view all of your appointments.
- By default, the Appointment List is sorted chronologically, ie. by the date and time of the appointment, see Appointments below. ParentPal currently does not support sorting appointments in other ways.
Contacts
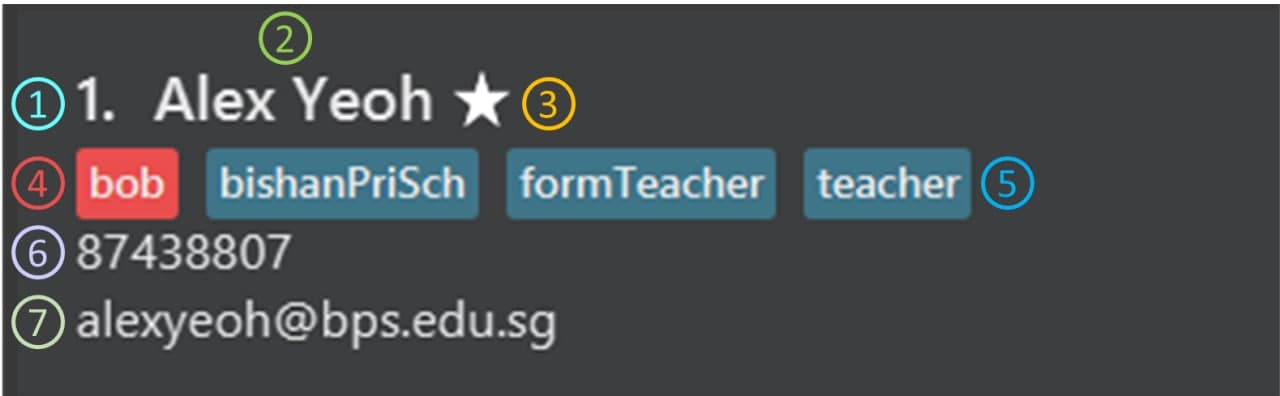
- Index
- Name
-
Favourite Icon
- The star will be filled if the contact is favourited as shown above.
It will be empty if the contact is not favourited. See
favfor how you can favourite and unfavourite contacts.
- The star will be filled if the contact is favourited as shown above.
It will be empty if the contact is not favourited. See
- Child Tag
- Tag
- Phone Number
Appointments

-
Index
- The index is mutable, and it changes depending on the settings for the Appointment List.
- For example, the Appointment List can be filtered by different commands, see
findAppt.
- Name
- Child Tag
- Address
- Date and Time
- Contacts
Expired appointments
ParentPal helps you to manage your expired appointments by colouring them red, once expired.
Command Parameters
The table below provides descriptions for all the parameters used by ParentPal commands.
| Parameter | Description | Example |
|---|---|---|
OPTION |
Specifies the options to be applied to a command | You can type name as an option to the find command to specify you wish to filter the Contact List by name. |
INDEX |
The index number of a contact or appointment shown in the Contact List or Appointment List. It must be a positive number. |
You can type 1 to refer to the first contact in the Contact List or first appointment in the Appointment List. |
COMMAND |
The name of a command. | You can type add as a command name to use with help. See Command Summary for a full list of command names. |
NAME |
The name of a contact or appointment. | You can type Betsy Crowe as the name for a contact or Parent Teacher Meeting as the name for an appointment. |
ADDRESS |
The address or location of a contact or appointment. | You can use ABC Primary School to represent the address of a contact or an appointment. |
PHONE |
The contact number of a contact. It should contain only numbers and be at least 3 digits long. |
You can type 91234567 to represent the phone number of a contact. |
EMAIL |
The email address of a contact. It must be a valid email. |
You can type betsycrowe@example.com to represent the email of a contact. |
TAG |
The tag you want to attach to a contact. | You can type form teacher to tag this additional information to a contact. |
CHILD_TAG |
The child tag you want to attach to a contact or appointment. | You can tag a contact or appointment with Alice to signify it is related to you child Alice. |
KEYWORD |
A keyword you want to search for. | You can type betsy as a keyword to search for the word ‘betsy’. See find and findAppt for more information. |
CONTACT_INDEX |
The index number of a contact in the Contact List. It must be a positive number. |
You can type 1 to refer to the first contact in the Contact List. |
Features
![]() Notes about the command format:
Notes about the command format:
-
Words in
UPPER_CASEare the parameters to be supplied by the user. See Command Parameters above.
e.g. inadd n/NAME,NAMEis a parameter which can be used asadd n/John Doe. -
Items in square brackets are optional.
e.gn/NAME [t/TAG]can be used asn/John Doe t/friendor asn/John Doe. -
Items with
… after them can be used multiple times including zero times.
e.g.[t/TAG]…can be used ast/friend,t/friend t/familyetc. -
Parameters can be in any order.
e.g. if the command specifiesn/NAME p/PHONE,p/PHONE n/NAMEis also acceptable. -
If a parameter is expected only once in the command but you specified it multiple times, only the last occurrence of the parameter will be taken.
e.g. if you specifyp/12341234 p/56785678, onlyp/56785678will be taken. -
Extraneous parameters for commands that do not take in parameters (such as
exit) will be ignored.
e.g. if the command specifiesexit 123, it will be interpreted asexit.
This section is separated into the following sub-sections:
- General Commands: Commands related to managing ParentPal itself
- Address Book Commands: Commands related to managing contacts
- Appointment Book Commands: Commands related to managing appointments
The command summary table can also be accessed here.
General Commands
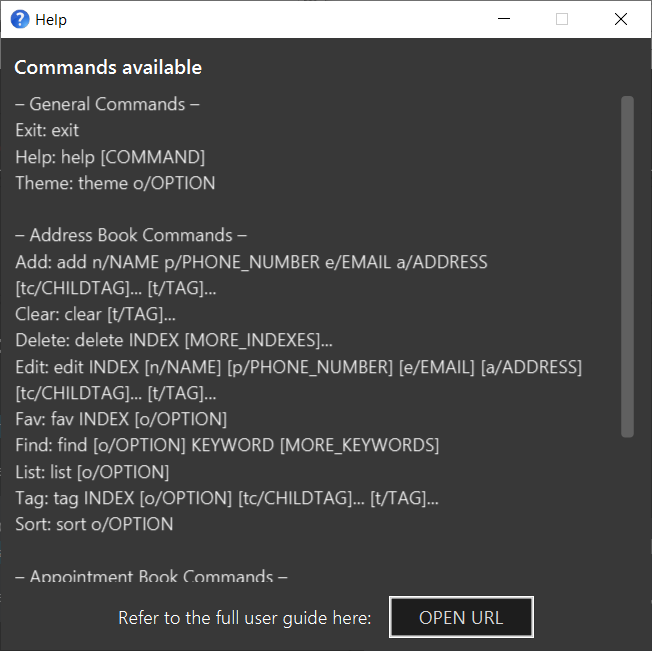
Viewing help : help
Shows information about available commands and how they can be used.
Format: help [COMMAND]
- If command is not specified, a summary of all available commands will be displayed, along with a link to access the full user guide.
- Click the ‘OPEN URL’ button to open the full user guide.
- If command is specified, detailed information about the command will be displayed.
- If multiple commands are specified, only the last command will be taken.
Example 1
Let’s say you are unsure about the commands that ParentPal offers. You can follow the steps below to view a help window.
Steps:
- Type
helpin the Command Box. - Press Enter to execute.
Outcome:
- The Status Box will show a success message.
- A help window with details of all commands will open.
Example 2
Let’s say that you want to view more details about the add command.
You can follow the steps below to view a help window for the add command.
Steps:
- Type
help addin the Command Box. - Press Enter to execute.
Outcome:
- The Status Box will show a success message.
- A help window with details of the
addcommand will open.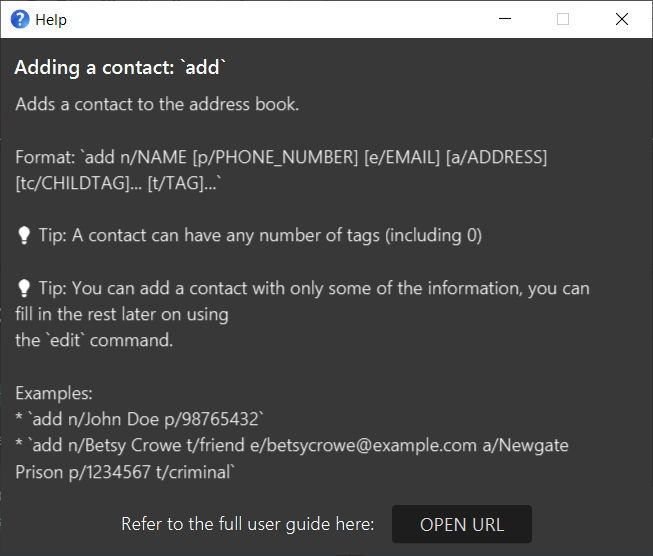
Exiting the program : exit
Exits the program.
Format: exit
Example 1
Let’s say you are done with ParentPal and would like to close the application. You can follow the steps below to close ParentPal.
Steps:
- Type
exitin the Command Box. - Press Enter to execute.
Outcome:
- ParentPal closes.
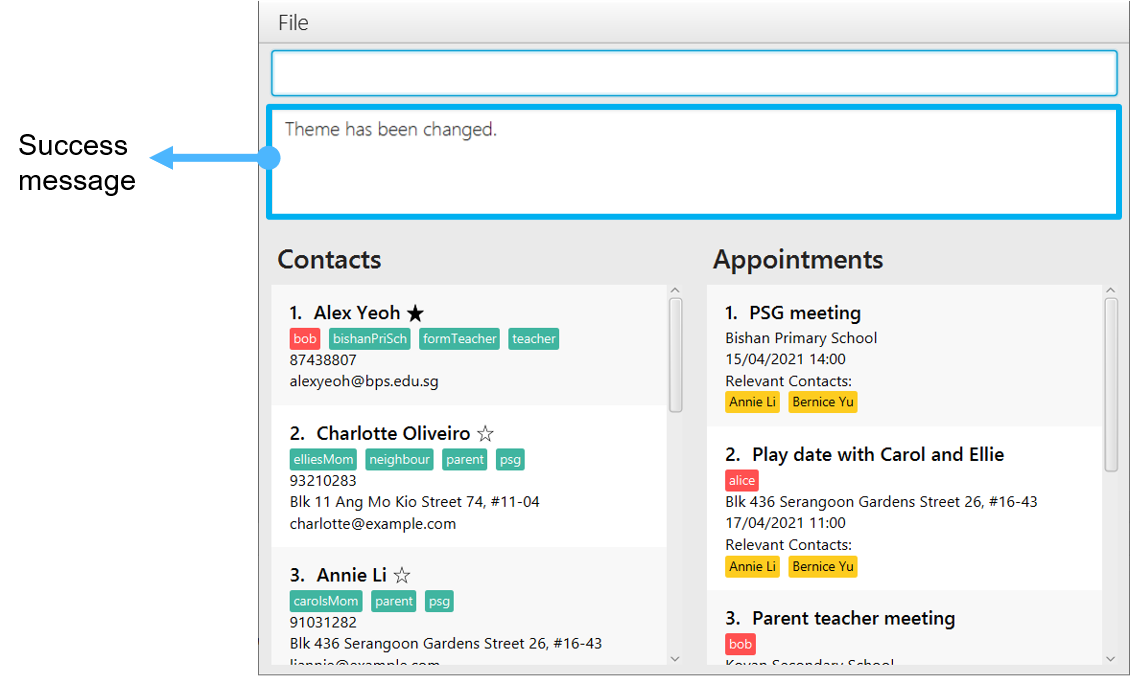
Changing ParentPal’s theme : theme
Changes the theme of ParentPal.
Format: theme o/OPTION
Current available options for the OPTION field include:
| Option | Description |
|---|---|
light |
Sets ParentPal to light theme |
dark |
Sets ParentPal to dark theme |
Light theme:
Dark theme:
Example 1
Let’s say you would like to try ParentPal’s light theme. You can follow the steps below to change ParentPal to the light theme.
Steps:
- Type
theme o/lightin the Command Box. - Press Enter to execute.
Outcome:
- The Status Box will show a success message.
- ParentPal will change to the light theme.
Address Book Commands
Adding a contact: add
Adds a contact to the address book.
Format: add n/NAME [p/PHONE] [e/EMAIL] [a/ADDRESS] [tc/CHILD_TAG]… [t/TAG]…
Example 1
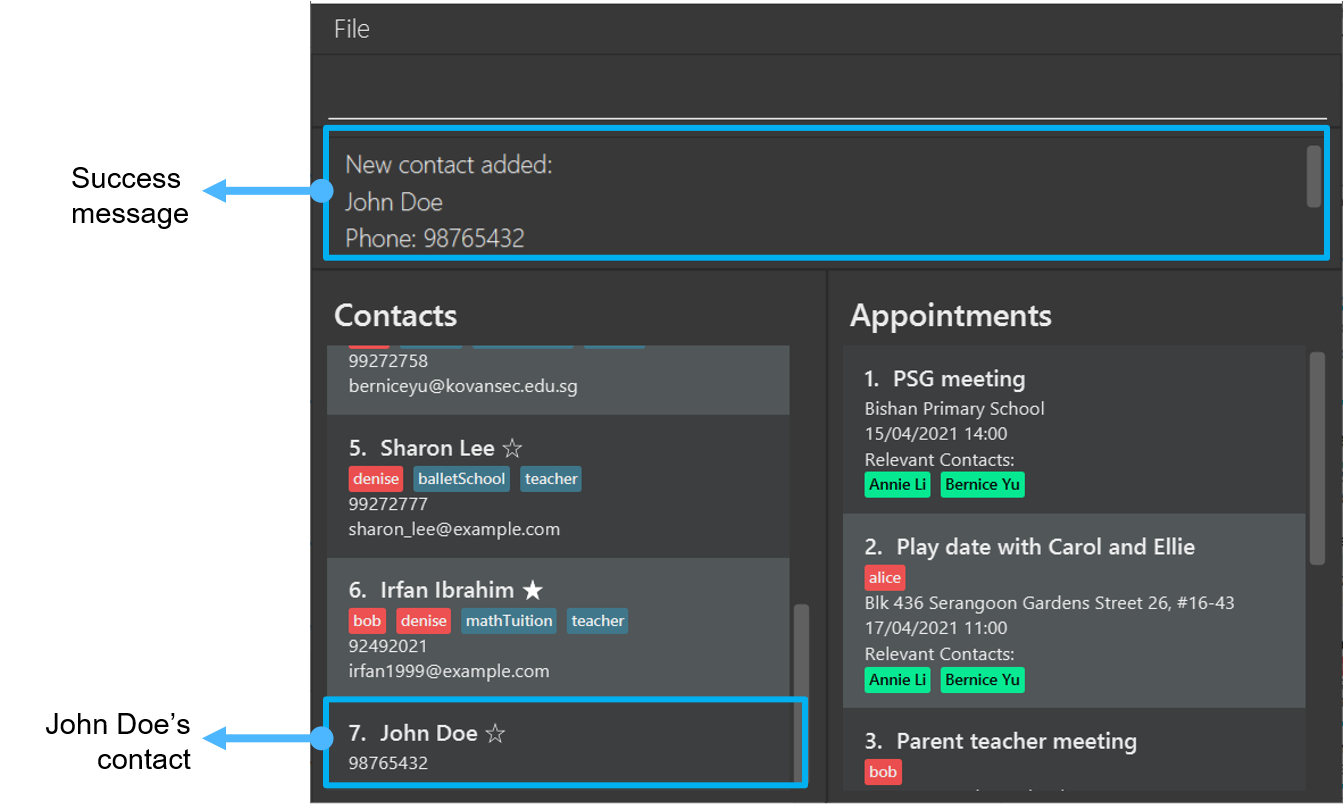
Let’s say you want to add a contact, but you only know his phone number. You can follow the steps below to add the contact with incomplete fields.
Steps:
- Type
add n/John Doe p/98765432in the Command Box. - Press Enter to execute.
Outcome:
- The Status Box will show a success message.
- John Doe’s contact will appear in the Contact List.
Example 2
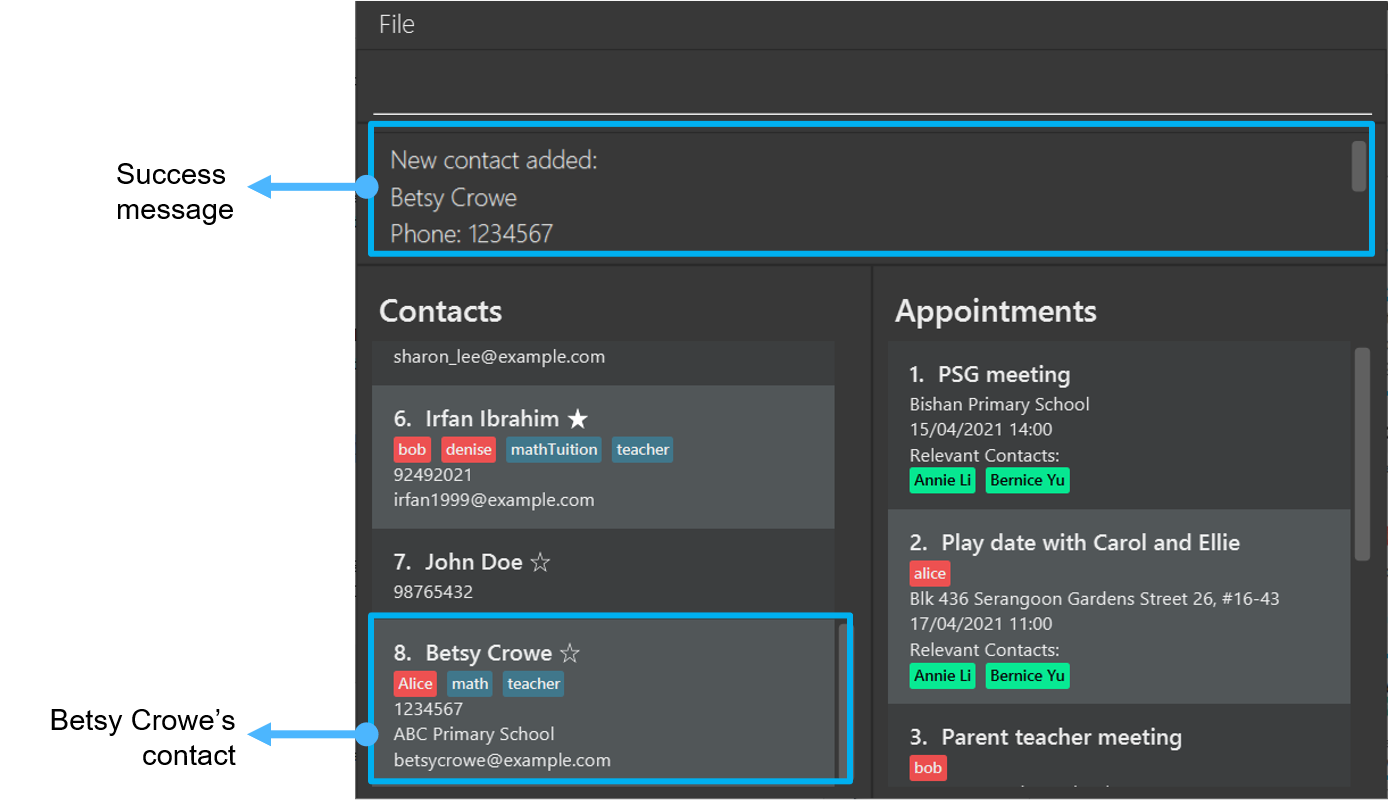
Let’s say you want to add contact of your child’s math teacher, and you have all her details. You can follow the steps below to add the contact with complete fields.
Steps:
- Type
add n/Betsy Crowe e/betsycrowe@example.com a/ABC Primary School p/1234567 t/teacher t/math tc/Alicein the Command Box. - Press Enter to execute.
Outcome:
- The Status Box will show a success message.
- Betsy Crowe’s contact will appear in the Contact List.
Deleting a contact : delete
Deletes the specified contact(s) from the address book.
Format: delete INDEX [MORE_INDEXES]…
- Deletes the contact at the specified
INDEXor multipleINDEXES. - The index refers to the index number shown in the displayed Contact List.
- Indexes must be positive integers: ie. 1, 2, 3, …
- If deleting multiple contacts by multiple indexes, the indexes must be separated by a whitespace and must all be valid.
Example 1
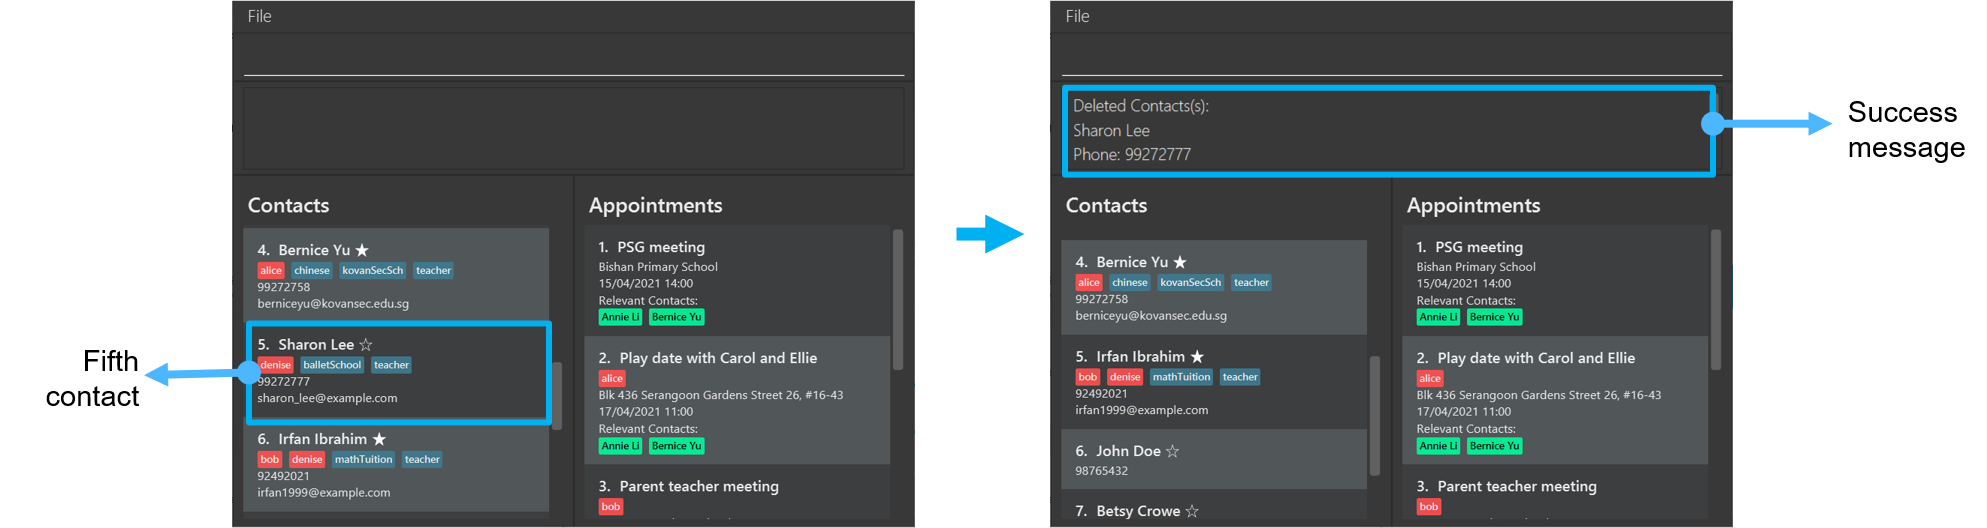
Let’s say you want to delete the fifth contact in the Contact List. You can follow the steps below to do so.
Steps:
- Type
delete 5in the Command Box. - Press Enter to execute.
Outcome:
- The Status Box will show a success message.
- The fifth contact will disappear from the Contact List.
Example 2
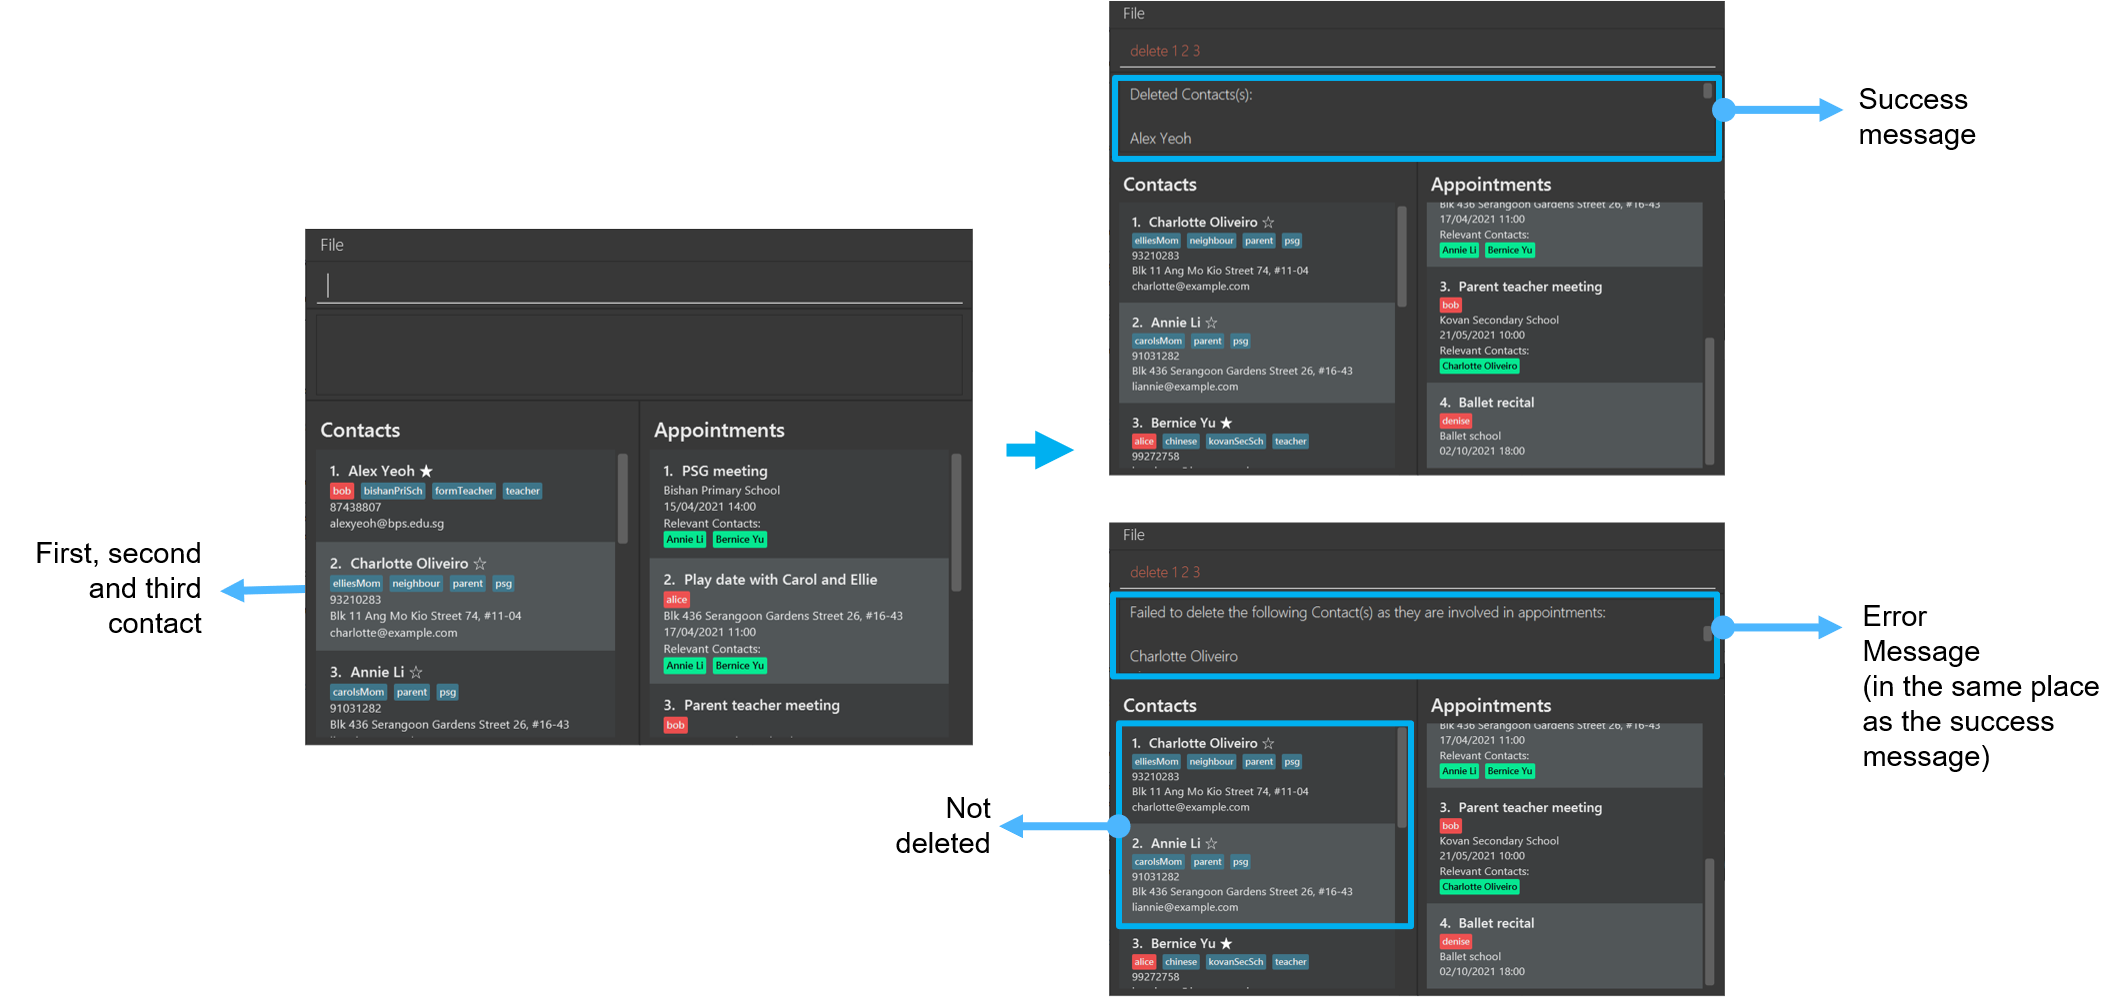
Let’s say you want to delete multiple contacts at once (for example, the first three contacts), you can follow the steps below to do so.
Steps:
- Type
delete 1 2 3in the Command Box. - Press enter to execute.
Outcome:
- The Status Box will show a success message. If any of the contacts you are trying to delete is involved in an appointment, the Status Box will show an error message to notify you on which contacts were successfully deleted, and which failed to delete.
- The successfully deleted contacts will disappear from the Contact List, but contacts with appointments will remain in the Contact List.
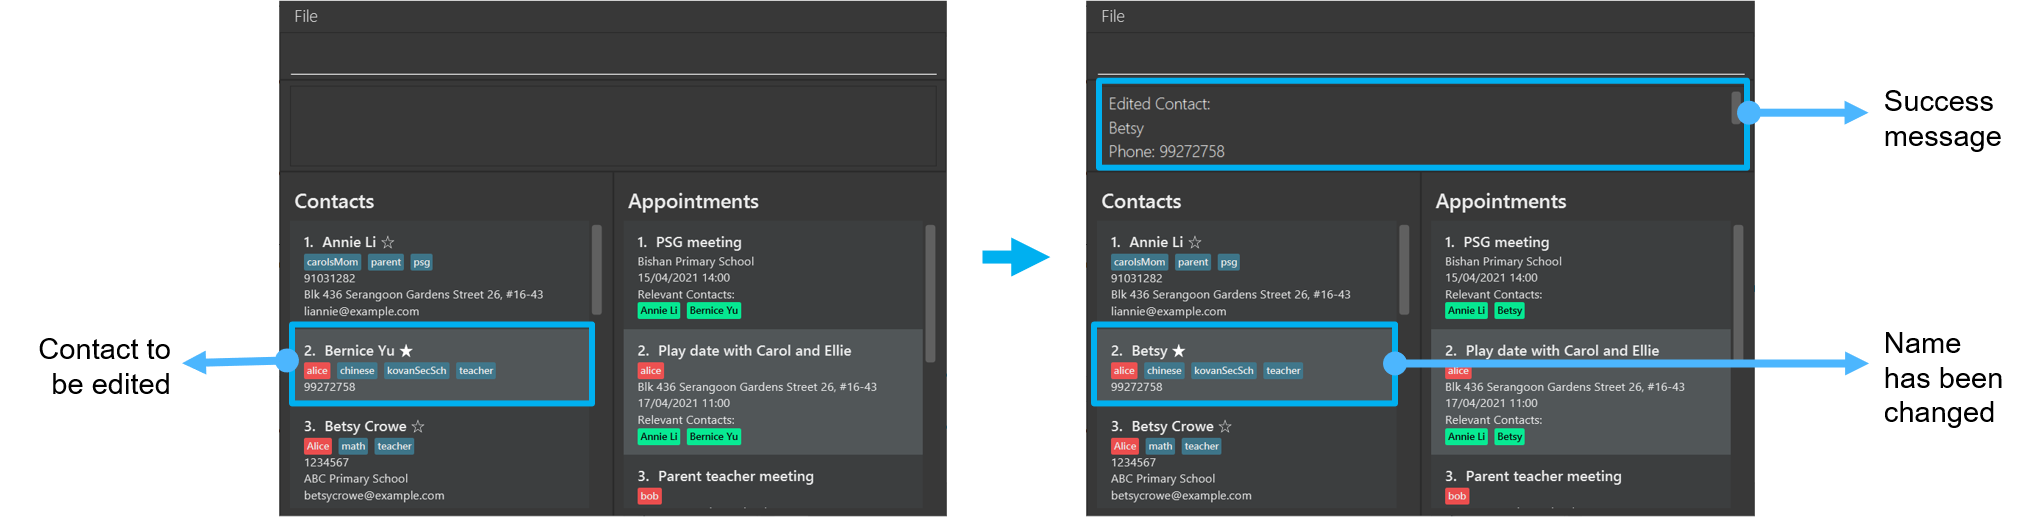
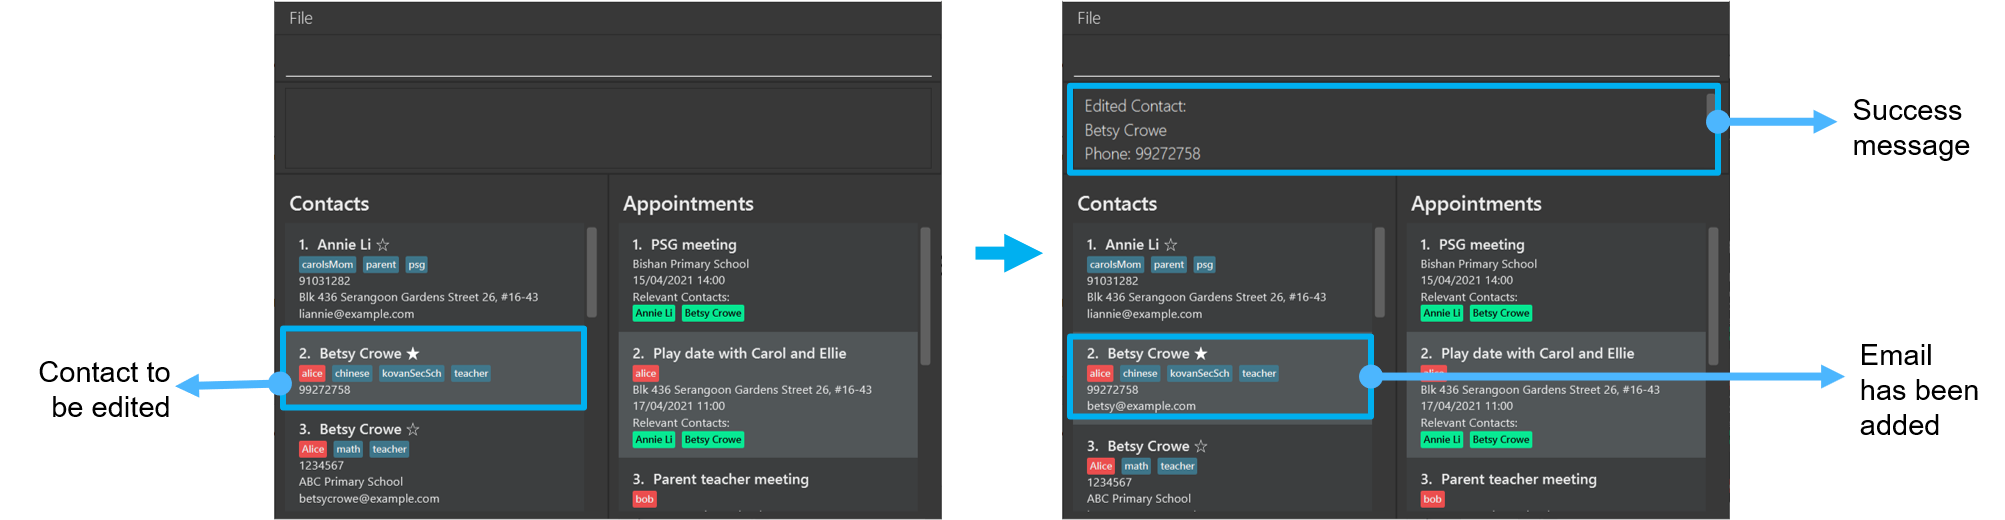
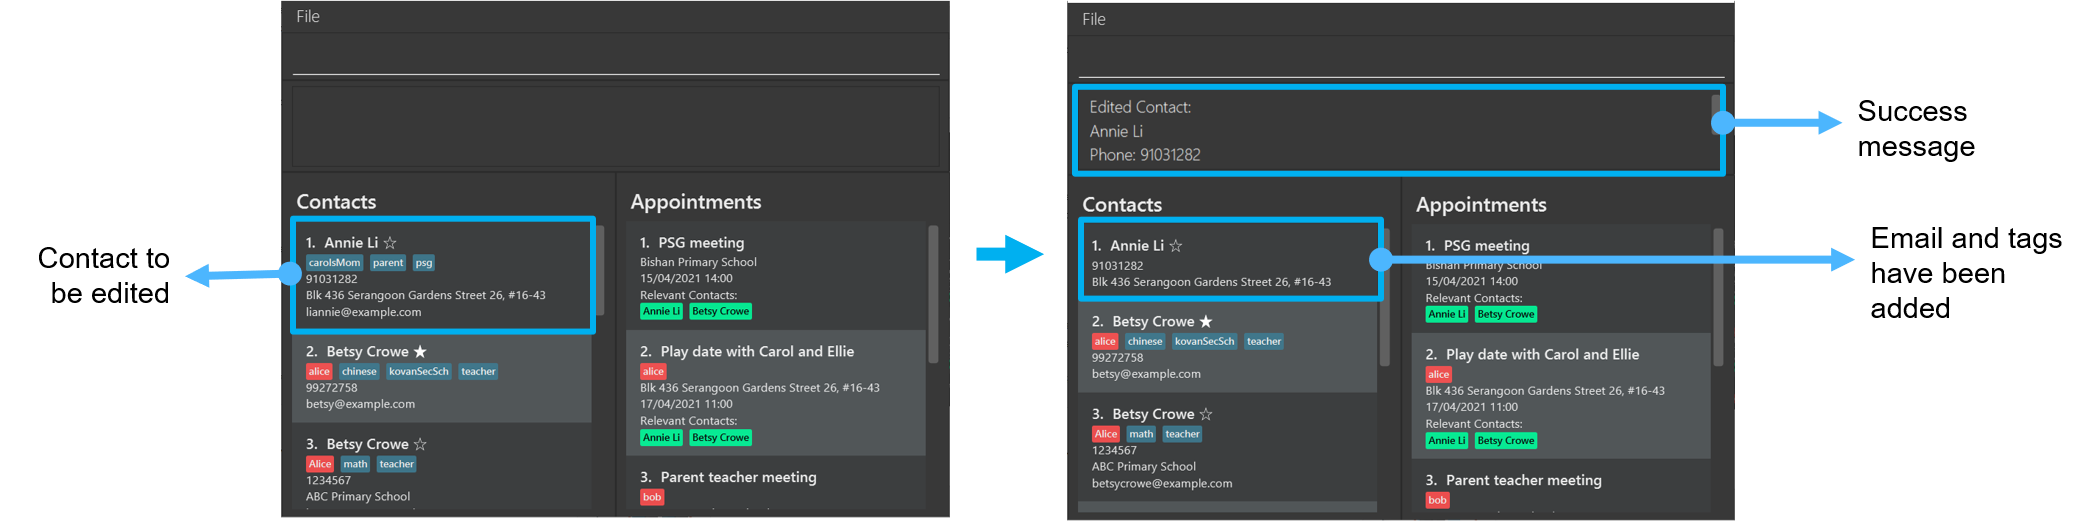
Editing a contact : edit
Edits an existing contact in the address book.
Format: edit INDEX [n/NAME] [p/PHONE] [e/EMAIL] [a/ADDRESS] [tc/CHILD_TAG]… [t/TAG]…
- Edits the contact at the specified
INDEX. - The index refers to the index number shown in the displayed Contact List.
- The index must be a positive integer 1, 2, 3, …
- At least one of the optional fields must be provided.
- Existing values will be updated to the input values.
- You can remove the optional fields (phone, email and address) by typing
p/,e/ora/without specifying any phone, email or address after it. - You can remove all the contact’s tags by typing
t/ortc/without specifying any tags after it. Note: both regular tags and child tags will be removed in both situations.
tag command.
Example 1
Let’s say you want to edit the name of the second contact. You can follow the steps below to do so.
Steps:
- Type
edit 2 n/Betsyin the Command Box. - Press Enter to execute.
Outcome:
- The Status Box will show a success message.
- The name of the second contact has been replaced with ‘Betsy’.
Example 2
Let’s say you have added the second contact, but you did not include any email during the adding process. You can follow the steps below to add an email to the first contact.
Steps:
- Type
edit 2 e/betsy@example.comin the Command Box. - Press Enter to execute.
Outcome:
- The Status Box will show a success message.
- The email of the second contact has been added as ‘betsy@example.com’.
Example 3
Let’s say you want to remove some fields like the email and tags of the first contact. You can follow the steps below to do so.
Steps:
- Type
edit 1 t/ e/in the Command Box. - Press Enter to execute.
Outcome:
- The Status Box will show a success message.
- The email and tags field of the first contact has been removed, and you can no longer see it in the contact details of the first contact.
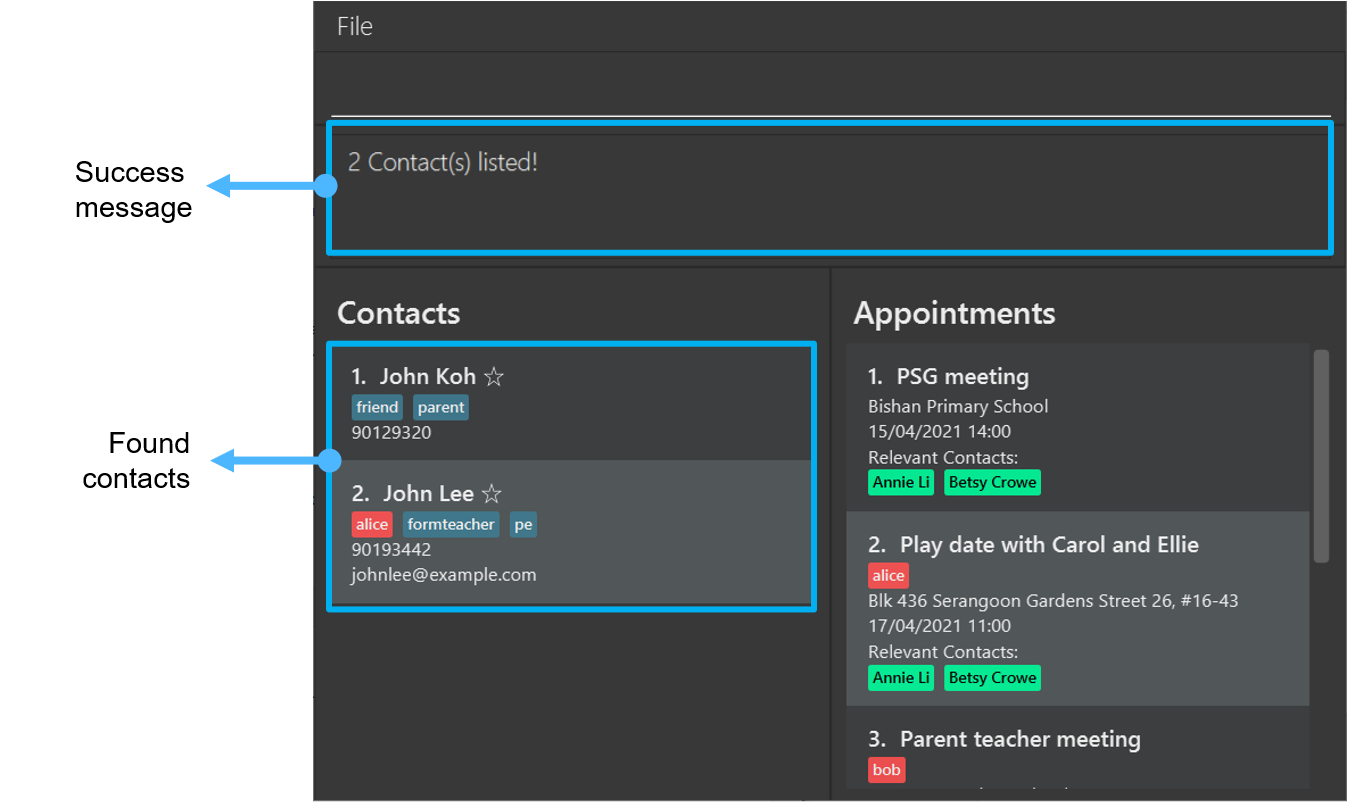
Finding contacts: find
Find contacts based on the given option.
If no options are specified, all of a contact’s fields will be searched and any keyword matches in any one of the fields will display that contact.
Format: find [o/OPTION] KEYWORD [MORE_KEYWORDS]…
Current available options for the [OPTION] field include:
| Option | Description |
|---|---|
name |
Finds by the name of the contact |
address |
Finds by the address of the contact |
phone |
Finds by the phone number of the contact |
email |
Finds by the email of the contact |
tag |
Finds by the tags of the contact (only exact tags will be matched) |
tag option t/ needs to be placed in front of the tag
you are searching for. Also, note that only exact matches will be returned for find by tag.Example:
find o/tag t/first t/second
- The search is case-insensitive. e.g
alexwill matchALEX. - The order of the keywords does not matter. e.g.
john doewill matchdoe john. - Incomplete words will also be matched e.g.
Alewill matchAlex. - Contacts with any field matching at least one keyword will be returned (i.e.
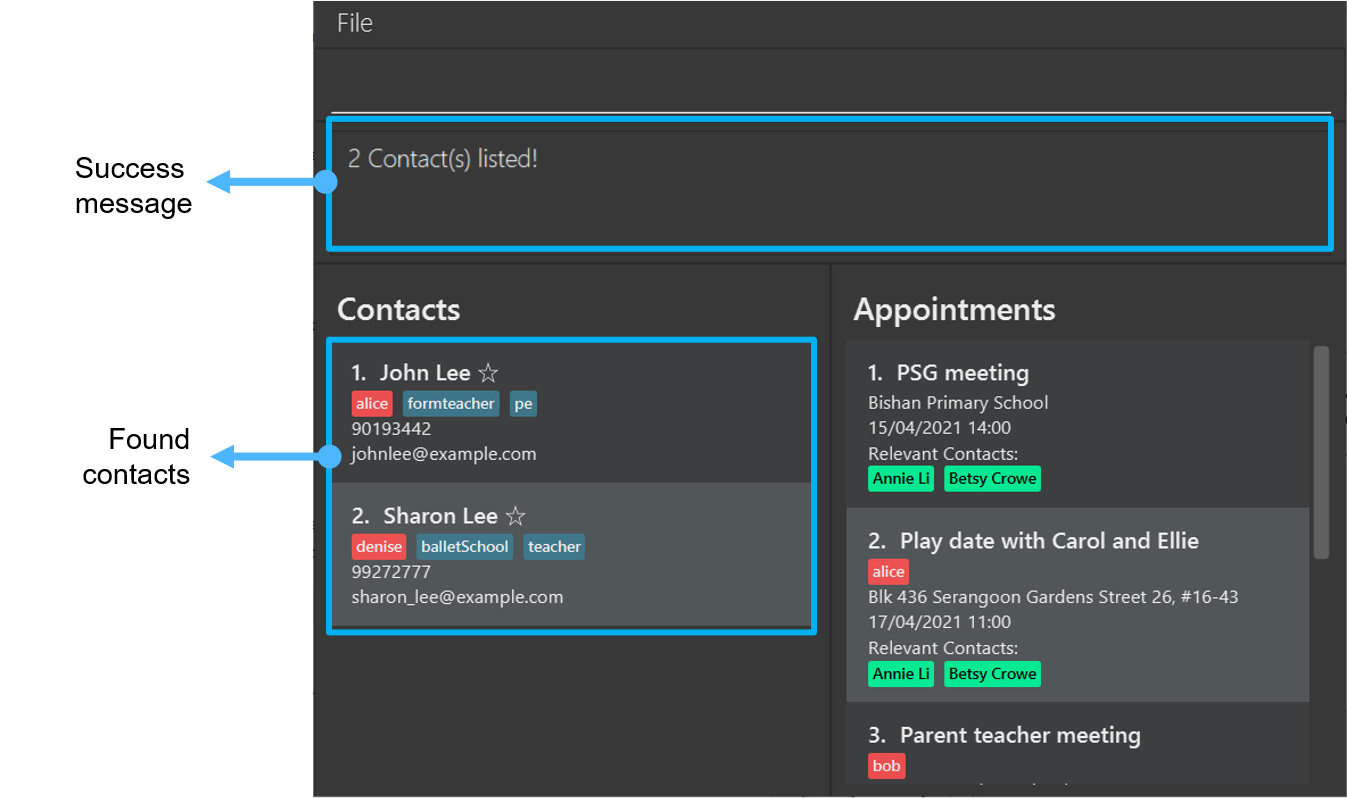
ORsearch) e.g.Alex Davidwill returnAlex Yeoh,David Li. - If n contacts can be found, message “n Contact(s) listed!” will be displayed e.g. when 0 results are found, “0 Contact(s) listed!” is displayed.
Example 1
Let’s say you want to find all the contacts in your address book named John. You can follow the steps below to do so.
Steps:
- Type
find o/name Johnin the Command Box. - Press Enter to execute.
Outcome:
- The Status Box will show a success message.
- All the contacts whose name contains the word ‘john’ will be displayed in the Contact List.
Example 2
Let’s say you only remember that a contact has the word ‘lee’ in his name or email. You find contacts with any of their fields containing the word ‘lee’ by following the steps below.
Steps:
- Type
find leein the Command Box. - Press Enter to execute.
Outcome:
- The Status Box will show a success message.
- All the contacts with any of their fields containing the word ‘lee’ will be displayed in the Contact List.
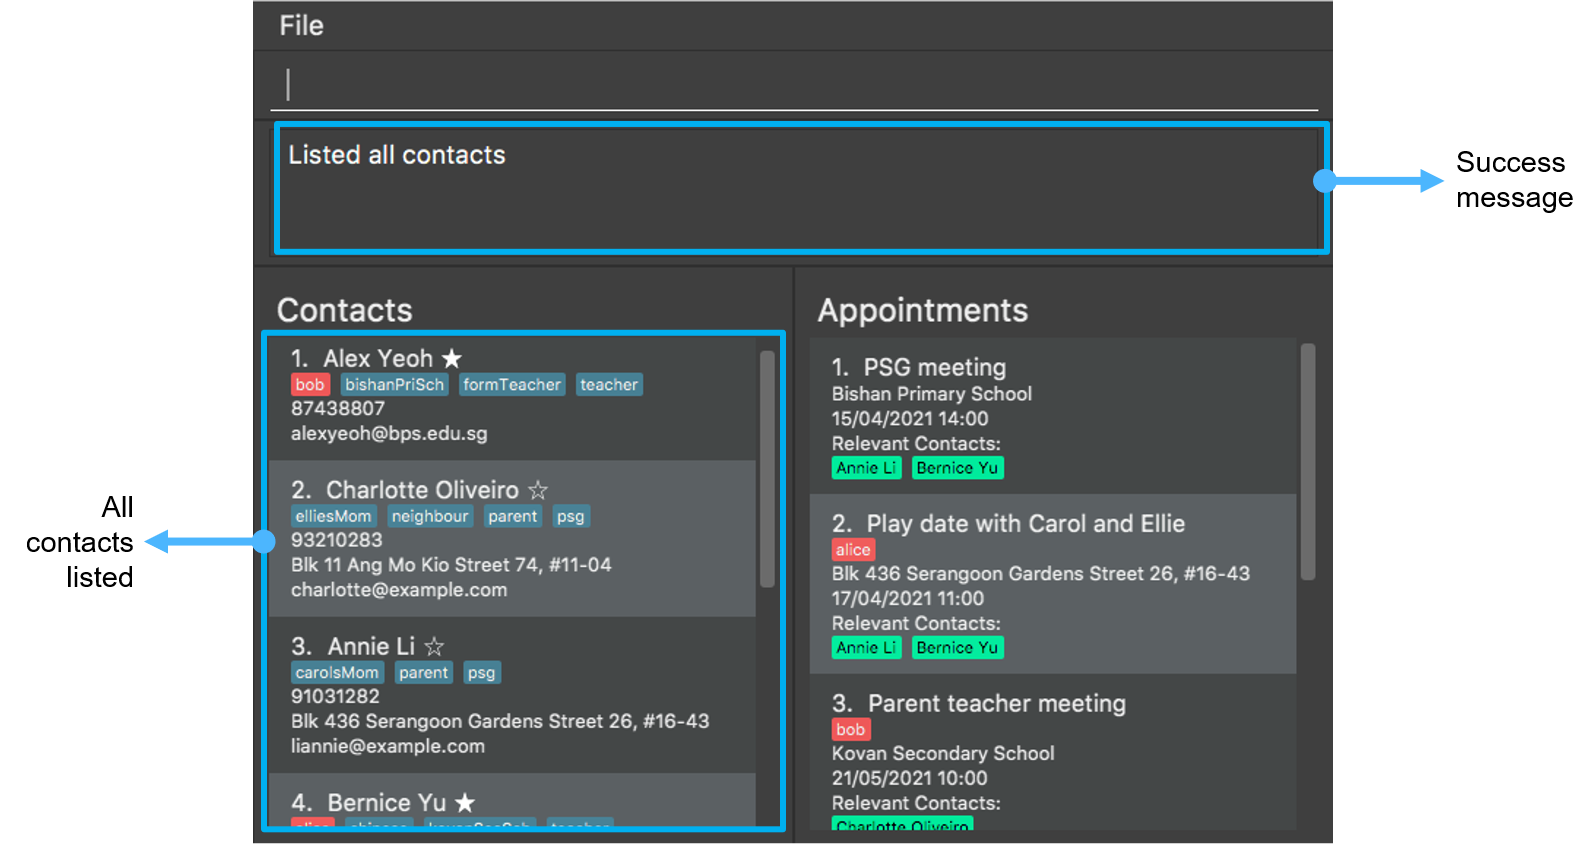
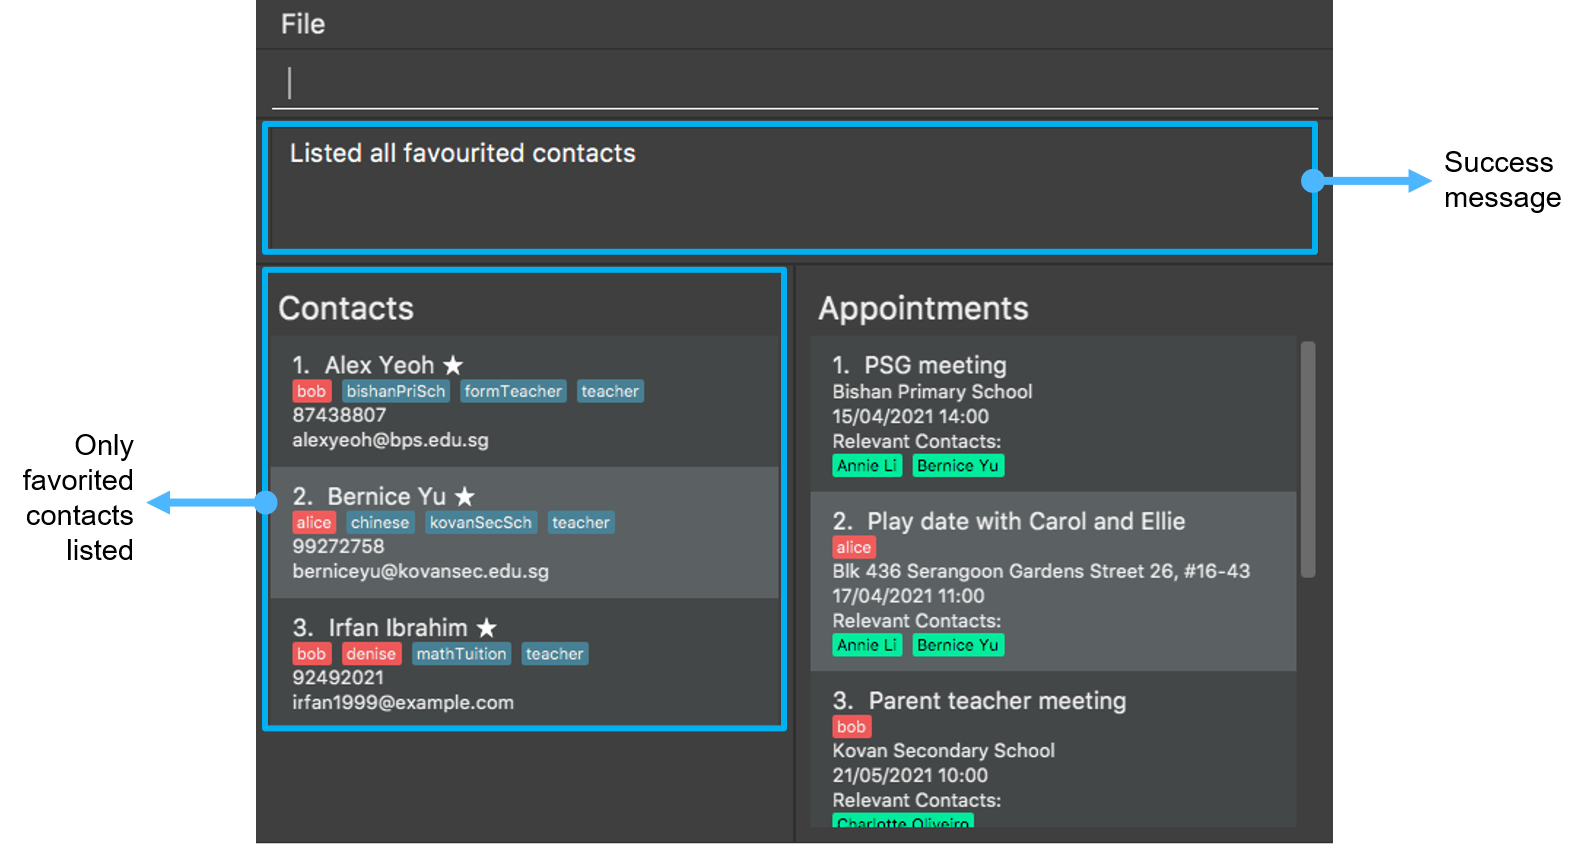
Listing all contacts : list
Display all contacts from the address book in the Contact List.
Format: list [o/OPTION]
Current available options for the [OPTION] field include:
| Option | Description |
|---|---|
fav |
Displays all favourited contacts in the Contact List |
fav command.
Example 1
Let’s say you want to view all your contacts again, as you have just filtered the contacts by some keywords. You can follow the steps below to view all your contacts.
Steps:
- Type
listin the Command Box. - Press Enter to execute.
Outcome:
- The Status Box will show a success message.
- All contacts are now displayed in the Contact List.
Example 2
Let’s say you want to view all of your favourite contacts. You can follow the steps below to view all of your favourite contacts.
Steps:
- Type
list o/favin the Command Box. - Press Enter to execute.
Outcome:
- The Status Box will show a success message.
- All favourite contacts are now displayed in the Contact List.
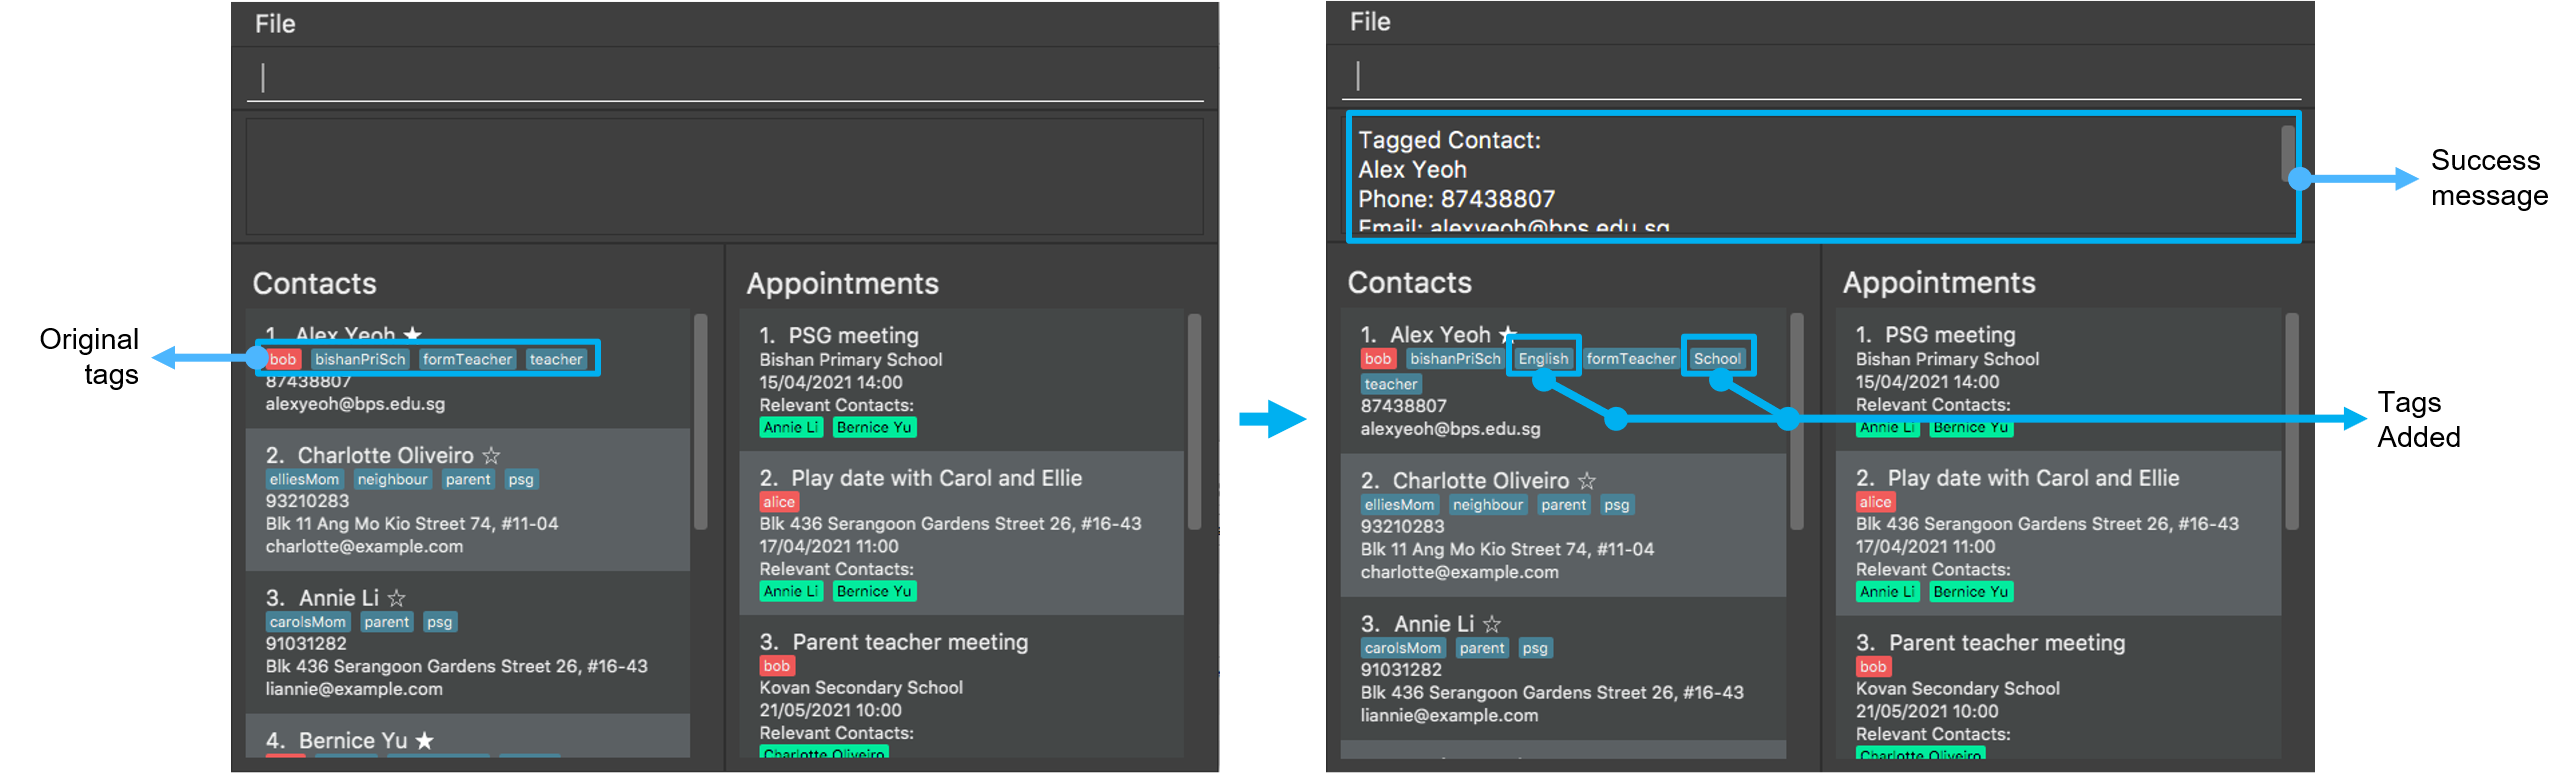
Adding/replacing tags to a contact: tag
Adds or replaces tags to the specified contact.
Format: tag INDEX [o/OPTION] [tc/CHILD_TAG]… [t/TAG]…
- Tags the contact at the specified
INDEX. - The index refers to the index number shown in the displayed Contact List.
- The index must be a positive integer 1, 2, 3, …
Current available options for the [OPTION] field include:
| Option | Description |
|---|---|
replace |
Replaces the currently existing tags with the given new set of tags |
Example 1
Let’s say that the first contact has some tags, and you would like to add more tags to the existing tags of the first contact. You can follow the steps below to append more tags.
Steps:
- Type
tag 1 t/School t/Englishin the Command Box. - Press Enter to execute.
Outcome:
- The Status Box will show a success message.
- The tags ‘School’ and ‘English’ are now added to the existing tags of the first contact.
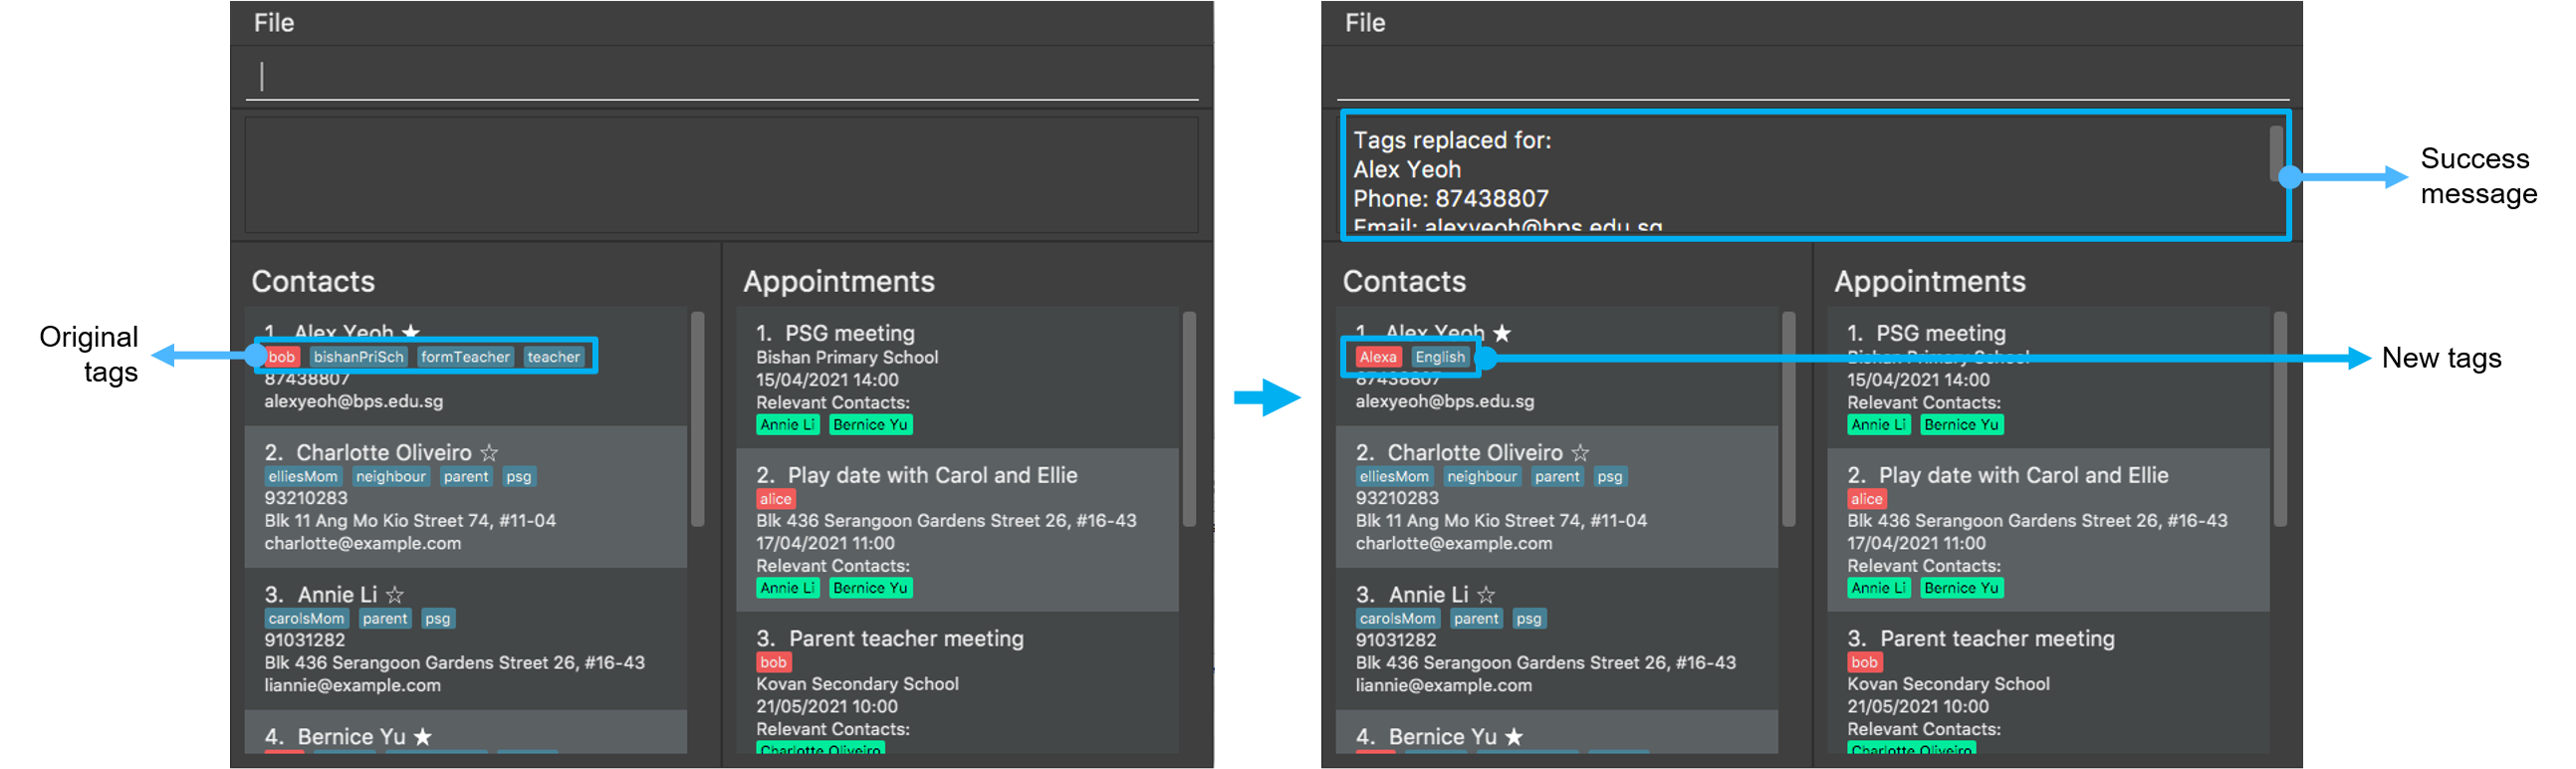
Example 2
Let’s say that you want to replace all the tags of the first contact. You can follow the steps below to do so.
Steps:
- Type
tag 1 o/replace tc/Alexa t/Englishin the Command Box. - Press Enter to execute.
Outcome:
- The Status Box will show a success message.
- The child tags for the first contact have been replaced with the child tag ‘Alexa’.
- The tags for the first contact have been replaced with the tag ‘English’.
Favourite a contact : fav
Format: fav INDEX [o/OPTION]
- Favourite the contact at the specified
INDEX. - The index refers to the index number shown in the displayed Contact List.
- The index must be a positive integer 1, 2, 3, …
Current available options for the [OPTION] field include:
| Option | Description |
|---|---|
remove |
Unfavourites the specified contact |
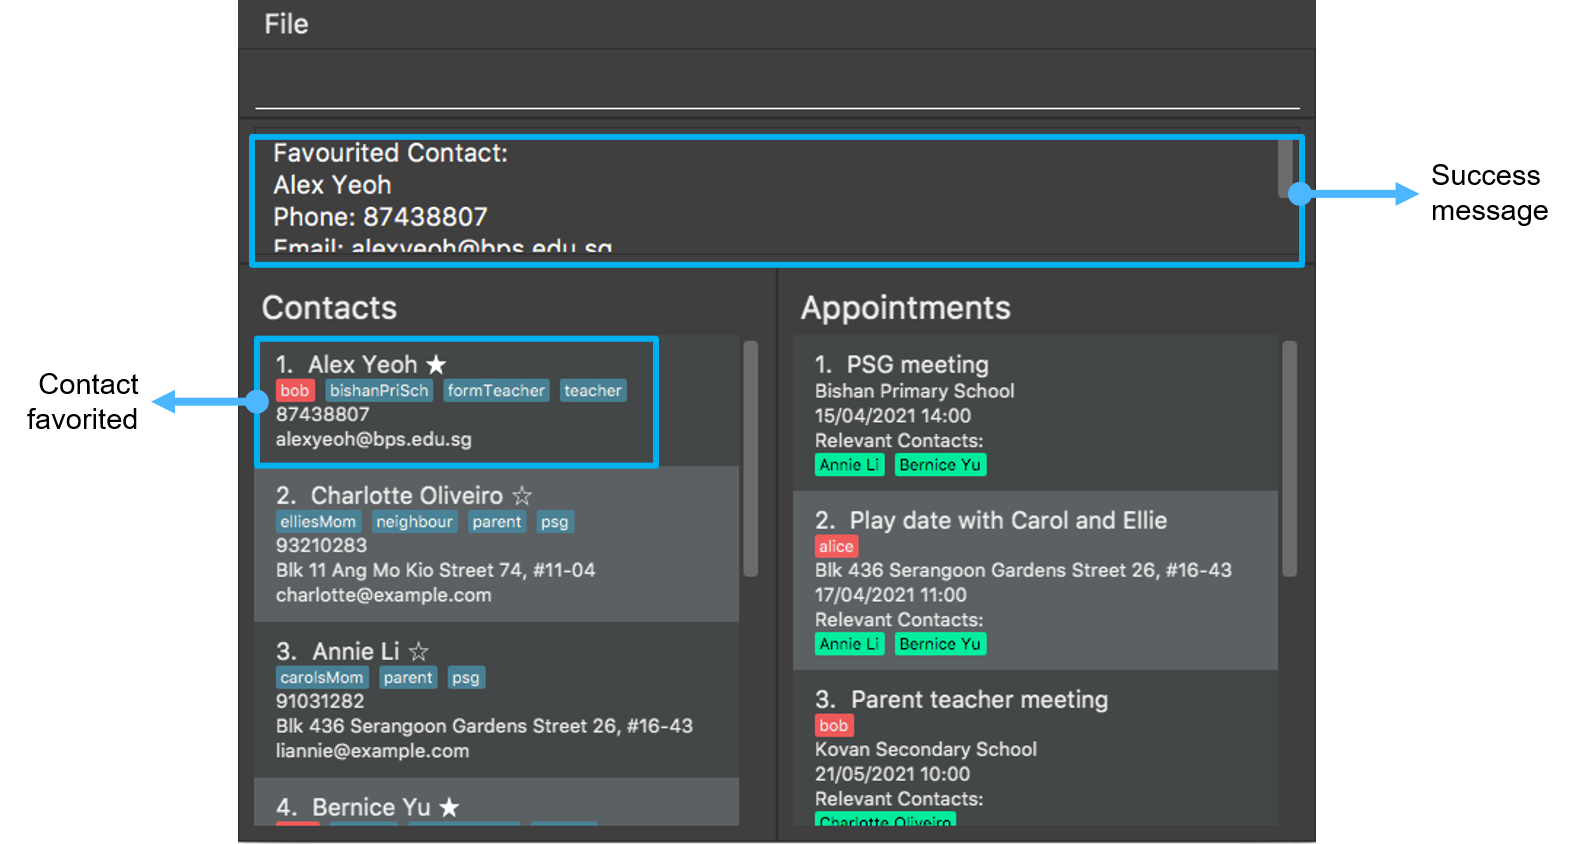
Example 1
Let’s say that you want to highlight the first contact as it is an important contact, you can do this by favouriting the first contact. You can follow the steps below to favourite a contact.
Steps:
- Type
fav 1in the Command Box. - Press Enter to execute.
Outcome:
- The Status Box will show a success message.
- The first contact is now favourited, and the star in the contact is filled.
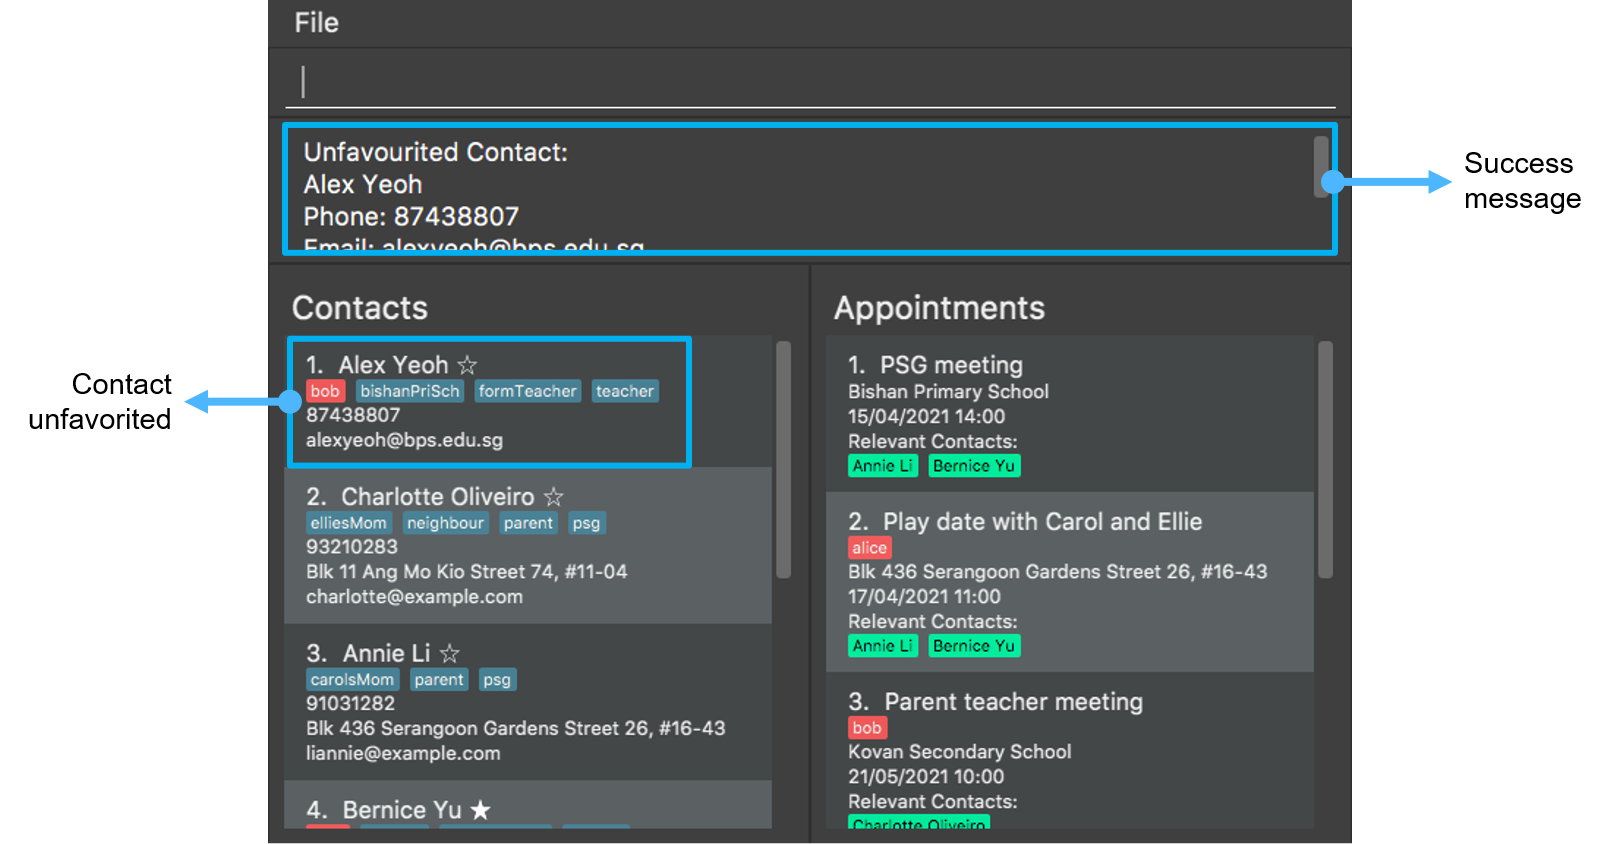
Example 2
Let’s say that you want to unfavourite the first contact. You can follow the steps below to unfavourite the contact.
Steps:
- Type
fav 1 o/removein the Command Box. - Press Enter to execute.
Outcome:
- The Status Box will show a success message.
- The first contact is now unfavourited and the star in the contact is not filled.
Sorting all contacts : sort
Sorts the address book in the order based on the given option.
Format: sort o/OPTION
Current available options for the [OPTION] field include:
| Option | Description |
|---|---|
name |
Sorts by name (alphabetical order) |
date |
Sorts by date added (chronological order) |
The sort order will also be saved and the full address book will be sorted.
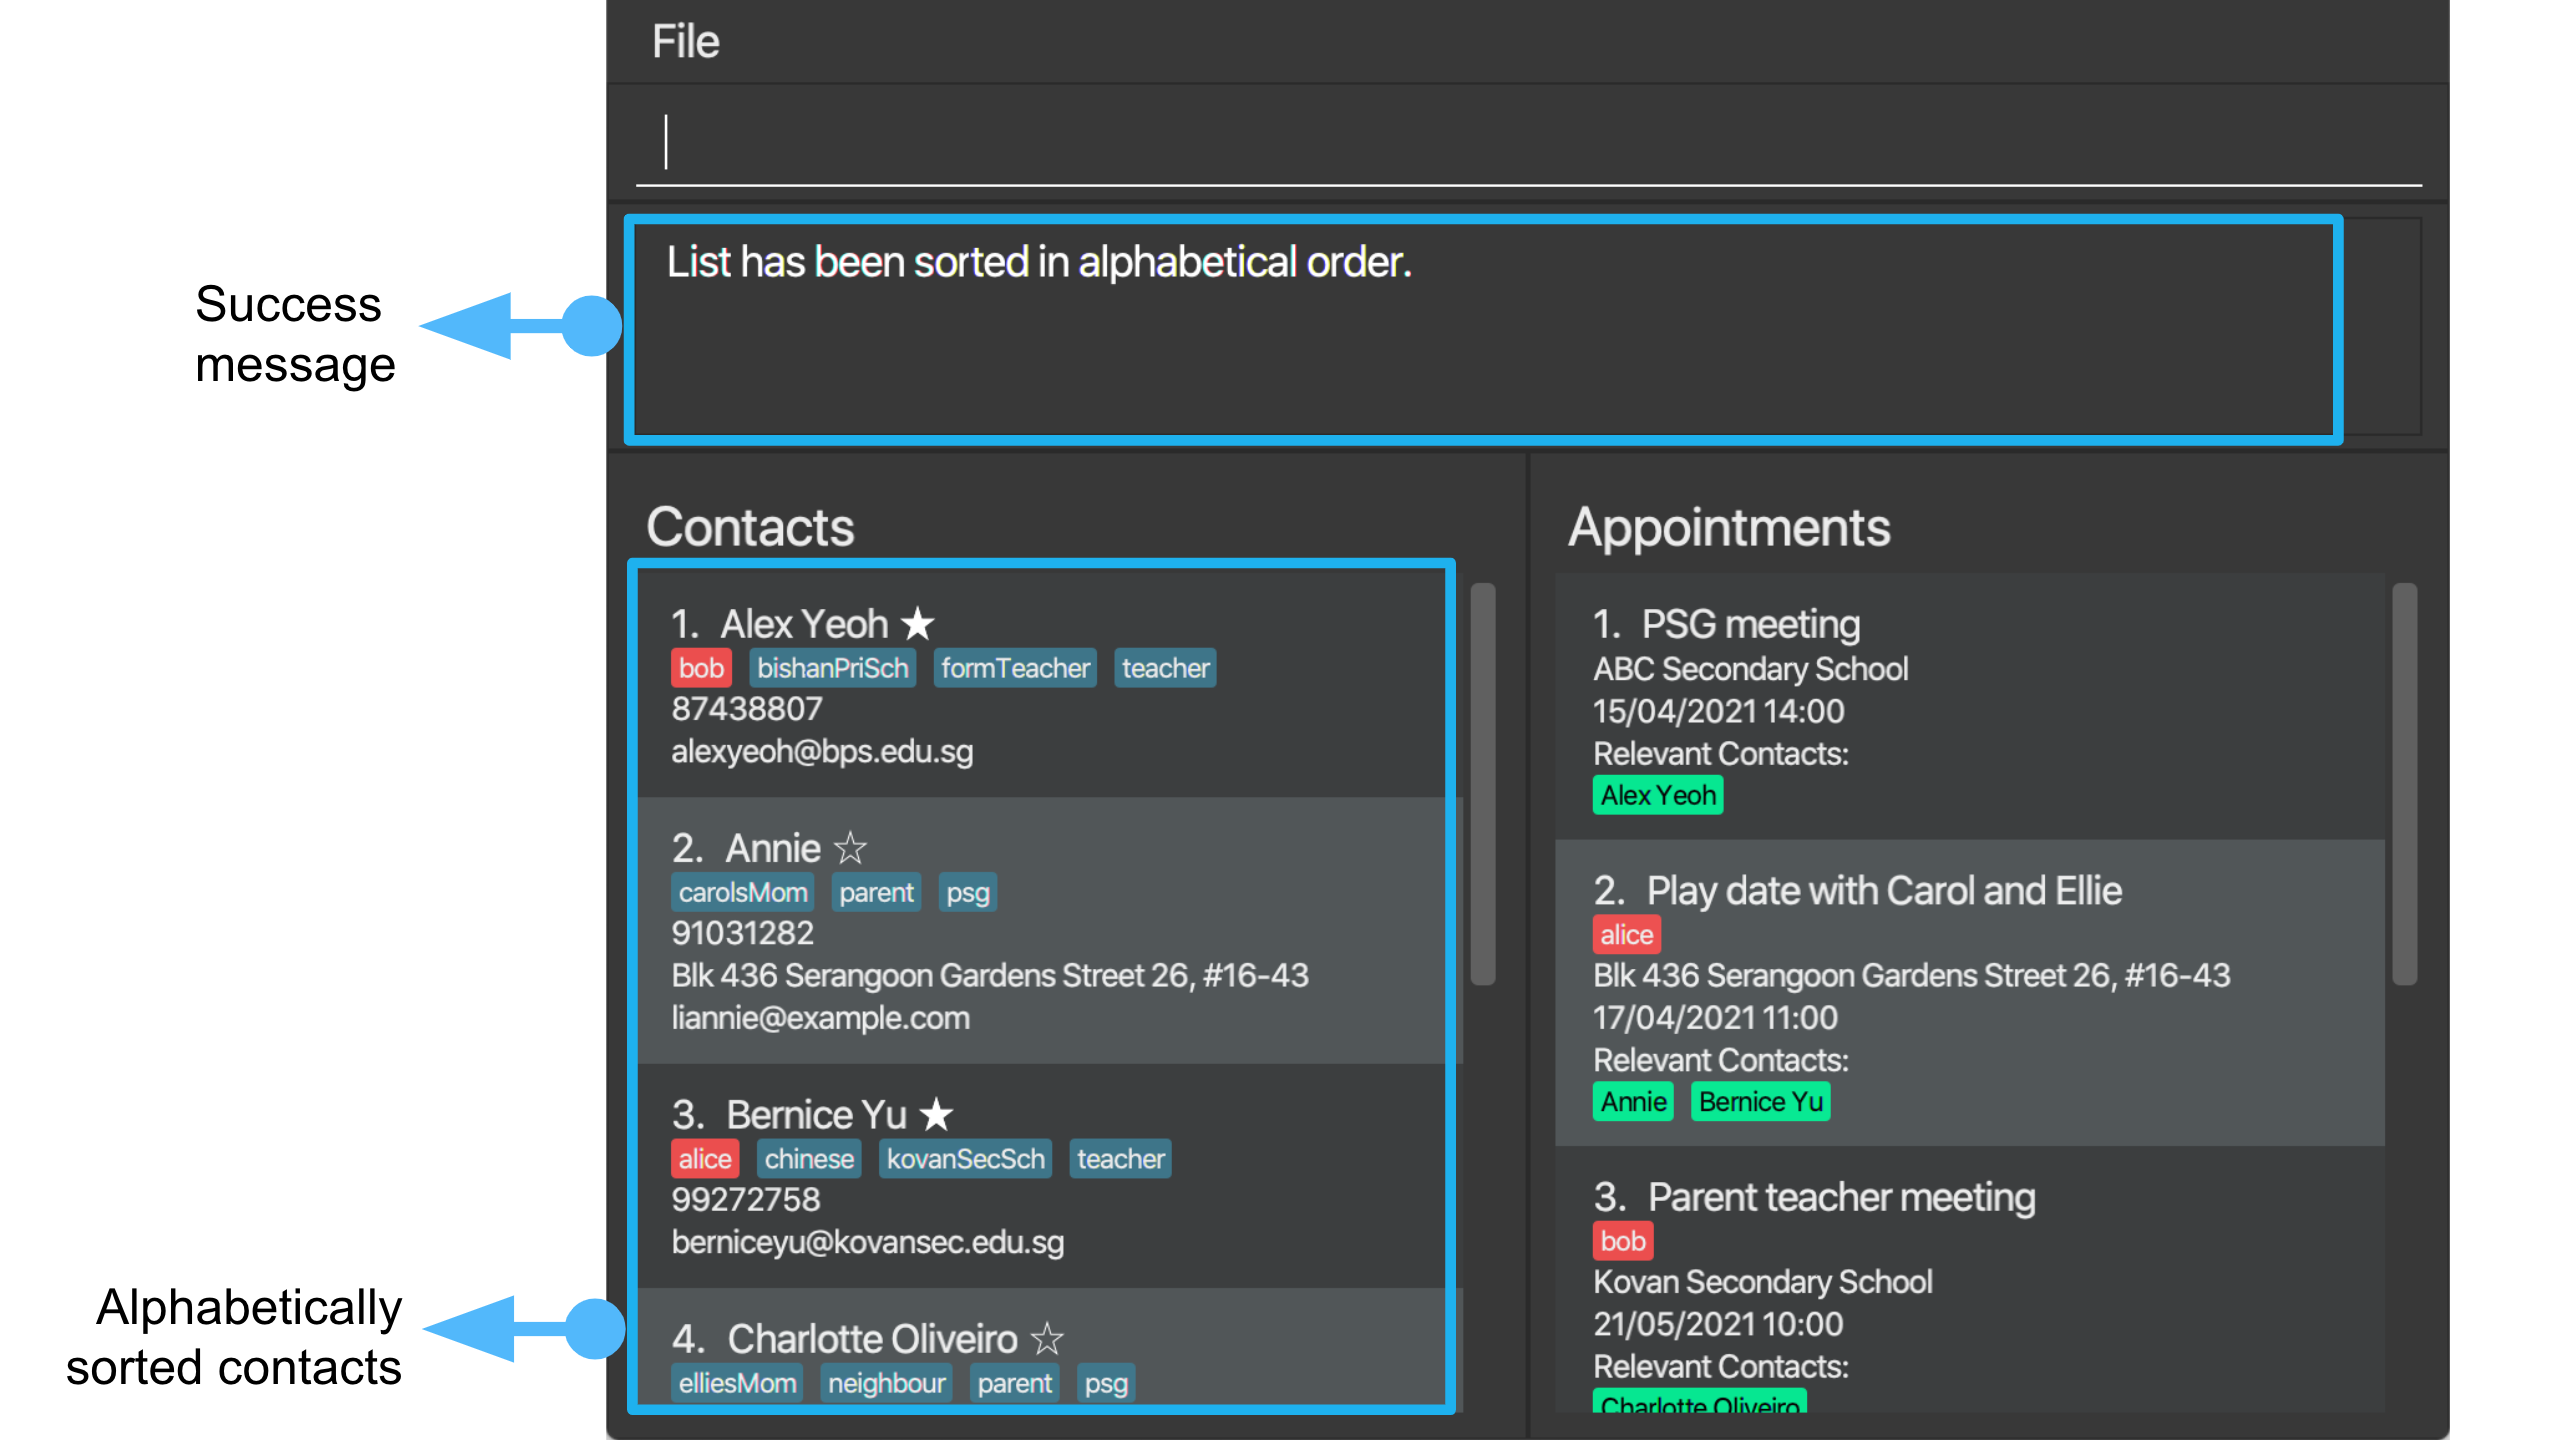
Example 1
Let’s say you want to sort the address book by the date the contacts were added. You can follow the steps below to do so.
Steps:
- Type
sort o/datein the Command Box. - Press Enter to execute.
Outcome:
- The Status Box will show a success message.
- The Contact List is now sorted by the date the contacts were added.
Example 2
Let’s say you searched for contacts tagged with ‘teacher’ and want to sort the contacts found by alphabetical order. You can follow the steps below to do so.
Steps:
- Type
sort o/namein the Command Box. - Press Enter to execute.
Outcome:
- The Status Box will show a success message.
- The Contact List is now in alphabetical order.
Clearing all entries : clear
Clears all entries from the address book or clears all contacts with the specified tags.
Format: clear [t/TAG]…
TAG here does not differentiate between child tags and regular tags.
This command will delete all entries that match any of the given tags.
Example 1
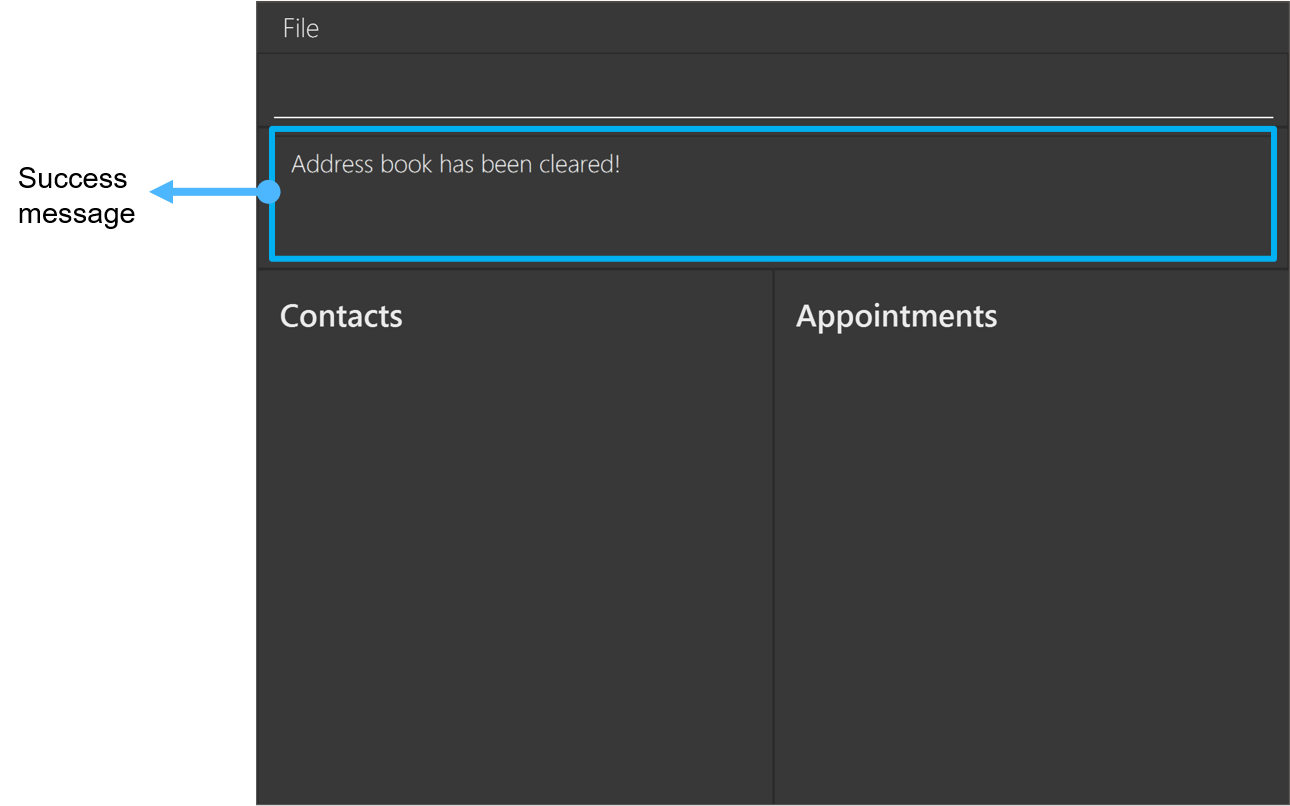
Let’s say you want to clear all contacts from ParentPal. You can follow the steps below to do so.
Steps:
- Type
clearin the Command Box. - Press Enter to execute.
Outcome:
- The Status Box will show a success message.
- The Contact List is now empty.
Example 2
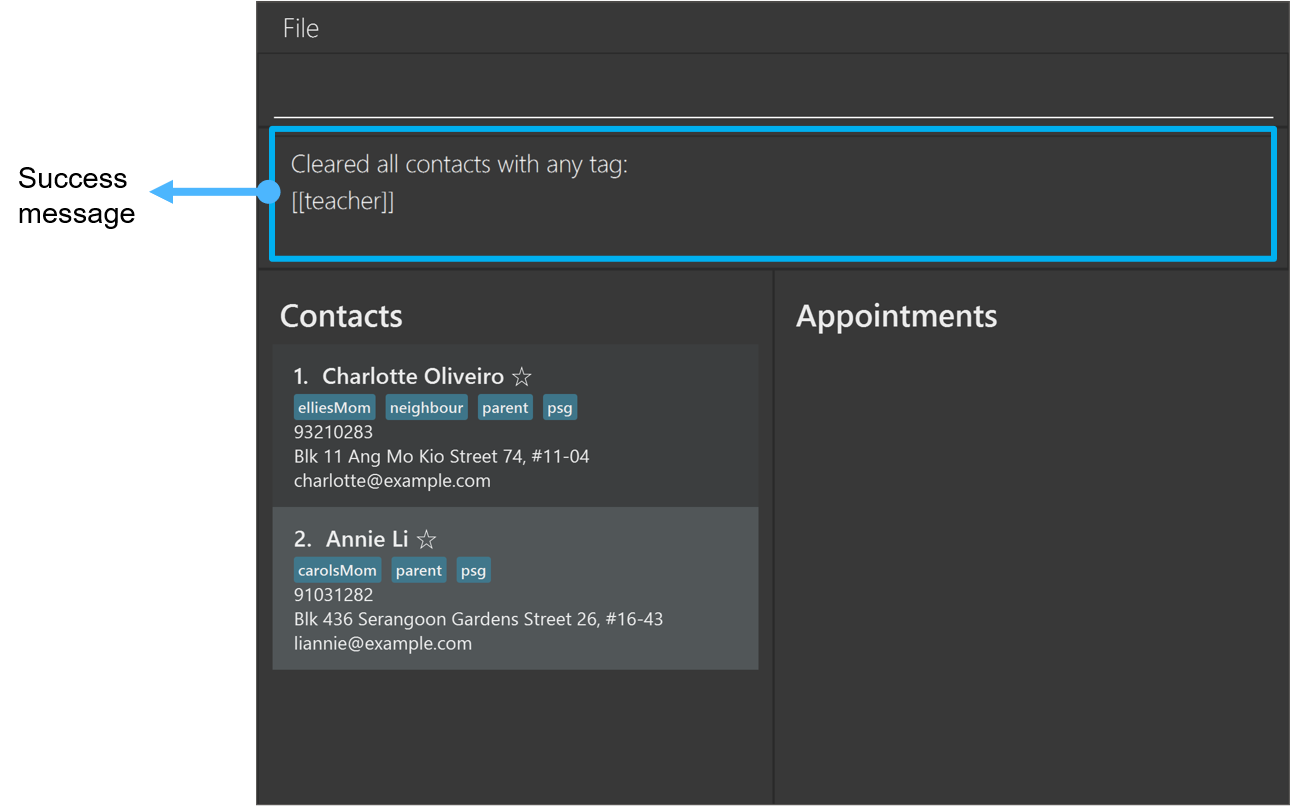
Let’s say you want to clear all contacts tagged with ‘teacher’. You can follow the steps below to do so.
Steps:
- Type
clear t/teacherin the Command Box. - Press Enter to execute.
Outcome:
- The Status Box will show a success message.
- All contacts tagged with ‘teacher’ are removed from the Contact List if none of them are involved in appointments.
Otherwise, an error message will be shown.
Appointment Book Commands
Adding an appointment : addAppt
Adds an appointment to the appointment book.
Format: addAppt n/NAME a/ADDRESS d/DATE [c/CONTACT_INDEX]… [tc/CHILD_TAG]…
- The contact in the Contact List at the specified
CONTACT_INDEXis added to the appointment. - The index refers to the index number shown in the displayed Contact List.
- The index must be a positive integer 1, 2, 3, …
-
DATEhas to be in the format ‘dd/MM/yyyyHH:mm’.
Example 1
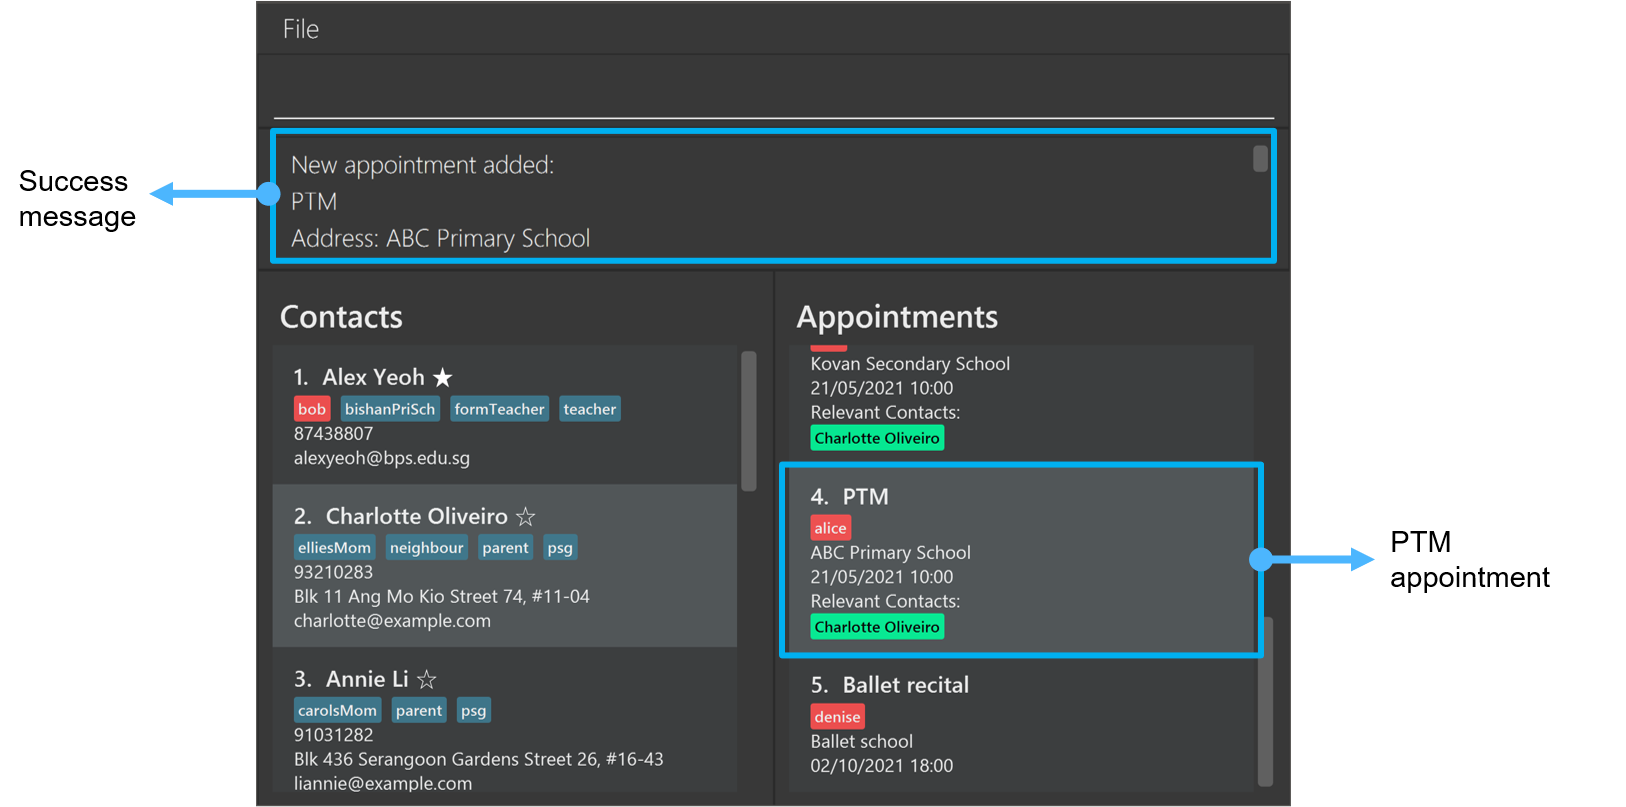
Let’s say you just received the details of the annual parent-teacher meeting at Alice’s school. You can follow the steps below to add the appointment to ParentPal.
Steps:
- Type
addAppt n/PTM a/ABC Primary School d/21/03/2021 10:00 c/2 tc/alicein the Command Box. - Press Enter to execute.
Outcome:
- The Status Box will show a success message.
- The appointment appears in the Appointment List.
Deleting an appointment : deleteAppt
Deletes the specified appointment from the appointment book.
Format: deleteAppt INDEX
- Deletes the appointment at the specified
INDEX. - The index refers to the index number shown in the displayed appointment list.
- The index must be a positive integer 1, 2, 3, …
Example 1
Let’s say you are viewing the full list of appointments, and you want to delete the 2nd appointment in the appointment list. You can follow the steps below to do so.
Steps:
- Type
deleteAppt 2in the Command Box. - Press Enter to execute.
Outcome:
- The Status Box will show a success message.
- The 2nd appointment in the Appointment List is removed.
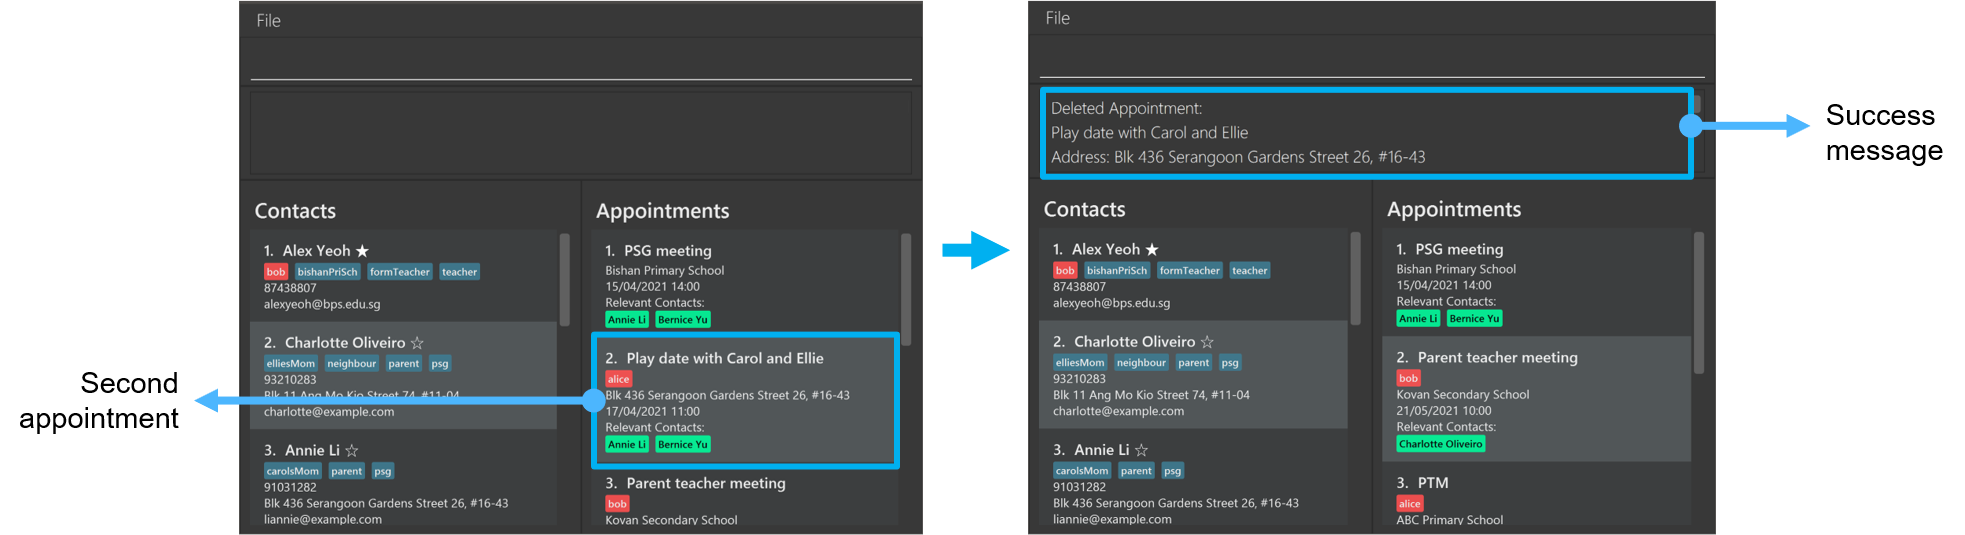
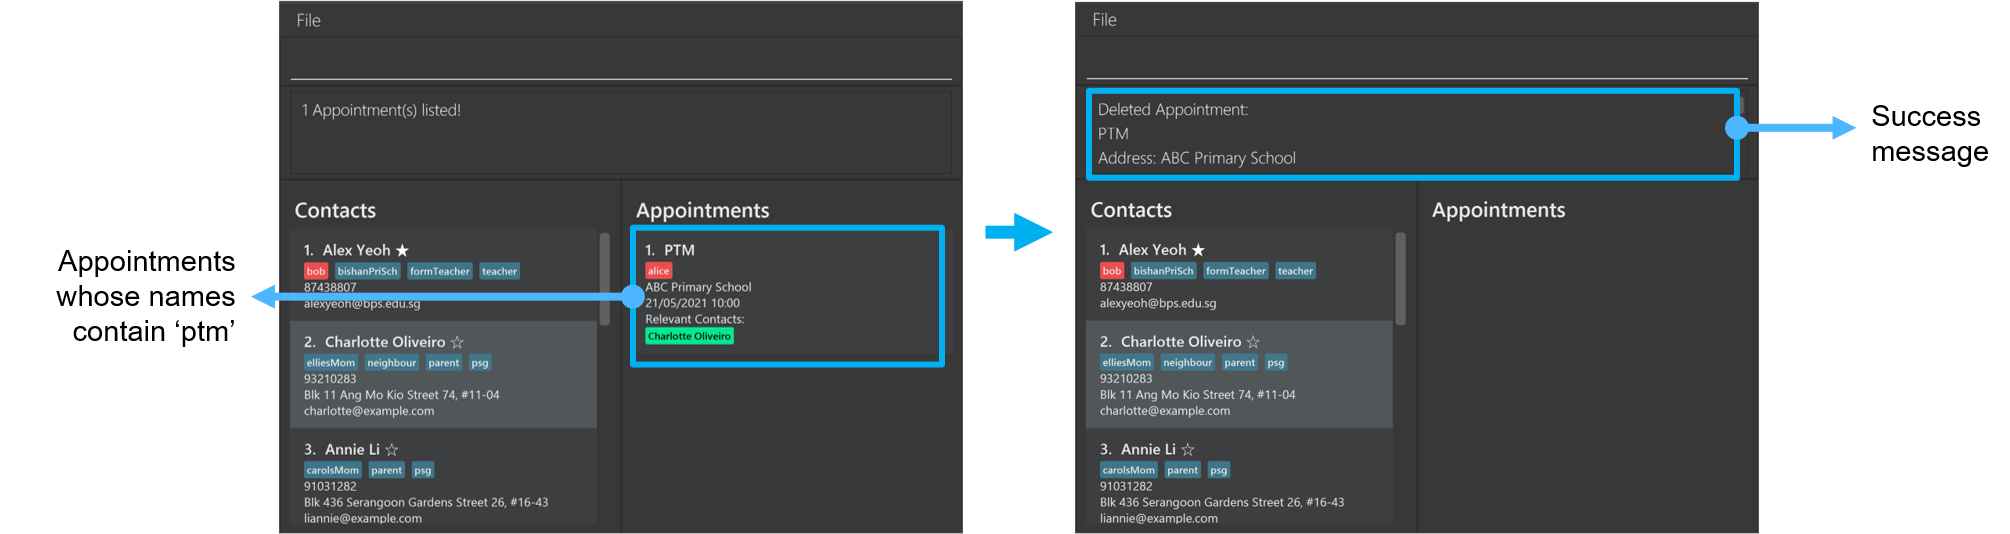
Example 2
Let’s say you want to delete an appointment named ‘PTM’. You can follow the steps below to find all appointments named ‘PTM’, then delete one of them.
Steps:
- Type
findAppt o/name ptmin the Command Box. - Press Enter to execute.
- Only appointments with ‘ptm’ in their name will be listed in the Appointment List.
- Say the first appointment is the one you want to delete. Type
deleteAppt 1in the Command Box. - Press Enter to execute.
Outcome:
- The Status Box will show a success message.
- The 1st appointment in the Appointment List is removed.
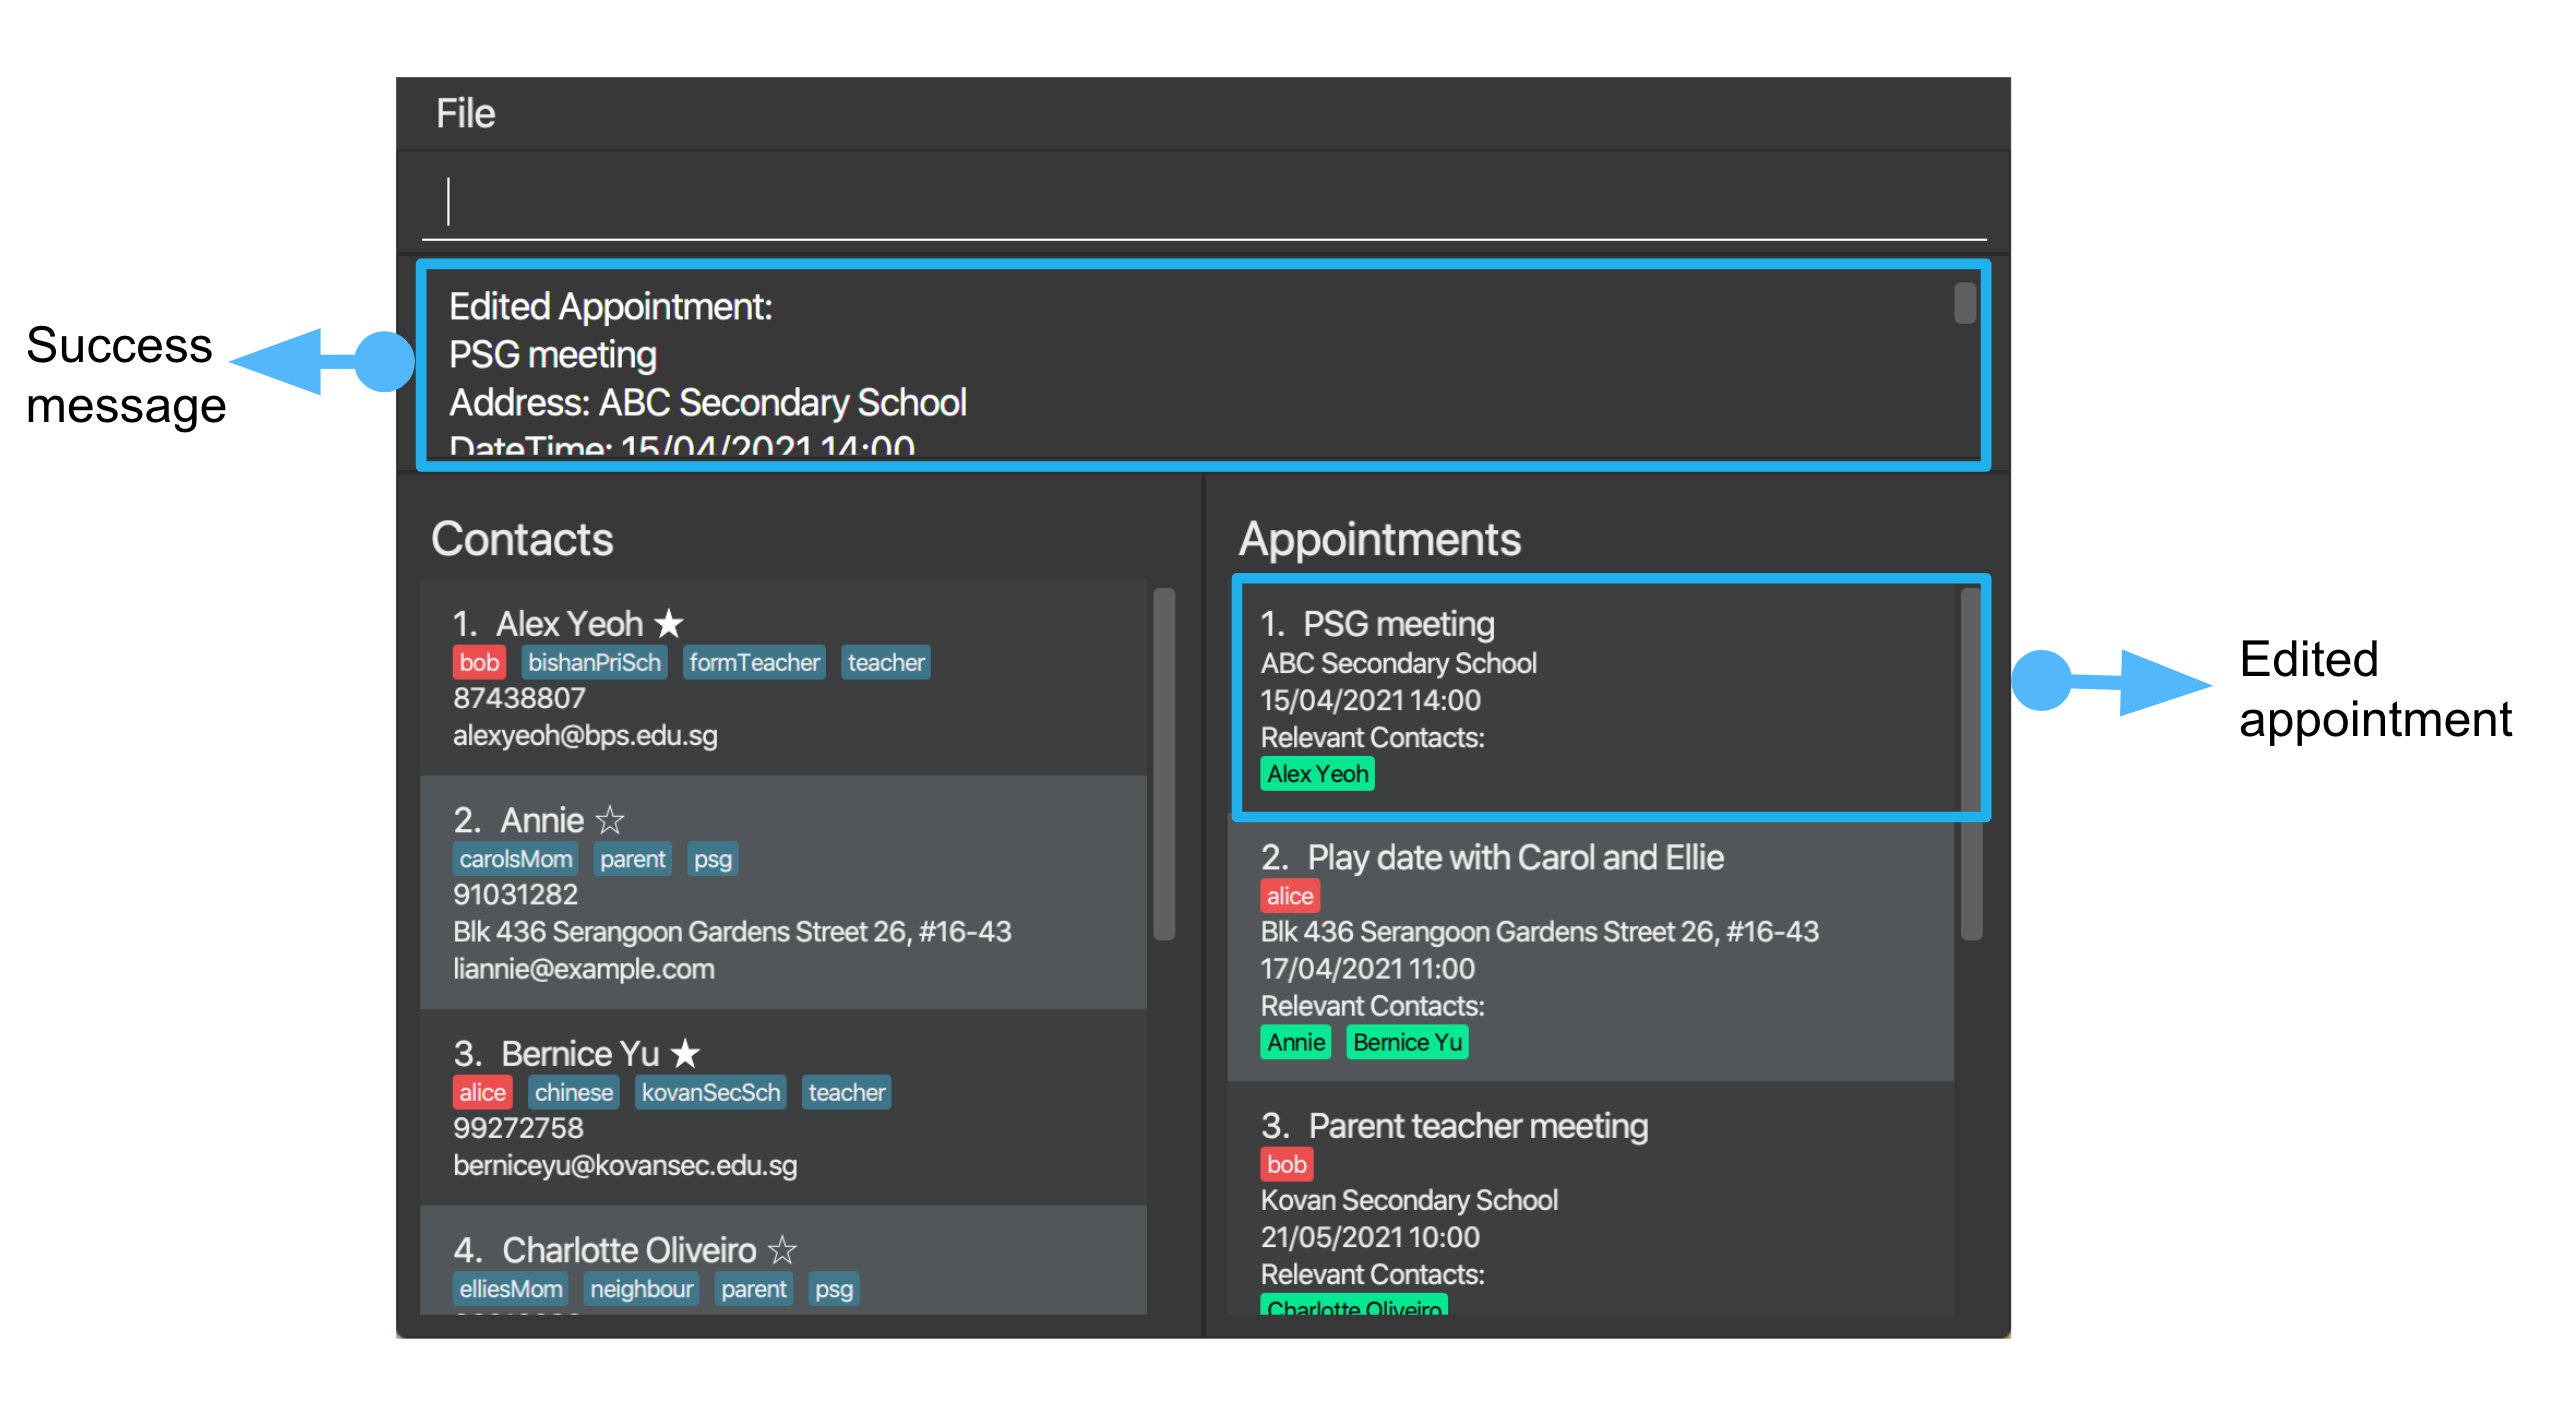
Editing an appointment : editAppt
Edits an existing appointment in the appointment book.
Format: editAppt INDEX [n/NAME] [a/ADDRESS] [d/DATE] [c/CONTACT_INDEX]… [tc/CHILD_TAG]…
- Contacts in the Contact List at the specified
CONTACT_INDEXis added to the appointment. - Edits the appointment at the specified
INDEX. - The index refers to the index number shown in the displayed Appointment Book.
- The index must be a positive integer 1, 2, 3, …
-
DATEhas to be in the format ‘dd/MM/yyyyHH:mm’. - At least one of the optional fields must be provided.
- Existing values will be updated to the input values.
- When editing tags and contacts, the existing tags and contacts of the contact will be removed i.e the operation is not cumulative.
Example 1
Let’s say you want to edit the first appointment in the full Appointment List so that the name and address is changed to ‘PSG meeting’ and ‘ABC Secondary School’ respectively and replace all related contacts with the 1st contact on the Contact List. You can follow the steps below to do so.
Steps:
- Type
editAppt 1 n/PSG meeting a/ABC Secondary School c/1in the Command Box. - Press Enter to execute.
Outcome:
- The Status Box will show a success message.
- The first appointment’s name, address and related contacts are updated.
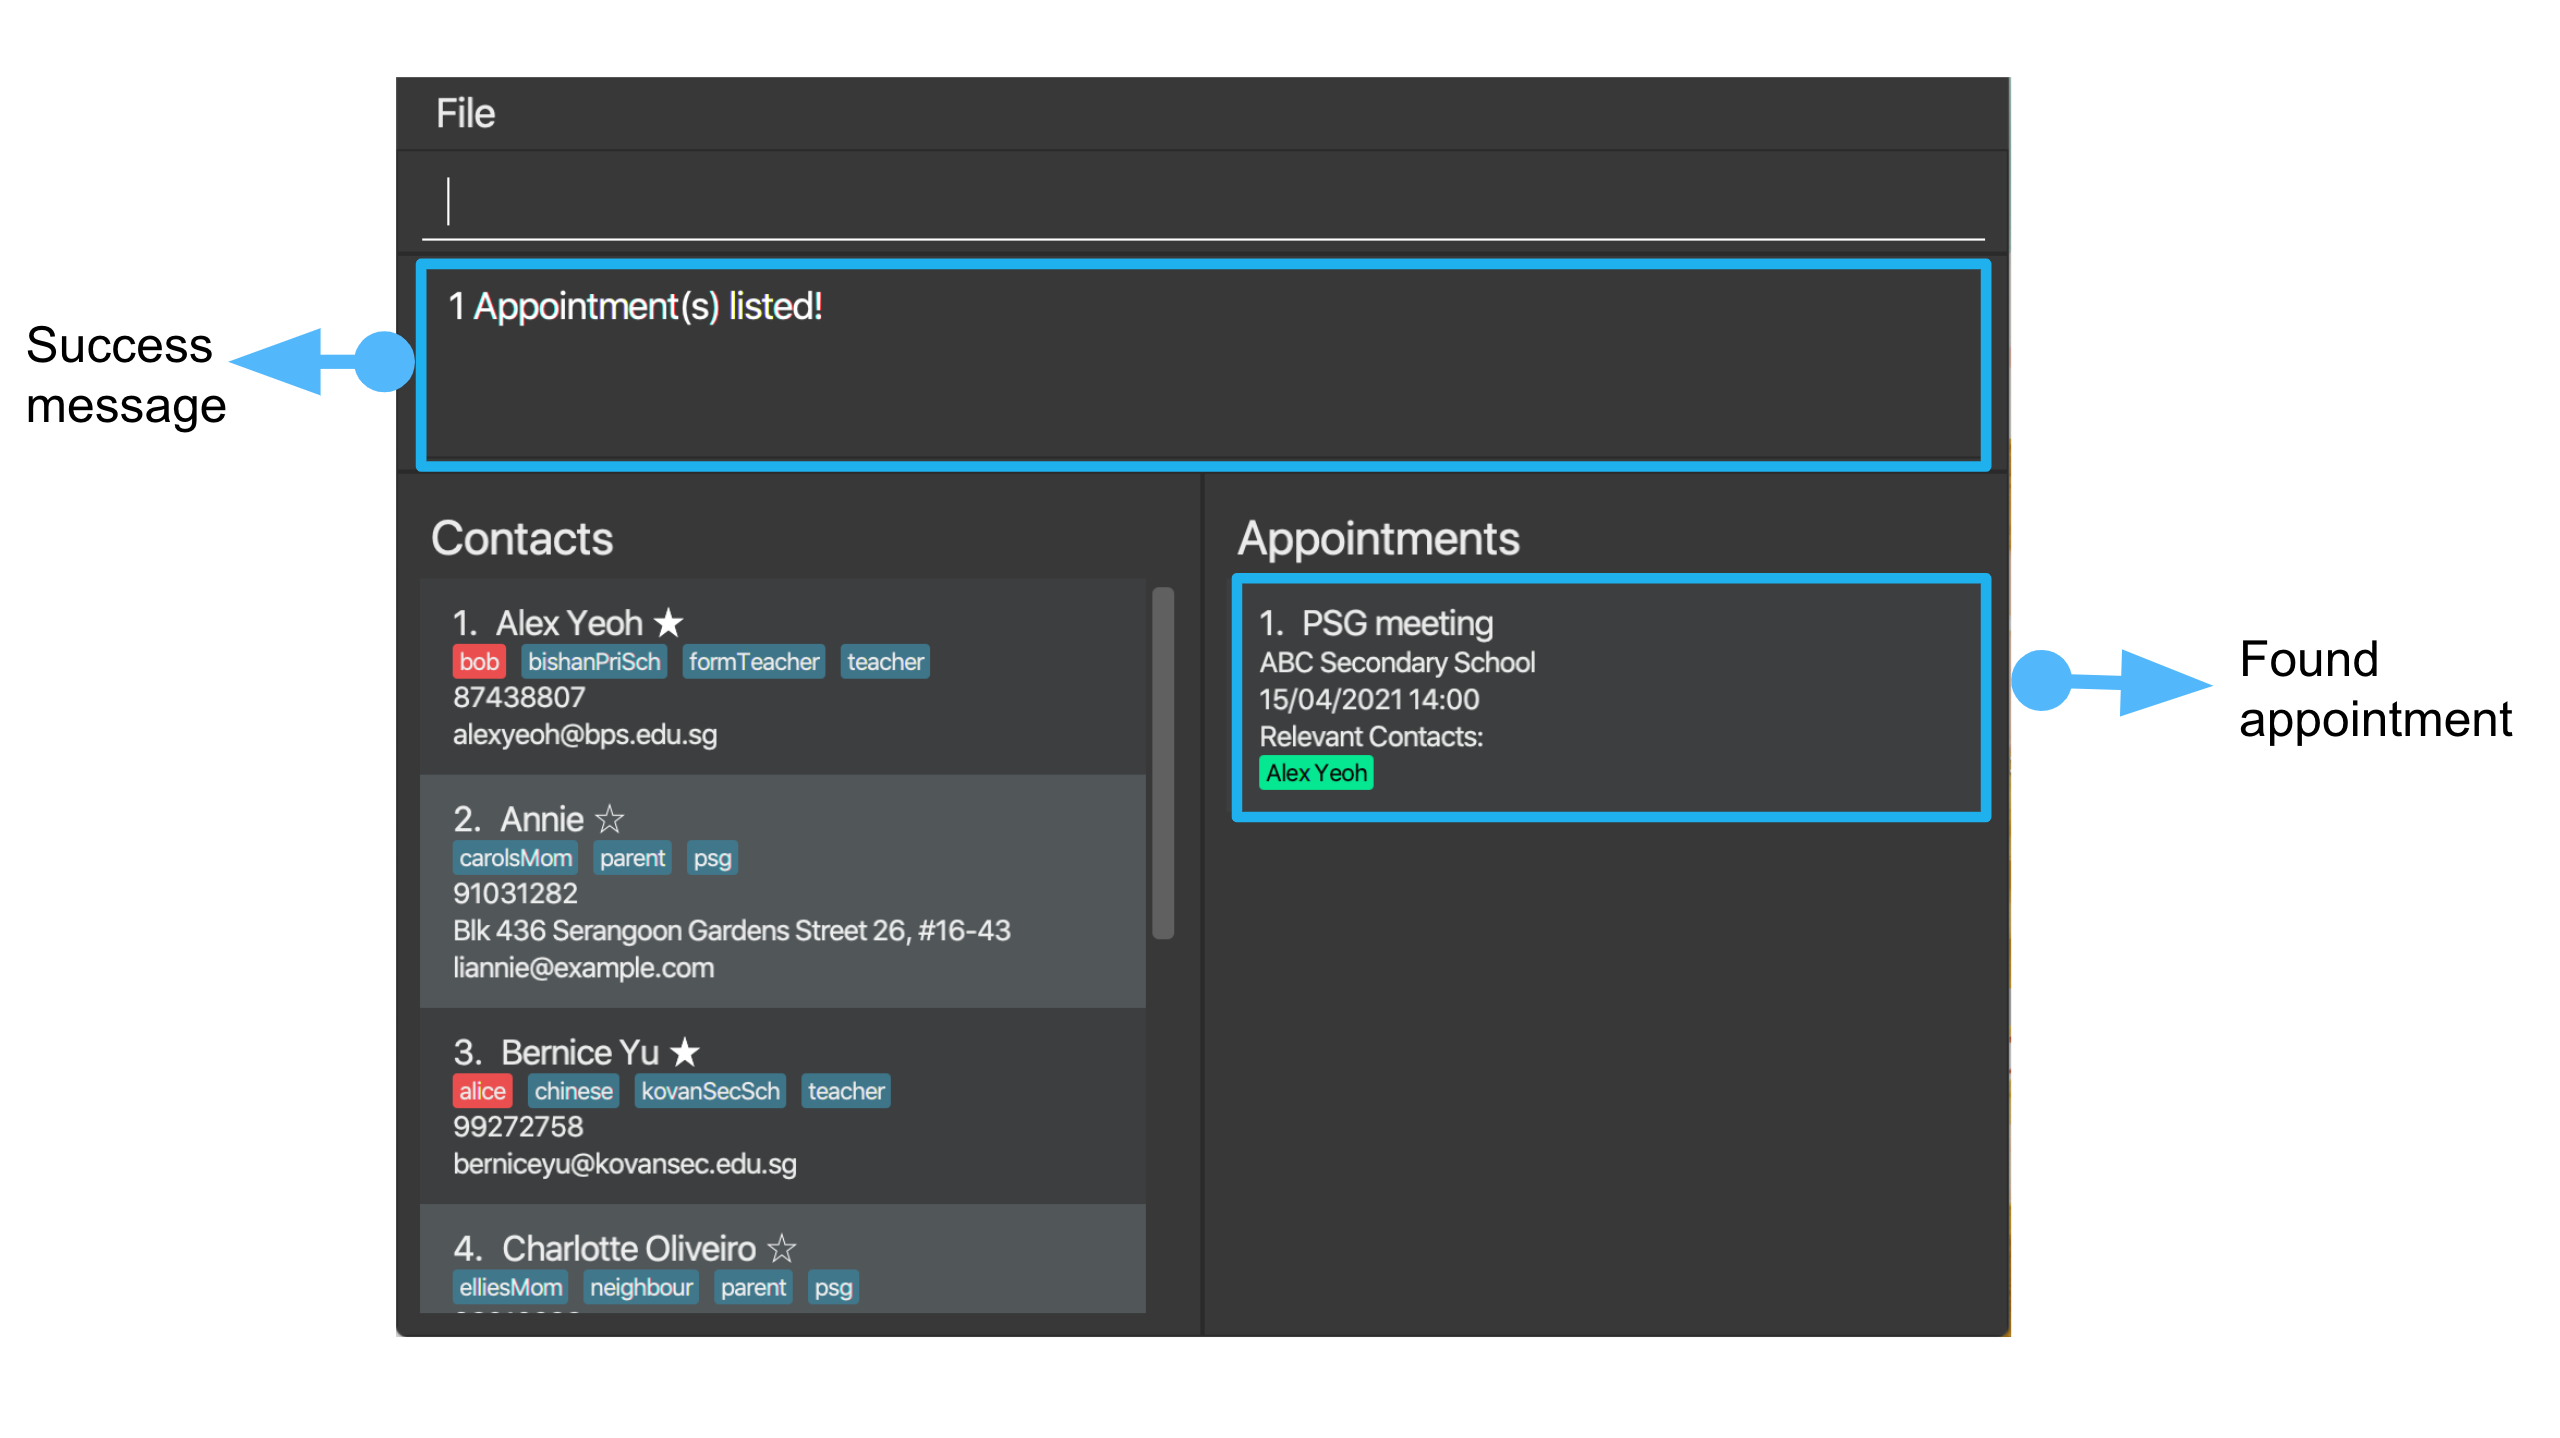
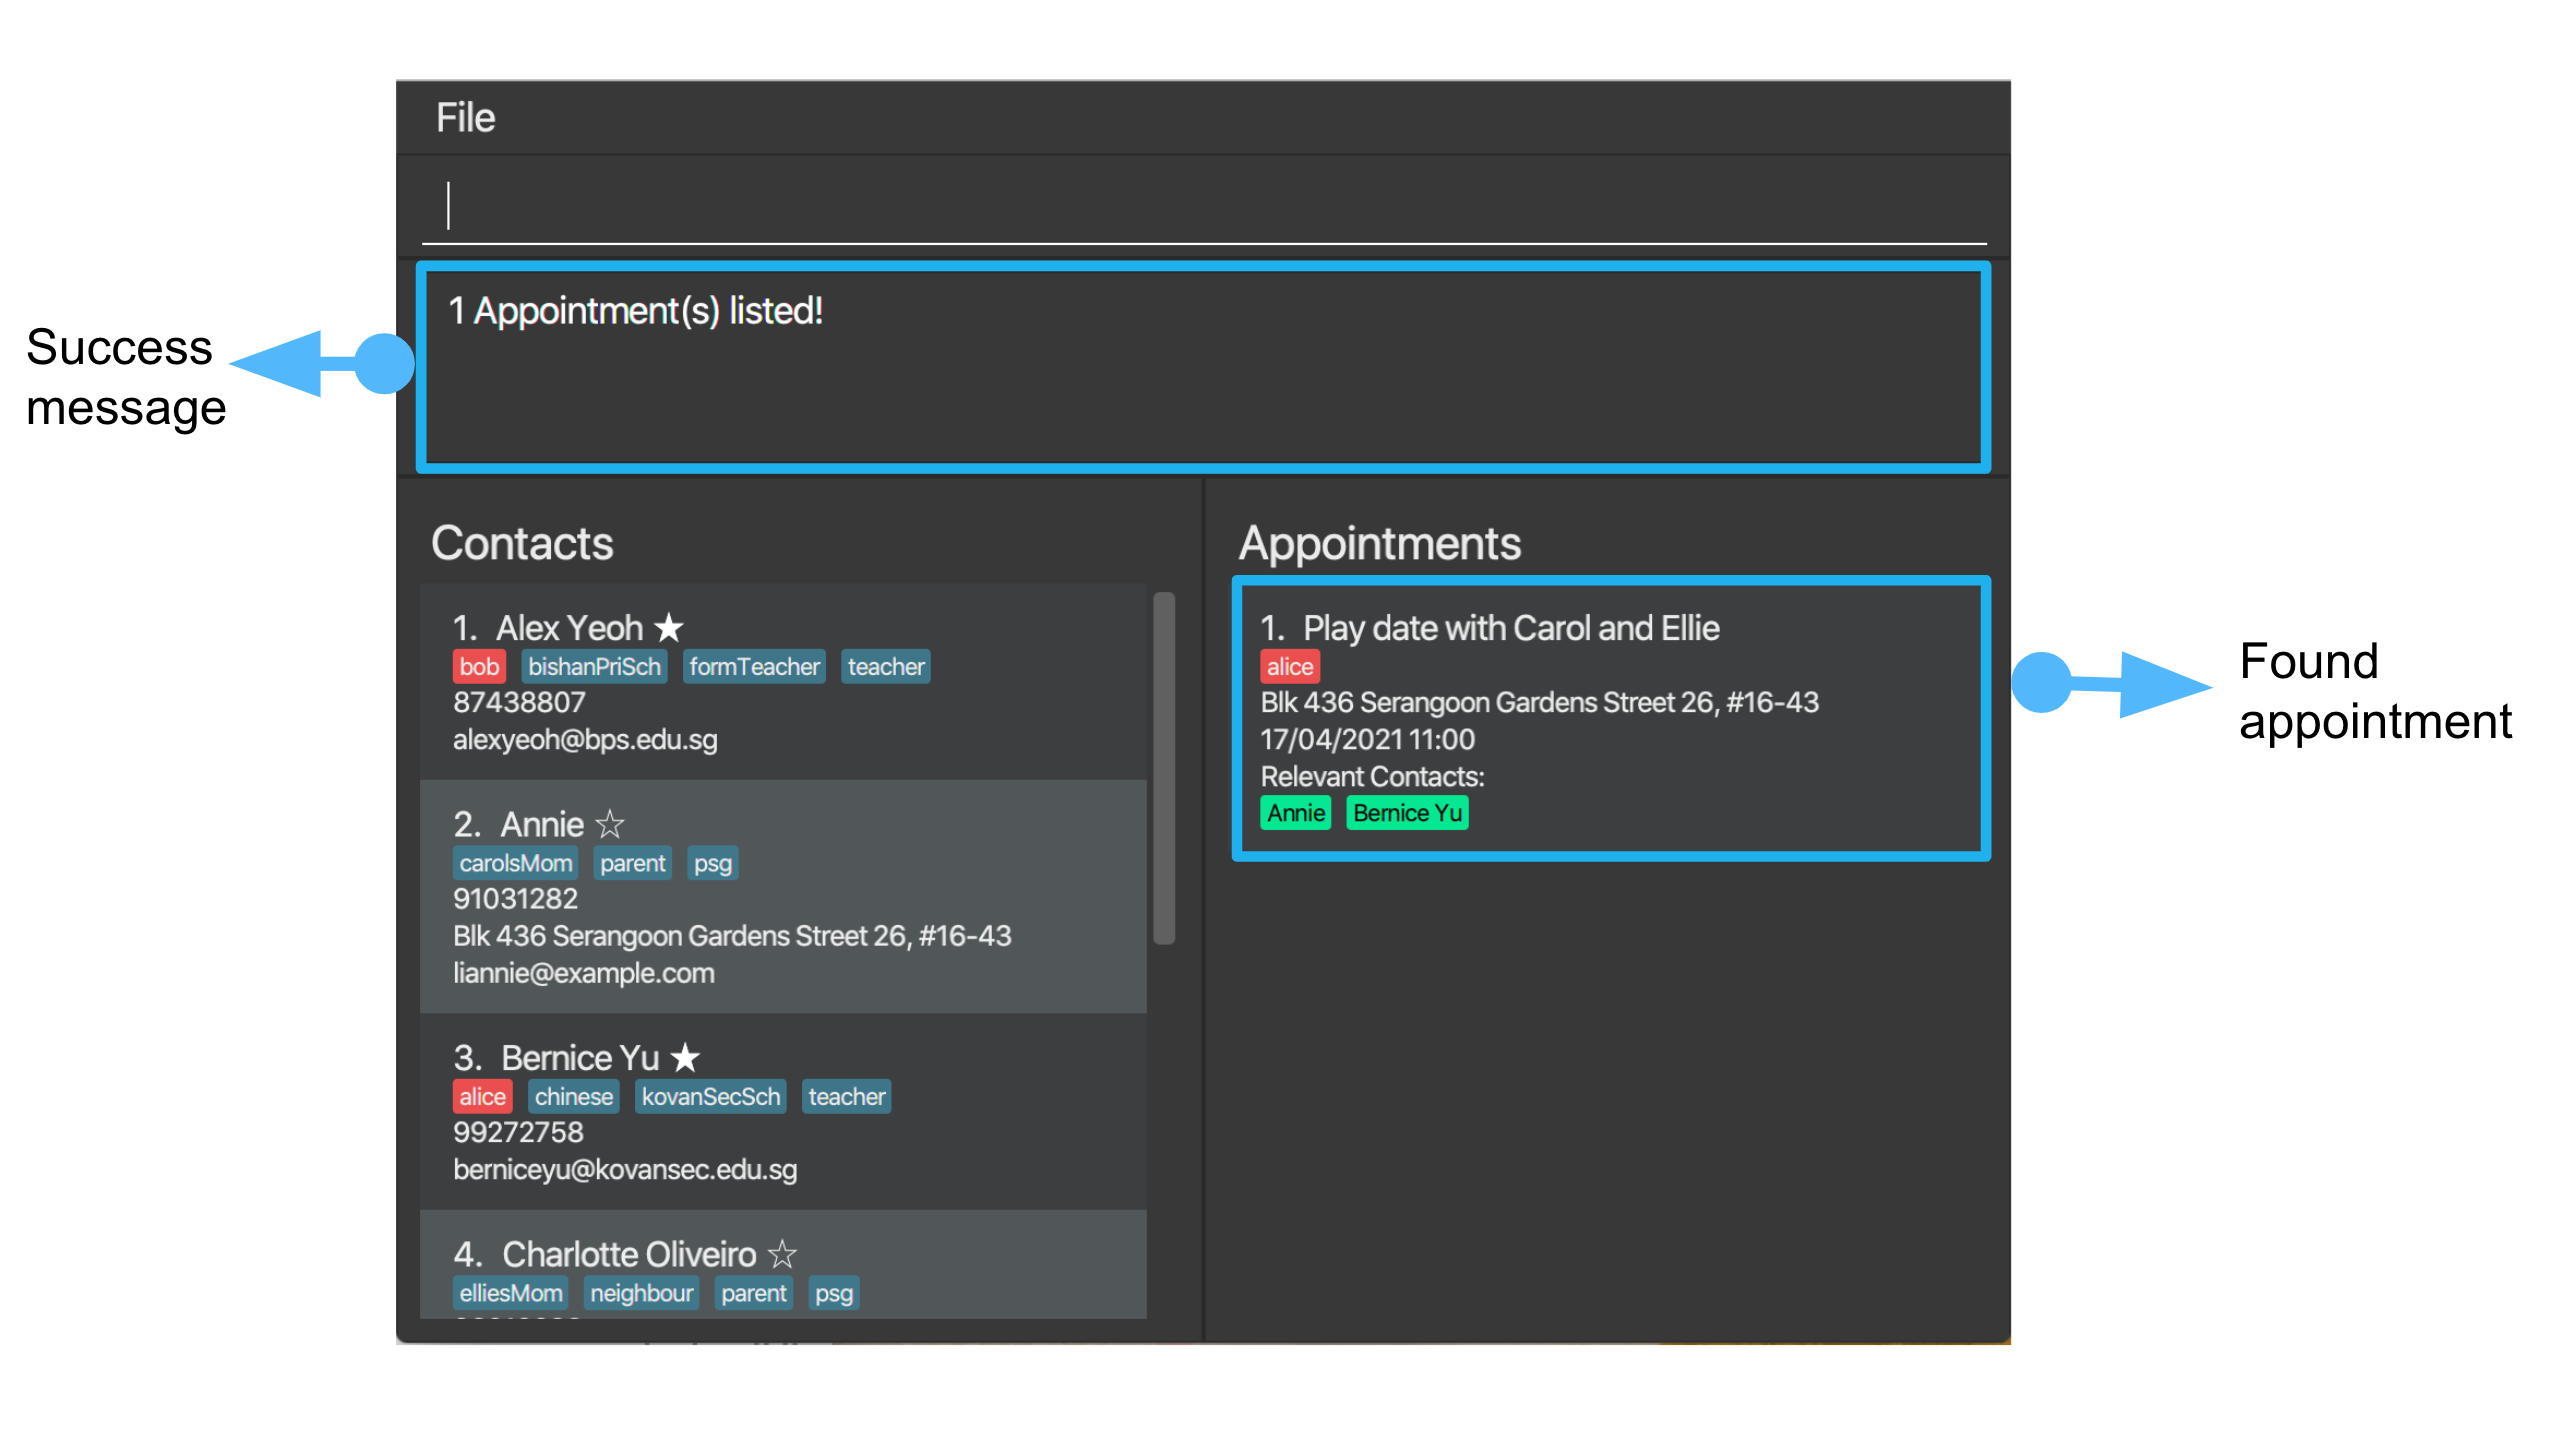
Finding appointments: findAppt
Find appointments based on the given option.
If no options are specified, all of an appointment’s fields will be searched and any keyword matches in any one of the fields will return that appointment.
Format: findAppt [o/OPTION] KEYWORD [MORE_KEYWORDS]…
- The search is case-insensitive. e.g
ptmwill matchPTM. - The order of the keywords does not matter. e.g.
Teacher meetingwill matchMeeting teacher. - Incomplete words will also be matched e.g.
PTwill matchPTM. - Appointments with any field matching at least one keyword will be returned (i.e.
ORsearch) e.g.Teacher meetingwill returnSpeak to ballet teacher,PSG meeting. - If n appointments can be found, message “n Appointment(s) listed!” will be displayed e.g. when 0 results are found, “0 Appointment(s) listed!” is displayed.
Current available options for the [OPTION] field include:
| Option | Description |
|---|---|
name |
Finds by the name of the appointment |
child |
Finds by the child that the appointment is tagged to |
address |
Finds by the address of the appointment |
date |
Finds by the date of appointment |
contact |
Finds by the name of the contacts involved in the appointment |
Example 1
Let’s say you want to search for all appointments with any fields containing ‘psg’. You can follow the steps below to do so.
Steps:
- Type
findAppt psgin the Command Box. - Press Enter to execute.
Outcome:
- The Status Box will show a success message.
- All appointments with ‘ptm’ in any of their fields will be listed in the Appointment List.
Example 2
Let’s say you want to search for all appointments related to a contact named Annie. You can follow the steps below to do so.
Steps:
- Type
findAppt o/contact anniein the Command Box. - Press Enter to execute.
Outcome:
- The Status Box will show a success message.
- All appointments with Annie as a related contact will be listed in the Appointment List.
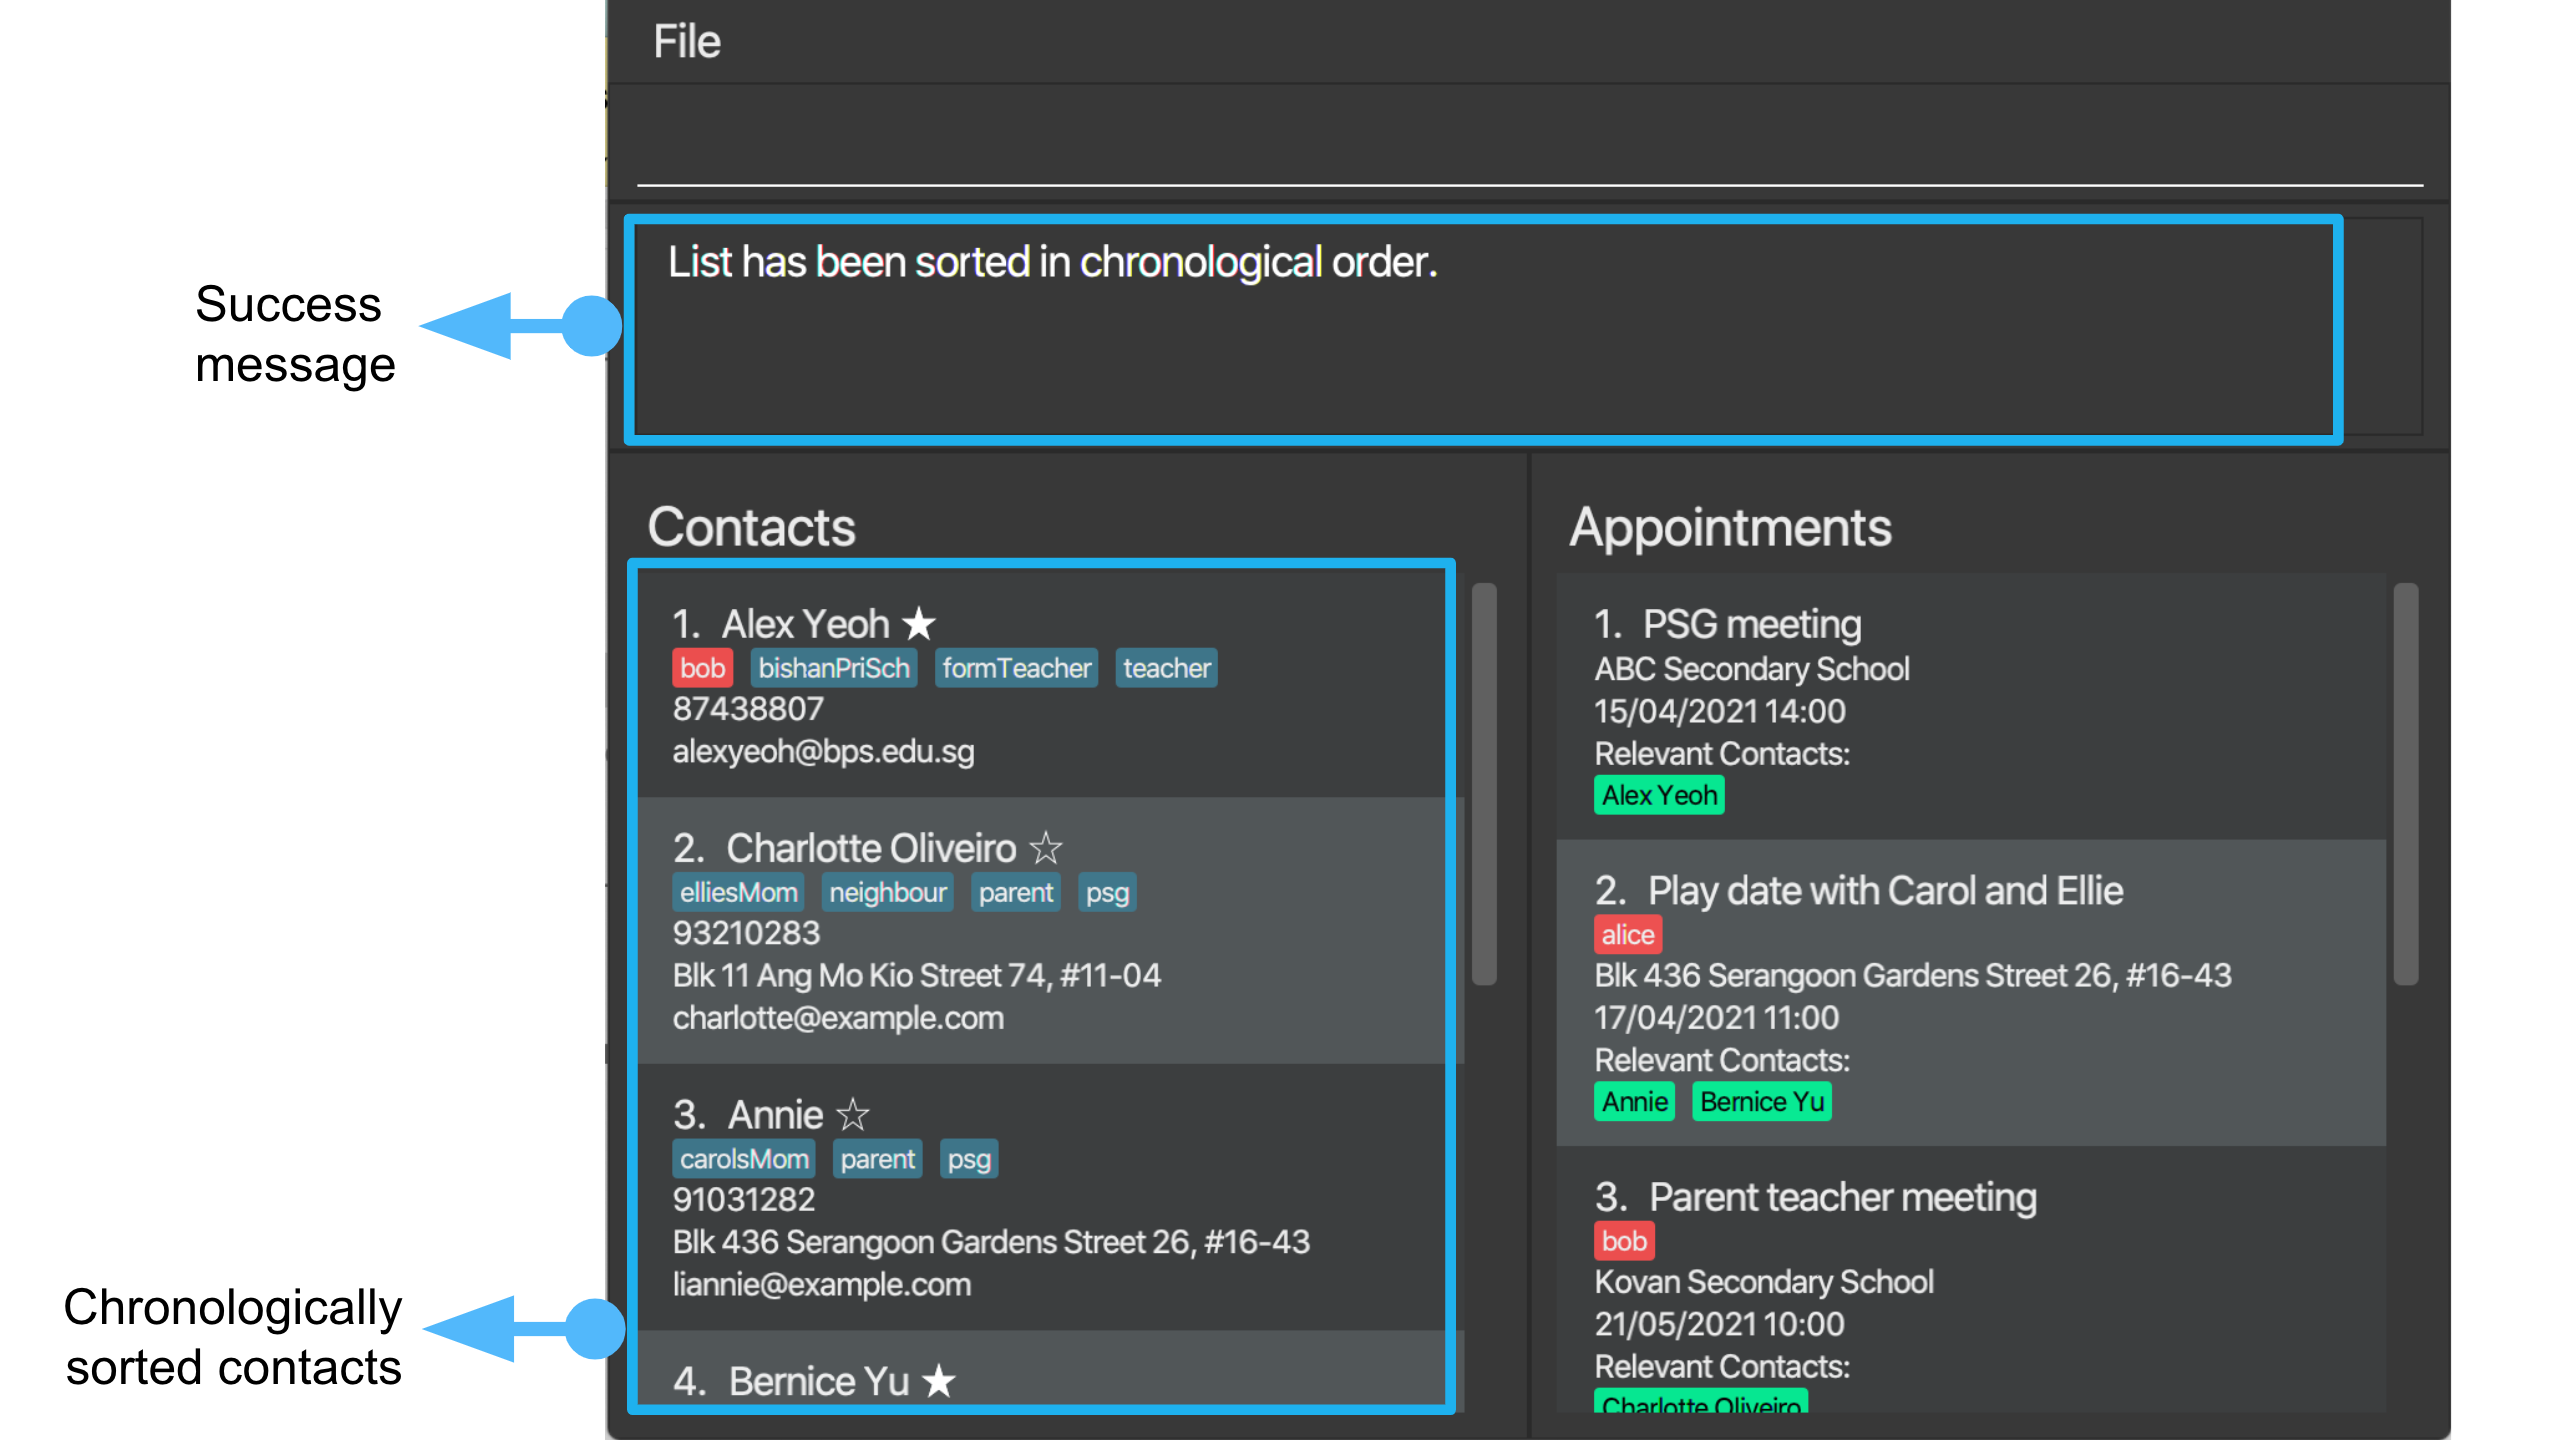
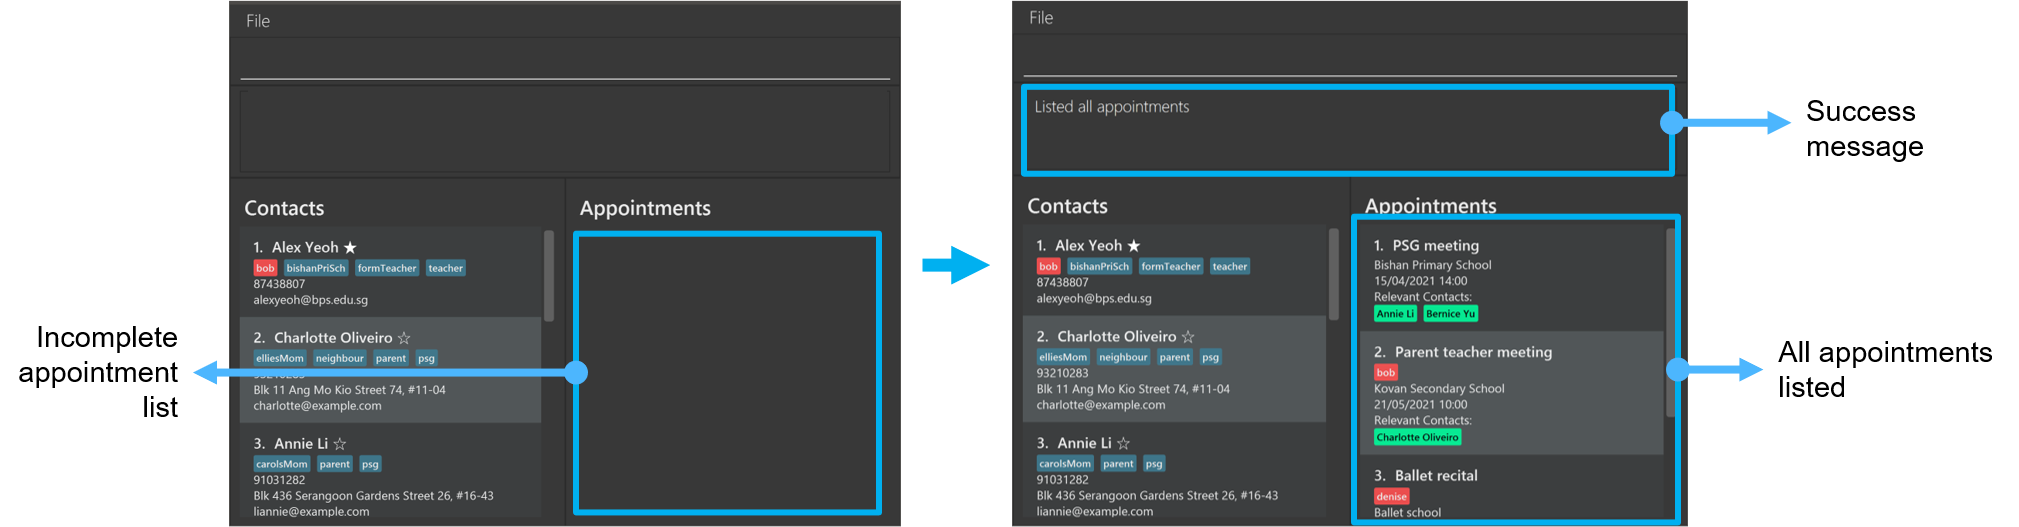
Listing all appointments : listAppt
Displays all appointments in the appointment book in the Appointment List.
List of appointments is always sorted in chronological order.
Format: listAppt
Example 1
Let’s say you want to view the full list of appointments. You can follow the steps below to do so.
Steps:
- Type
listApptin the Command Box. - Press Enter to execute.
Outcome:
- The Status Box will show a success message.
- All the appointments will be listed in the Appointment List.
Managing ParentPal Data
Saving your data
ParentPal data is saved in the hard disk automatically after any command that changes the data. There is no need to save manually.
Editing data files
ParentPal data is saved as two JSON files in the data directory at [JAR file location]/data as addressbook.json and appointmentbook.json. Advanced users are welcome to update data directly by editing that data file.
Transferring your data to another device
Exporting your data
- Locate the data folder on your device which can be found in the same folder as your parentpal.jar file.
- Transfer this data folder to your other device.
Importing your data
- Install ParentPal on your new device and run it once, exit the program before proceeding.
- Copy the data folder from your old device to the new device to the same folder as where you installed the parentpal.jar file.
- Override the files on your new device if prompted.
Congratulations! You have successfully transferred your data to a new device.
FAQ
Q: What’s the difference between a child tag and a regular tag?
A: ChildTags are meant to represent your children, useful especially
if you have multiple children. Child tags will always appear at the front of the list of tags
for each contact and are displayed in a different color to differentiate them. Any command
that works with regular tags such as find will also work with child tags.
Q: What’s the difference between address book and contact list? What’s the difference between appointment book and appointment list?
A: The address book refers to all the contacts currently stored by ParentPal, including what is not currently displayed in the interface. The contact list refers
to what is currently displayed on screen. Similarly, the appointment book refers to all appointments stored by ParentPal
while the appointment list only refers to what is currently displayed on screen, see Interface of ParentPal.
Q: Why is your application named ParentPal?
A: It is named ParentPal because it aims to be a ‘pal’ to the busy parents who need help with managing their kids’ schedules and important contacts.
Command Summary
| Action | Format | Examples |
|---|---|---|
| | General Commands | |
| Exit | exit |
|
| Help | help [COMMAND] |
help find |
| Theme | theme o/OPTION |
theme o/light |
| | Address Book Commands | |
| Add | add n/NAME p/PHONE_NUMBER e/EMAIL a/ADDRESS [tc/CHILD_TAG]… [t/TAG]… |
add n/James Ho p/22224444 e/jamesho@example.com a/123, Clementi Rd, 1234665 t/friend t/colleague |
| Delete | delete INDEX |
delete 3 |
| Edit | edit INDEX [n/NAME] [p/PHONE_NUMBER] [e/EMAIL] [a/ADDRESS] [tc/CHILD_TAG]… [t/TAG]… |
edit 2 n/James Lee e/jameslee@example.com |
| Find | find [o/OPTION] KEYWORD [MORE_KEYWORDS] |
find John |
| List | list [o/OPTION] |
|
| Tag | tag INDEX [o/OPTION] [tc/CHILD_TAG]… [t/TAG]… |
tag 4 t/School t/English |
| Favourite | fav INDEX [o/OPTION] |
fav 3 o/remove |
| Sort | sort o/OPTION |
sort o/name |
| Clear | clear [t/TAG]… |
|
| | Appointment Book Commands | |
| Add | addAppt n/NAME a/ADDRESS d/DATE [c/CONTACT_INDEX]… [tc/CHILD_TAG]… |
addAppt n/PTM a/ABC Primary School d/21/03/2021 10:00 c/2 |
| Delete | deleteAppt INDEX |
deleteAppt 2 |
| Edit | editAppt INDEX [n/NAME] [a/ADDRESS] [d/DATE] [c/CONTACT_INDEX]… [tc/CHILD_TAG]… |
editAppt 1 n/PSG meeting a/ABC Secondary School c/1 |
| Find | findAppt [o/OPTION] KEYWORD [MORE_KEYWORDS]… |
findAppt PTM |
| List | listAppt |
Glossary
- Action: Executed command
- Address book: Section of the application that stores and manages contact data
- Appointment: Entry in the appointment book containing an appointment’s information
- Appointment list: List of appointments displayed, see Interface of ParentPal
- Appointment book: Section of the application that stores and manages appointment data
- CLI: Application where you perform actions by typing commands into a command box
- Command: The input the user enters into the Command Box to perform an action
- Contact: Entry in the address book containing a contact’s information
- Contact list: List of contacts displayed, see Interface of ParentPal
- GUI: Application where you interact with it via graphical icons such as buttons
- Home folder: The folder containing all the files needed to run ParentPal
- Index: Index number shown in the displayed contact/appointment list